


Use VCE Exam Simulator to open VCE files

Today, cloud computing is a consolidated reality that any company or professional should consider when developing or maintaining new or existing products. When you are planning for developing or deploying an application, you can choose between two main models of cloud services, Infrastructure as a Service (IaaS) or Platform as a Service (PaaS), and each model has its own pros and cons.
In this chapter, we will review how to work with the options that Azure makes available to you for developing your solutions based on the Infrastructure as a Service model.
Important Have you read page xvii?
It contains valuable information regarding the skills you need to pass the exam.
One of the main characteristics of the IaaS model is the greater level of control that it offers when deploying the infrastructure needed for your application. Typically, you need to work with this model because you need more control over the different elements of your application. Using IaaS, you deploy your own virtual machines where you will deploy all the needed components for solution.
Azure will provide you with all the underlying hardware and configuration needed for your virtual machine to run correctly, but you still need to manage all administrative tasks related to the VM’s operating system, such as installing operating system upgrades or security patches. Even Microsoft manages the configuration needed for providing the fault tolerance for the physical hardware that supports your virtual machine. If you require that your application or software solution be highly available, you need to manage the configuration of the VMs that host your application.
This skill covers how to:
Deploying a VM in Azure is a straightforward process, but you still need to think about some key points if you want to achieve the best balance between the costs and your requirements. Perhaps the most obvious decision is which operating system you should use. The good news is that Azure fully supports Windows, Windows Server, and the main distributions of Linux.
All these Windows and Linux OSes are preinstalled and available to you in the Azure Marketplace as VM Images. Apart from these default VM images, you will also find other images in the marketplace from other vendors containing preconfigured solutions that may better match with your needs.
Once you have chosen your operating system, you need to decide other important aspects of the virtual machine:
Once you have gathered all the information that you need to deploy your VM, you are ready for deployment. You have several ways for doing this task:
In general, when you want to deploy a new virtual machine, you need to follow these steps:
The following piece of code shows how to create a virtual machine with managed disks in your Azure subscription.
Listing 1-1 Creating a virtual machine
//dotnet core 2.2
/* You need to create an authentication file with the following subscription=<subscription-id>
client=<client-id>
key=<client-secret>
tenant=<tenant-id>
managementURI=https://management.core.windows.net/
baseURL=https://management.azure.com/
authURL=https://login.windows.net/
graphURL=https://graph.windows.net/
*/
//Create the management client. This will be used for all //perform in Azure.
var credentials = SdkContext.AzureCredentialsFactory.FromFile("./var azure = Azure.Configure().WithLogLevel(HttpLoggingDelegatingHandler..Authenticate(credentials)
.WithDefaultSubscription();
//First of all, we need to create a resource group where //needed for the virtual machine.
var groupName = "az203-ResoureGroup";
var vmName = "az203VMTesting";
var location = Region.USWest2;
var vNetName = "az203VNET";
var vNetAddress = "172.16.0.0/16";
var subnetName = "az203Subnet";
var subnetAddress = "172.16.0.0/24";
var nicName = "az203NIC";
var adminUser = "azureadminuser";
var adminPassword = "Pa$$w0rd!2019";
//Create the management client. This will be used for all perform in Azure.
var credentials = SdkContext.AzureCredentialsFactory.FromFile("./var azure = Azure.Configure()
.WithLogLevel(HttpLoggingDelegatingHandler.Level.Basic)
.Authenticate(credentials)
.WithDefaultSubscription();
//We need to create the resource group where we will add var resourceGroup = azure.ResourceGroups.Define(groupName
.WithRegion(location)
.Create();
//Every virtual machine needs to be connected to a virtual var network = azure.Networks.Define(vNetName)
.WithRegion(location)
.WithExistingResourceGroup(groupName)
.WithAddressSpace(vNetAddress)
.WithSubnet(subnetName, subnetAddress)
.Create();
//Any virtual machine needs a network interface for connecting var nic = azure.NetworkInterfaces.Define(nicName)
.WithRegion(location)
.WithExistingResourceGroup(groupName)
.WithExistingPrimaryNetwork(network)
.WithSubnet(subnetName)
.WithPrimaryPrivateIPAddressDynamic()
.Create();
//Create the virtual machine.
azure.VirtualMachines.Define(vmName)
.WithRegion(location)
.WithExistingResourceGroup(groupName)
.WithExistingPrimaryNetworkInterface(nic)
.WithLatestWindowsImage("MicrosoftWindowsServer", "WindowsServer",
"2012-R2-Datacenter")
.WithAdminUsername(adminUser)
.WithAdminPassword(adminPassword)
.WithComputerName(vmName)
.WithSize(VirtualMachineSizeTypes.StandardDS2V2)
.Create();
Note: Application Requirements
To run all the examples through this book, you need to have an Azure subscription. If you don’t have an Azure subscription, you can create a free subscription for testing the code in this book.
Also, you will need to create an Azure AD application and a security principal in your Azure subscription. You need to configure these elements to grant create and modify privileges to your application. Follow the instructions in this procedure for creating the Azure AD application and the security principal. See https://docs.microsoft.com/enus/ azure/active-directory/develop/howto-create-service-principal-portal.
As you can see in Listing 1-1, we need to create each of the related and required resources separately and then provide all the needed dependencies to the Azure management client that will create the virtual machine.
Before you proceed to deploy a new VM, you also need to take into account other considerations that would affect the deployment. For example, if your application or software solution must be highly available, you would typically use a load balancer. If your virtual machines use a load balancer, you need to put your VMs that host the application into an availability set.
This will ensure that any virtual machine in the same availability set will never be on the same hardware and won’t be restarted at the same time because of software upgrades on the servers running the VM. A virtual machine may only be added to an availability set during creation of the VM. If you forget to add the VM to an availability set, you need to delete the VM and start from the beginning.
One of the biggest advantages of using Azure IaaS is the level of automation that you can achieve when deploying new services, resources, or infrastructure. One of the main reasons you can do this is because Microsoft provides you the Azure Resource Manager (ARM), which is the deployment and management service in Azure. The ARM service is in charge of creating, updating, and deleting the different kind of services you can deploy in your subscription. All actions offered by the ARM service are exposed through the same API. This means that no matter which mechanism you use-portal, PowerShell, Azure CLI, Rest API, or client SDKs-you will get a consistent behavior and result when interacting with ARM.
When we work with the Azure Resource Manager, there are some concepts and terms that we need to clearly understand:
The main advantage of using ARM templates is that you have the definition of all the resources that you want to deploy in a consistent structure. This allows you to reuse the same template for deploying the same group of resources in different subscriptions, resource groups, or regions. Some common scenarios in which you can take advantage of the ARM templates are disaster recovery plan implementations, high availability configurations, or automatic provisioning scenarios (such as continuous deployment scenarios). In the following code snippet, you can see the most basic structure for an ARM template.
{
"$schema": "https://schema.management.azure.com/schemas/deploymentTemplate.json#",
"contentVersion": "",
"parameters": { },
"variables": { },
"functions": [ ],
"resources": [ ],
"outputs": { }
}
Insofar as the ARM template structure is concerned, only the $schema, contentVersion, and resources sections are required to be present in a valid template. Following is a brief description of each section in a template:
The ARM template that you need to use for deploying new VMs with the same configuration is shown in Listing 1-2. You may modify the values of the parameters according to your needs.
Listing 1-2 ARM template for deploying a VM
{
"$schema": "https://schema.management.azure.com/schemas/deploymentTemplate.json#",
"contentVersion": "1.0.0.0",
"parameters": {
"virtualNetworks_az203VNET_name": {
"defaultValue": "az203demoVNET",
"type": "string"
},
"networkInterfaces_az203NIC_name": {
"defaultValue": "az203demoNIC",
"type": "string"
},
"virtualMachines_az203VMTesting_name": {
"defaultValue": "az203demoVM",
"type": "string"
},
"subnets_az203Subnet_name": {
"defaultValue": "az203demoSubnet",
"type": "string"
},
"virtualMachines_az203VMTesting_id": {
"defaultValue": "[concat(parameters('virtualMachines_
az203VMTesting_name'),'_OSDisk1_1')]",
"type": "string"
},
"virtualMachines_adminUser": {
"defaultValue": "azureadminuser",
"type": "string"
},
"virtualMachines_adminpassword": {
"defaultValue": "Pa$$w0rd",
"type": "securestring"
}
},
"variables": {
"osDiskName": "_OSDisk1_1_39c654d89d88405e968db84b722002d1"
},
"resources": [
{
"type": "Microsoft.Compute/virtualMachines",
"name": "[parameters('virtualMachines_az203VMTesting_"apiVersion": "2018-06-01",
"location": "westus2",
"tags": {},
"scale": null,
"properties": {
"hardwareProfile": {
"vmSize": "Standard_DS2_v2"
},
"storageProfile": {
"imageReference": {
"publisher": "MicrosoftWindowsServer",
"offer": "WindowsServer",
"sku": "2012-R2-Datacenter",
"version": "latest"
},
"osDisk": {
"osType": "Windows",
"name": "[concat(parameters('virtualMachines_variables('osDiskName'))]",
"createOption": "FromImage",
"caching": "ReadWrite"
},
"dataDisks": []
},
"osProfile": {
"computerName": "[parameters('virtualMachines_"adminUsername": "azureadminuser",
"adminPassword": "Pa$$w0rd",
"windowsConfiguration": {
"provisionVMAgent": true,
"enableAutomaticUpdates": true
},
"secrets": [],
"allowExtensionOperations": true
},
"networkProfile": {
"networkInterfaces": [
{
"id": "[resourceId('Microsoft.www.examsnap.com
ExamSnap - IT Certification Exam Dumps and Practice Test Questions
parameters('networkInterfaces_"properties": {
"primary": true
}
}
]
}
},
"dependsOn": [
"[resourceId('Microsoft.Network/networkInterfaces',
parameters('networkInterfaces_az203NIC_name'))]"
]
},
{
"type": "Microsoft.Network/networkInterfaces",
"name": "[parameters('networkInterfaces_az203NIC_"apiVersion": "2018-10-01",
"location": "westus2",
"tags": {},
"scale": null,
"properties": {
"ipConfigurations": [
{
"name": "primary",
"properties": {
"privateIPAllocationMethod": "subnet": {
"id": "[resourceId('Microsoft.subnets', parameters('virtualNetworks_parameters('subnets_az203Subnet_},
"primary": true,
"privateIPAddressVersion": "IPv4"
}
}
],
"dnsSettings": {
"dnsServers": [],
"appliedDnsServers": []
},
"enableAcceleratedNetworking": false,
"enableIPForwarding": false,
"primary": true,
"tapConfigurations": []
},
"dependsOn": [
"[resourceId('Microsoft.Network/virtualNetworks/
subnets', parameters('virtualNetworks_az203VNET_parameters('subnets_az203Subnet_name'))]"
]
},
{
"type": "Microsoft.Network/virtualNetworks",
"name": "[parameters('virtualNetworks_az203VNET_"apiVersion": "2018-10-01",
"location": "westus2",
"tags": {},
"scale": null,
"properties": {
"resourceGuid": "145e7bfc-8b00-48cf-8fa1-"addressSpace": {
"addressPrefixes": [
"172.16.0.0/16"
]
},
"dhcpOptions": {
"dnsServers": []
},
"subnets": [
{
"name": "[parameters('subnets_az203Subnet_"properties": {
"addressPrefix": "172.16.0.0/}
www.examsnap.com
ExamSnap - IT Certification Exam Dumps and Practice Test Questions
}
],
"virtualNetworkPeerings": [],
"enableDdosProtection": false,
"enableVmProtection": false
},
"dependsOn": []
},
{
"type": "Microsoft.Network/virtualNetworks/subnets",
"name": "[concat(parameters('virtualNetworks_parameters('subnets_az203Subnet_name'))]",
"apiVersion": "2018-10-01",
"scale": null,
"properties": {
"addressPrefix": "172.16.0.0/24"
},
"dependsOn": [
"[resourceId('Microsoft.Network/virtualNetworks',
parameters('virtualNetworks_az203VNET_name'))]"
]
}
]
}
This example has some interesting features to which we should pay attention. We have defined parameters and variables that we will use throughout the template. If you look at any parameter definition, you can see that it has three elements�"paramenterName, default Value, and type. The type element is almost self-explanatory; it sets the kind of the value that this parameter will contain. The allowed types are string, securestring, int, bool, object, secureObject, and array. The parameterName is also quite straightforward and is any valid JavaScript that represents the name of the parameter. However, why use a defaultValue element instead of a value element? You use defaultValue because when you define a parameter in the template file, the only required elements are parameterName and type. The parameter’s value is actually provided during the deployment process. If you don’t provide a value for a parameter that you defined in the template, then the defaultValue will be used instead. You should bear in mind that this element is optional.
You can provide values to the parameters that you define for your template by using the command line or creating a file with the values that you want to provide to each parameter. The following example shows the content of a parameter file for the template shown previously in Listing 1-2:
{
"$schema": "https://schema.management.azure.com/schemas/deploymentParameters.json#",
"contentVersion": "1.0.0.0",
"parameters": {
"virtualNetworks_az203VNET_name": {
"value": "az203demoVNET"
},
"networkInterfaces_az203NIC_name": {
"value": "az203demoNIC"
},
"virtualMachines_az203VMTesting_name": {
"value": "az203demoVM"
},
"subnets_az203Subnet_name": {
"value": "az203demoSubnet"
},
"virtualMachines_az203VMTesting_id": {
"value": "[concat(parameters('virtualMachines_'_OSDisk1_1_39c654d89d88405e968db84b722002d1')]"
},
"virtualMachines_adminUser": {
"value": "azureadminuser"
},
"virtualMachines_adminpassword": {
"value": "Pa$$w0rd"
}
}
}
When you are defining the value for a parameter, you can also use functions to construct dynamic values. If you take a look at the virtualMachines_az203VMTesting_id parameter, you can see that its value is set to a function. In this case, the function returns a string that is the result of adding the string _OSDisk1_1_39c654d89d88405e968db84b722002d1 to the value of the parameter virtualMachines_az203VMTesting_name.
There are many predefined functions that you can use in your template. You can even define your own custom functions for those complicated pieces of code that repeats in your template. When working with custom functions, beware of some limitations:
Note: Template Reference
When you are working with ARM templates, is useful to consult the template reference for each type of resource you are configuring. You can review the complete template reference at https://docs.microsoft.com/enus/azure/templates/. You can also review the complete reference of predefined functions at https://docs.microsoft.com/en-us/azure/azureresource-manager/resource-group-template-functions.
When we initially talked about the resources that we need for deploying a VM, we saw that there are some resources that we need for the VM to run correctly. For example, we need at least one virtual disk for storing the operating system. We also need a virtual network for connecting the VM with the world, and we need a virtual network interface card for connecting the VM to the virtual network. All those dependencies are defined in an ARM template by using the element dependsOn on each resource type. This element accepts a list of resource names, separated by commas, that define the resources that need to be deployed before the resource can be deployed. As a best practice to avoid ambiguity, you should reference any resource that you put on the dependsOn element by using its provider namespace and type. You can do this by using the resourceId() predefined function.
If we review our example, the virtual network virtualNetworks_az203VNET_name needs to be deployed before subnets_az203Subnet_name can be deployed (see Figure 1-1). The dependsOn element is needed because the resources defined in the template are not deployed in the same order that appears in the template.
Note: Child Elements vs. Dependencies
Some resources can contain other resources as child elements. This parent-child relationship is not the same as a dependency relationship. The parent-child relationship does not guarantee that the parent will be deployed before its children. You need to use the dependsOn element to ensure the correct deployment order.
Once we are happy with our template, we can deploy it to our Azure subscription by using PowerShell, Azure CLI, Azure Cloud Shell, or REST API. Another interesting feature that we didn’t mention before is that you can store your template JSON files in a remote location. This remote location needs to be publicly available. If your template contains information that shouldn’t be public, you can provide that information as an inline parameter during the deployment. If you prefer your template not to be public, you can also store your template in a storage account and protect it by using an SAS token.
The following command shows how to deploy our example template using the template file az203-template.json and the properties file az203parameters.json.
#!/bin/bash
#Azure CLI template deployment
az group create --name AZ203-ResourceGroup --loca az group deployment create    --name AZ203DemoDeployment
--resource-group AZ203-ResourceGroup
--template-file az203-template.json
--parameters @az203-parameters.json
The previous command creates the resource group called AZ203ResoureGroup in the West US region. Then it creates a new deployment called AZ203DemoDeployment that will create the resources defined in the az203-template.json template using the values provided in the parameters file named az203-parameters.json. Note the use of the @ symbol in front of the parameters file. This is required by the az group deployment create command.
One of the main concerns of any organization is how to protect their data.
Azure has the security of all data that is stored in one way or another in the cloud. Azure VM uses virtual disks for storing the operating system or any additional data that the VM needs. Virtual disks�"managed or unmanaged disks�"are automatically and transparently encrypted and decrypted by the Azure Storage Service Encryption (SSE) service. However, the SSE service only ensures the data protection at rest. This means the virtual disk file is encrypted, but the information inside the virtual disk is not encrypted.
The good news is that you can also encrypt the content of the virtual disk by using the Azure Disk Encryption service. This service is supported by the Azure Key Vault service for storing the encryption keys that you need for encrypting your disks. The Azure Disk Encryption service also depends on the BitLocker feature for Windows VMs and the DM-Crypt feature existing in Linux VMs.
Note: Azure Key Vault
Azure provides the Azure Key Vault service for securely storing your passwords, connection strings, and any other sensitive information that your application may need. You can get more detailed information about Azure Key Vault by reviewing the article at https://docs.microsoft.com/en-us/azure/key-vault/.
Before you enable disk encryption on one of your IaaS VMs, you should review the supported scenarios:
You should also carefully review these non-supported scenarios:
You cannot use the disk encryption feature for encrypting
Once you have evaluated the supported scenarios, you should follow the next high-level workflow (see Figure 1-2) for encrypting a Windows or Linux VM:
You can use following procedure for deploying the prerequisites and encrypt an existing Windows IaaS VM. In this procedure we will use Azure Cloud Shell and PowerShell:
1. If needed, create a new resource group:
New-AzureRmResourceGroup -Name 'az203-Encrypt
2. Create a new key vault. Remember that your vault name needs to be universally unique.
$keyVault = New-AzureRmKeyVault -VaultName 'a
-ResourceGroupName 'az203-EncryptionDemo' -Loc
3. Grant Azure access to your key vault. Azure needs to access your key vault to make the encryption keys available to the VM during the boot and decryption processes:
Set-AzureRmKeyVaultAccessPolicy -VaultName 'az
-ResourceGroupName 'az203-EncryptionDemo' -Ena
4. Grant Azure yourself access to your key vault. When you create a new key vault, all access is denied by default. You need to create an access policy for your Azure Active Directory user to be able to create a new key for encrypting disks:
Set-AzureRmKeyVaultAccessPolicy -VaultName 'az
-UserPrincipalName '<your_AAD_username>' -Perm
Import,Delete -PermissionsToSecrets Get,List,S
5. Create a new key for encrypting the disk:
$keyEncryptionKeyName = 'az203VMEncryptionKey'
Add-AzureKeyVaultKey -VaultName 'az203DemoEncr
-Name $keyEncryptionKeyName -Destination 'Soft
$keyEncryptionKeyUrl = (Get-AzureKeyVaultKey -
-Name $keyEncryptionKeyName).Key.kid;
6. Encrypt the disks of the Windows IaaS VM. You need to ensure that you set the ResourceGroupName parameter to the resource group where the VM exists. The VM also needs to be running to enable the disk encryption extension.
Set-AzureRmVMDiskEncryptionExtension -Resource
'az203-EncryptionDemo' -VMName 'az203demoVM' -
$keyVault.VaultUri -DiskEncryptionKeyVaultId $
-KeyEncryptionKeyUrl $keyEncryptionKeyUrl -Key
$keyVault.ResourceId;
When you start a new project, you need to evaluate how you are going to implement the requirements of the application or solution that you need to implement. Sometimes, one of those requirements is that the application needs to make a lot of calculations to prepare some amount of data that needs to be presented to the user; calculations also might be processed before other components of the solution so it can work with the data. These types of tasks are usually time consuming and heavy in terms of resource needs that can negatively affect the performance of an application.
Examples include running risk simulations for a financial service application, image processing for a geographic information system (GIS), or VFX or 3D image–rendering for a movie. In all these cases, a good option for your application is to have a specialized and separate system from your main application that can run all these heavy tasks.
You can implement this specialized and separate system by deploying your own VMs or scale sets in Azure. However, in this case, you need to take care of the overhead of managing those VMs or scale sets. Another downside is that you will be charged for all the time those VMs are running, regardless of whether you are running your specialized workload (risk simulation, image analysis, 3D image–rendering, and the like).
Fortunately, Azure provides you with a service that is aimed to solve this need. Azure Batch allows you to run parallel workloads that can execute the application that makes the specialized calculations and provides you with the results. The advantages of this service are that you don’t need to take care of configuring virtual machines, clusters, and the like, and you only will be charged for the resources that your application needs while it is running.
This skill covers how to:
Manage batch jobs by using Batch Service API
When you plan to work with Azure Batch, there are some resources that are common to any workload that you may integrate into your application. These common resources are:
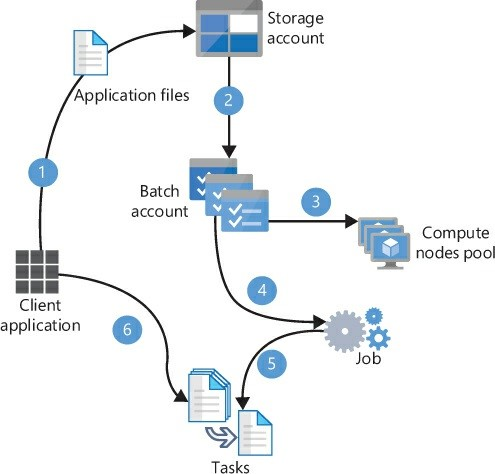
Batch account Every single processing resource dedicated to run your workloads needs to be managed by a batch account. You can run more than one workload inside a single batch account. You can also associate a storage account to a batch account for storing all the files, programs, and resources that your workloads may need during their execution.
Compute node A compute node is each of the computing resources that will actually run the application that performs the task you need to accomplish, such as image processing or data manipulation. Compute nodes are organized into pools.
Pool A pool is a collection of compute nodes. A pool is the resource that manages the type, size, scaling policy communication, task scheduling, network configuration, and other settings that your workload needs for running correctly. A single pool can run multiple jobs and tasks. You should bear in mind that you configure the target or desired size of your pool, but the actual size could be limited by the quota of the number of cores in the batch account.
Job Manages how the execution of the tasks is performed on each compute node in a pool. When you create a job, you can specify whether you want to create a new pool for this job or use an existing pool. It also manages other attributes, such as job priority, constraints, or the behavior of the job when all tasks are completed.
Task This type of resource performs the actual execution of your command, script, or application in a single compute node. A task is always associated to a job, and it is scheduled, queued, and prioritized by its job.
All these elements are related to each other in the high-level workflow that you see in Figure 1-3.
Following is a description of the workflow shown in Figure 1-3:
When you need to implement this workflow in your application, you need to work with two main APIs—Azure Batch Services and Azure Storage. You will use Azure Storage API for uploading and downloading files from blob containers. You will use Azure Batch for creating and deleting the pool of compute nodes; you’ll also use Azure Batch for creating, monitoring, deleting, starting, and stopping the job as well as managing, monitoring, and adding the tasks to the job.
During the configuration of a Batch job, you may have some additional requirements that are not covered with the default configuration. You can control the amount of time that a job is executing by configuring the MaxWallClockTimeExpiry setting. If the job didn’t finish all the tasks in the max wall clock time, then the Batch Account terminates the job and any pending tasks with MaxWallClockTimeExpiry. You can also control the number of times that a failing task can be relaunched by setting the MaxTaskRetryCount parameter. A task is considered to have failed if it returns an exit code different from zero. If an error occurs while downloading the assets needed for the task to perform its actions, the task can fail. In this situation, a failureInfo object is created and attached to the task. The Azure Batch account uses this object for determining whether it should finish the job after the failure of one task in the job. This action is controlled by the OnTaskFailure property (you can see this property as the When a task fails setting in the Azure Portal), and its default value is to take no action.
As we already saw, a job is in charge of managing the execution of tasks on the compute node. Azure Batch provides you with a default task manager that performs this task management. However, you can also create a job manager task for implementing your own logic when deploying and running your tasks in the compute nodes. The job manager task is executed in one of the compute nodes, and it has all the information required for creating the tasks in the job. The job manager task is managed by the batch account and is created as one of the first steps when the job is created. Because of the importance of this task, it is monitored and automatically created if the task fails. This job manager task is also a requirement if you decide to use job schedules, which allow you to create recurring tasks when you need to control the duration, frequency, and schedule of jobs created during the scheduled period.
Microsoft offers a client Batch API for .NET, Python, Node.js, and Java. If your application doesn’t use any of the previous languages, you can still work with Azure Batch from your application by using the provided REST API.
Whatever API you decide to use, you need to get the following information from your batch and storage account before you can make any API call:
Batch account name This is the name you gave to your batch account when you created it.
Batch account URL This URL has the form of https://<batch_account_name>.<region>.batch.azure.com.
Batch account key This key is used for authenticating the request to the batch account. Any batch account has two separate keys. You can use either of them for authenticating, although you should only use the same key on your application.
Storage account name This is the name of the storage account associated with the batch account.
Storage account key You need to provide one of the two available keys for accessing the storage account.
In the section “Write code to run an Azure Batch Services batch job,” we will review an example of code that you can use for running jobs in Azure using C#.
In the previous section, we looked at a high-level review of the Batch Service API for managing jobs. You can also use Batch Management API for managing batch accounts. However, you can also perform these actions by using other tools like PowerShell, Azure CLI, Azure Portal, Azure Batch Explorer, Azure Batch Shipyard, or Azure Storage Explorer. With the exception of Azure Storage Explorer, the main advantage of using any of these tools is that they unify the Batch Service and Batch Management APIs’ capabilities into the same tool. Although Azure Storage Explorer cannot directly manage batch jobs or tasks, this tool makes developing and debugging your Batch solutions easier.
Azure Batch Explorer is a rich desktop client that you can download for Windows, Linux, or OSX. You can manage different batch accounts to view high level statistics and manage pools, jobs, job schedules, packages, or digital certificates. You can also troubleshoot the task execution by accessing to the content of each compute node in the pool.
Another interesting feature is that Azure Batch supports the execution of tasks using Docker or Singularity containers. For easing the provision, monitoring, and execution of batch workloads based on containers, you can use Batch Shipyard. The best part is that you don’t need to download or install any tool in your local environment; simply open a Cloud Shell and type shipyard in your favorite shell to run this tool.
In the next few examples, we will review the procedure for running a batch job by using these tools. The job consists of discovering the type of data that your files contain. To do so, we will use the Linux file command. For this example, we will assume that all needed resources are already created:
An Azure Batch account.
A compute nodes pool.
A storage account linked with the Azure Batch account.
A container in the storage account. This container will store the files that will be analyzed in the tasks.
A resource group that will contain all the resources needed for the Azure Batch account.
In this first example, we will review how to create a job and tasks using the Azure Portal. To start, we need to create the compute nodes pool that will execute the job:
Note: Advanced Settings Creating Pools
When you are creating a compute node pool, you have more advanced options that allow you to control how to dynamically scale the number of nodes associated to the pool or create nodes from custom images. For more detail about the pool’s advanced settings, you can review Microsoft Docs at https://docs.microsoft.com/en-us/azure/batch/batch-automatic-scaling
Once we have created the pool, we can create the job and tasks. Creating a task for a job is a separate procedure that you need to perform once you have created a job:
Once you have created the job, you need to create the tasks that will be run by this job:
While you have been adding the task, you can also adjust some Advanced Settings:
Max Wall Clock Time This controls the maximum time that the task is allowed to run. If the task is not completed before this time is exhausted, the Batch account terminates the job and all its tasks.
Max Task Retry Count If a task completes with a non-zero return code, the task is considered to have failed. This setting controls the maximum times that a failed task can be retried.
Retention Time This is the time that the Batch account will maintain the data in the working directory of the task. By default, this time is 7 days, but you can customize it with this setting.
User Identity Controls the user privileges that will be used for running this task. You can select between auto-user accounts with or without admin privileges. Auto-user accounts are built-in user accounts used for running the task. You can also define your own named user accounts, but you can only programmatically attach a named user account to a task.
Multi-Instance Settings By default, tasks cannot communicate with other tasks. This setting allows your tasks to be able to communicate between them, using MPI (Message Passing Interface).
Resource Files This is a list of files that will be downloaded to the task before it runs. These files are needed for the task to do the job.
Environment Settings Defines any environment variable that your task may require to run.
Task Dependencies You can define a hierarchy of tasks by defining dependencies between them. The child task won’t run until the parent task has successfully executed. You can define the following Task Dependency types:
One-To-One A child task won’t run until its parent task has finished successfully.
One-To-Main A child task has two or more parents. Child tasks won’t run until all parent tasks have finished successfully. The parent task ID can be any string that best fits your needs.
Task ID Range This is similar to the One-To-Many dependency type, but parent task IDs need to be resolved to an integer. For example, this means that 5, 7, 008, and 256 are valid task IDs, but 3monkeys is not a valid task ID.
Application Packages An application package contains all the needed dependencies and binaries for the task to run. This setting controls the application package that will be uploaded to the task before starting its execution.
Just as we have configured a pool, a job, and its tasks using the Azure Portal, we can use PowerShell or Azure CLI to do the same. In the following procedure, we will configure a pool, a job, and its tasks using PowerShell:
Connect-AzAccount
Register-AzResourceProvider -ProviderName Micr
$context = Get-AzBatchAccountKeys -AccountName
$vmImage = New-Object -TypeName "Microsoft.Azu
PSImageReference" -ArgumentList @("UbuntuServe
$vmConfig = New-Object -TypeName "Microsoft.Az
PSVirtualMachineConfiguration" -ArgumentList @
18.04") New-AzBatchPool -Id <your_pool_id> -VirtualMac
-VirtualMachineConfiguration $vmConfig -AutoSc
-BatchContext $context
$poolInformation = New-Object -TypeName "Micro
PSPoolInformation"
$poolInformation.PoolID = <your_pool_id>
New-AzBatchJob -Id <your_job_id> -PoolInformat
$context
$tasks = @()
1..4 | foreach {     $task = New-Object Microsoft.Azure.Command
PSCloudTask("SampleTask$_", "uname -a")
$tasks += $task
}
New-AzBatchTask -JobId "jobPStesting" -Tasks $
Note: Az Versus Azurerm Modules
In August 2018, Microsoft released Az, which is a new PowerShell module for managing Azure. This new module unifies the functionality of previous modules, AzureRM and AzureRM.Netcore, and it is crossplatform compatible. You can recognize cmdlets in this new module because the noun part is prefixed with Az. You can review the official GitHub page for more details. See
https://github.com/Azure/azurepowershell/blob/master/documentation/announcing-az-module.md.
Although Azure Portal, PowerShell, Azure CLI, and Azure Batch Explorer are powerful tools for managing or even defining Batch pools, jobs, and tasks, the most flexible approach for integrating your solution with Azure Batch is using one of the available client SDKs in your code.
In this section, we will review how to perform the same tasks that you already performed in the previous section using Azure Portal or PowerShell, but we’ll use the .Net client library. Also, we will add a little bit of complexity by including some interaction with the Azure Storage account linked to the Batch account. The tasks in the job will get information about the file type of the files that we will provide to the tasks. You will upload to the storage account all the files that the tasks will need to run. Microsoft provides separate SDKs for working with pools, jobs, and tasks, and for managing a Batch account. Azure Batch Client library is the SDK used for creating your pools, jobs, and tasks. If you need to manage a Batch account, you need to use the Azure Batch Management library.
When you are writing code for Batch jobs, you are not limited to write your code for Windows Operating System if you want to use the .NET client library. The example that we will review in this section is written in .NET Core, and you can execute it on Windows, Linux, or MacOS X.
Before you can proceed to compile this example, you need to meet some requirements:
Create an Azure Batch account.
Create an Azure Storage account and link it to the Azure Batch account.
You need .NET Core 2.1 or newer.
You need the Microsoft.Azure.Batch nuget package.
You need the WindowsAzure.Storage nuget package.
Before you can start programming the batch pools, jobs, and tasks, you need to upload the files to the storage account. You need to do this as one of the first steps because you need the references to the files in the storage account to pass them as the resource files for the tasks. You need to create a CloudBlobClient object. This object will be used for managing the access to your storage account.
//.Net Core 2.2
//Create a blob client. We will use this client f
//process
string storageConnectionString = $"DefaultEndpoin ACCOUNT_NAME };AccountKey={ STORAGE_ACCOUNT_KEY }
CloudStorageAccount storageAccount = CloudStorage
CloudBlobClient blobClient = storageAccount.Creat
Once you have the CloudBlobClient object, you need to ensure that the container that you will use for storing the images already exists. You need to get a CloudBlobContainer object for working with blob containers. Then you call the method CreateIfNotExistsAsync(), which ensures that the container is created even if it didn’t exist on your storage account. Then you need to upload the files to the blob storage by using the UploadFromFileAsync() method. This method requires the CloudBlobClient that you created for uploading the images (see Listing 1-3).
Listing 1-3 Uploading files to a Storage account
//Get a reference to the blob container. We will create if const string STORAGE_ACCOUNT_IMAGES_CONTAINER_NAME = "images";
CloudBlobContainer imagesContainer = blobClient.
GetContainerReference(STORAGE_ACCOUNT_IMAGES_CONTAINER_NAME);
imagesContainer.CreateIfNotExistsAsync().Wait();
//List of images your local computer that will be uploaded
List<string> inputFilePaths = new List<string>(Directory.//Create a list of references of files once they have been container
List<ResourceFile> inputImages = new List<ResourceFile>();
foreach (string imagePath in inputFilePaths)
{
Console.WriteLine("Uploading file {0} to container [{STORAGE_ACCOUNT_IMAGES_CONTAINER_NAME);
string blobName = Path.GetFileName(imagePath);
imagePath = Path.Combine(Environment.CurrentDirectory, CloudBlobContainer container = blobClient.
GetContainerReference(STORAGE_ACCOUNT_IMAGES_CONTAINER_CloudBlockBlob blobData = container.GetBlockBlobReference(blobData.UploadFromFileAsync(imagePath).Wait();
//We access the storage account by using a Shared Access //You need to start the upload operation as soon as possible, //time for making the token immediately available.
SharedAccessBlobPolicy sasConstraints = new SharedAccessBlobPolicy
{
SharedAccessExpiryTime = DateTime.UtcNow.AddHours(Permissions = SharedAccessBlobPermissions.Read
};
// Construct the SAS URL for blob
string sasBlobToken = blobData.GetSharedAccessSignature(string blobSasUri = String.Format("{0}{1}", blobData.ResourceFile resourceFile = new ResourceFile(blobSasUri, inputImages.Add(resourceFile);
}
Once you have all the files needed for the tasks to run, you need to create the Batch pool, job, and tasks. When you work with Batch Client Library for .NET, the first thing you need to do is create a batch client that will be in charge of authenticating and performing all the communication tasks with the Azure Batch account. To create a BatchClient, you need to provide the credentials that your application will use for connecting to your Batch account. These credentials are managed by a BatchSharedKeyCredentials. You need to provide the Batch account name, URL, and key for creating the BatchSharedKeyCredentials object. You can get the value for the name and URL from the Overview page in your Batch Account blade. The value for the key parameter can be obtained from the Keys sections in your Batch Account blade. You will find two different keys. You can use either of them. As a best practice, you should always use the same key for all your applications that need to access to your Batch account.
//We start by getting a Batch Account client.
BatchSharedKeyCredentials batchCredentials = new BatchSharedKeyCredentials(ACCOUNT_URL, BATCH_ACCOUNT_NAME, BATCH_ACCOUNT_KEY);
using (BatchClient batchClient = BatchClient.Open(batchCredentials))
{…
Now you can create the pool, job, and tasks that will run in your Batch account. First, you need to create the compute nodes pool. To do this, you need to create an image reference for the VMs that will be included in the pool. Then, using the image reference, you can create the VM configuration. The last step will be to create the pool itself. When creating the Batch pool, you need to create a BatchPool object, fill all the required properties�"such as pool ID, number of target nodes, size of the nodes, and VM configuration �"and then commit the changes to the Batch account for creating the pool. See Listing 1-4
Listing 1-4 Create a compute node pool
//Create the compute nodes pool
Console.WriteLine($"Creating pool {POOL_ID} ...");
www.examsnap.com
ExamSnap - IT Certification Exam Dumps and Practice Test Questions
//We will use Linux VMs for this pool.
//We need to create a Linux Server image reference, VM configuration ImageReference imageReference = new ImageReference(
publisher: "Canonical",
offer: "UbuntuServer",
sku: "18.04-LTS",
version: "latest");
VirtualMachineConfiguration vmConfiguration = new VirtualMachineConfiguration(
imageReference: nodeAgentSkuId: //Create the Batch pool
try
{
CloudPool pool = batchClient.PoolOperations.CreatePool(
poolId: POOL_ID,
targetDedicatedComputeNodes: POOL_NODE_virtualMachineSize: POOL_VM_SIZE,
virtualMachineConfiguration: vmConfiguration);
pool.Commit();
} catch (
BatchException be)
{
// Accept the specific error code PoolExists as that // exists
if (be.RequestInformation?.BatchError?.Code == BatchErrorCodeStrings.{
Console.WriteLine("The pool {0} already existed when POOL_ID);
}
else
{
throw; // Any other exception is unexpected
}
}
Now that you have the Batch pool, you can create the job and the tasks for getting the information from the uploaded files. You need to create a CloudJob object for working with any job in the Batch pool. The way you create a job is similar to creating a pool. You need to create the CloudJob object, fill the required properties ID and PoolInformation, and then commit the changes to the Batch account for actually creating the job (see Listing 1-5).
Listing 1-5 Creating a CloudJob object
//Create the actual Batch Job
Console.WriteLine($"Creating job [{JOB_ID}]...");
try
{
CloudJob job = batchClient.JobOperations.CreateJob();
job.Id = JOB_ID;
job.PoolInformation = new PoolInformation { PoolId = job.Commit();
} catch (
BatchException be)
{
//If the job already exists, we just accept it and register if (be.RequestInformation?.BatchError?.Code == BatchErrorCodeStrings.{
Console.WriteLine($"The Job {JOB_ID} already exists...");
}
else
{
throw;
}
}
Now that you have your pool ready, you can create the tasks that will get the information from the files that you uploaded previously. In this case, you are going to create a task for every file that you uploaded to the storage account. You need to create a CloudTask object and use the ResourceFiles property for indicating which file will be analyzed by the task. When creating the task, you need to set the command line that will be run by the task. In this example, your task will run the file command to get the information about the file uploaded in the ResourceFiles property. Place all the tasks that you need to create in a List object that you use for storing CloudTask objects. Then you will use this list to pass the tasks to the job for so they can be executed (see Listing 1-6).
Listing 1-6 Creating the tasks to add to a job
System.Console.WriteLine($"Adding {inputImages.Count} tasks List<CloudTask> tasks = new List<CloudTask>();
//We put each file to be processed in a separate task. We //when you uploaded the files to the storage account
for (int i = 0; i < inputImages.Count; i++)
{
string taskId = $"Task{i}";
string imageFilename = inputImages[i].FilePath;
string taskCommandLine = $"file {imageFilename}";
CloudTask task = new CloudTask(taskId, taskCommandLine);
task.ResourceFiles = new List<lResourceFile> { inputImages[tasks.Add(task);
}
Now you can attach the list of your tasks to your job. As soon as you add the tasks to the job, the job manager will try to deploy to an available node and execute the task.
//Add all tasks to the job.
batchClient.JobOperations.AddTask(JOB_ID, tasks);
Once you have your tasks running inside your job in your compute nodes tool, you need to monitor them to ensure all the tasks have completed successfully. You can monitor the status of the added task by creating a TaskStateMonitor. Before you can create this monitor, you need to get the list of added tasks to the job by using the method ListTasks() in the JobOperations property of your Batch client.
//At this point, we need to monitor if tasks are failing //maximum amount of time to wait for the tasks to complete.
TimeSpan timeout = TimeSpan.FromMinutes(30);
System.Console.WriteLine($"Monitoring all tasks to be completed, {timeout}...");
IEnumerable<CloudTask> addedTasks = batchClient.JobOperations.batchClient.Utilities.CreateTaskStateMonitor().WaitAll(addedTasks, timeout);
To get the result of the execution of each task, you need to read the content of the stdout.txt file from the node where the task was executed.
//Print tasks results
System.Console.WriteLine();
System.Console.WriteLine("Printing tasks results...");
System.Console.WriteLine("Printing tasks results...");
IEnumerable<CloudTask> completedTasks = batchClient.JobOperations.foreach (CloudTask task in completedTasks)
{
System.Console.WriteLine($"Task: {task.Id}");
System.Console.WriteLine($"Node: {task.ComputeNodeInformation.System.Console.WriteLine("Standard output:");
System.Console.WriteLine(task.GetNodeFile(Constants.StandardOutFileName).
ReadAsString());
}
Finally, you can perform some clean up by deleting the job and the pool, directly from your code.
//Clean up Batch resources
batchClient.JobOperations.DeleteJob(JOB_ID);
batchClient.PoolOperations.DeletePool(POOL_ID);
With the evolution of technology and the emergence of the cloud, we need to meet other challenges presented by this technical evolution. One of these requirements is the ability to deploy pieces of software in a reliable and quick manner. Virtualization technologies were one of the keys for making this kind of reliable and quick deployment possible.
However, when we talk about operating system virtualization using virtual machines, one of the main drawbacks is the fact that we have a complete set of binaries, libraries, and resources that are duplicated between virtual machines. This is where containerization provides a different approach to deploying pieces of software across multiple servers in a reliable and quick manner.
A container is piece of software that packages your code and all its dependencies in a single package that can be run directly by the computer environment. When a container is executed, it uses a read-only copy of the common libraries of the operating system that your code needs to run. This reduces the required amount of resources that a container needs to run your code when compared to running the same code on a virtual machine. Container technology was originally born in Linux environments, but it also has been ported to the Microsoft Windows environment. There are several implementations of container technology in the Linux ecosystem, but Docker Containers are the most widely used.
When you move the container technology to an enterprise environment, scaling dynamically and automatically is a problem, just as it is with virtual machines. There are several available solutions, such as Docker Swarm, DC/OS, or Kubernetes. All these solutions are orchestration solutions that automatically scale and deploy your containers in the available resources.
Microsoft offers the ability to work with containers using two different services:
Azure Container Service (ACS) This is a service that allows you to deploy a production-ready cluster of Docker Swarm, DC/OS, or Kubernetes. With this service, you still need to manage and fine-tune the cluster.
Azure Managed Kubernetes Service (AKS) This is a managed Kubernetes cluster in which you only need to worry about deploying your containers and images.
Create an Azure Managed Kubernetes Service (AKS) cluster
Kubernetes is an open-source system for orchestrating the deployment, management, and scaling of application running in containers. This means that the containers that you upload to a Kubernetes cluster are automatically balanced and distributed across the different nodes of the cluster.
Azure allows you to deploy a managed Kubernetes cluster, which means you only need to worry about the cluster nodes that run the containers. You don’t need to manage the other components that comprise the cluster and are needed to run correctly. Before we can continue with creating a managed Kubernetes service in Azure, we should review the components that are part of any Kubernetes cluster and the advantage of using a managed service like
AKS.
Any AKS cluster is divided in two main components:
Cluster master nodes These are the nodes that manage the cluster and provide the core orchestration services.
Nodes A node contains the VMs where your container will be executed.
When you create an AKS cluster, all the elements are automatically
created and configured for you, including the cluster master nodes. Because this is a managed service, the cluster master nodes are included in the managed part of the service. That is, they are managed by Azure. You are not charged for any of these cluster master nodes. Even these cluster master nodes are managed by Azure, and they are single tenant. This means that all master nodes are dedicated to the same tenant. Every master node has deployed the following components:
API Server The kube-apiserver is the component that exposes the needed APIs that Kubernetes needs to run. These APIs are managed by tools like kubectl or the Kubernetes Dashboard.
Scheduler This component determines what nodes can run the workloads that are part of your application. Once a node is selected as valid for running a workload, the scheduler is also in charge of starting the workload.
Etcd This component is a key-value store that maintains the configuration and the state of the Kubernetes cluster.
Controller Manager The kube-controller-manager is in charge of managing other controllers. A controller is control loop that watches for the shared state of the cluster. The controller works with the API server for querying the current state and making the needed changes to achieve the desired state. You can have controllers for deployments, cron jobs, garbage collecting, namespaces, and most of the operations in the cluster.
Because the master nodes are managed by Azure, you cannot directly connect to these nodes to perform any configuration or troubleshooting. If you need to troubleshoot your AKS cluster, you can do so by reviewing the AKS cluster logs in the Azure Monitor logs. Other administrative operations, like the version upgrade, can be performed using the Azure Portal or Azure CLI.
Cluster master nodes are only one part of any AKS cluster. Other important parts are the nodes or node pools. In Kubernetes, a node is each of the VMs that run the workloads of your application. A node pool is a group of nodes that share the same configuration. When you create your AKS cluster, Azure creates a default node pool with the number of nodes that you set during the initial deployment.
Each node in the AKS cluster has deployed some default components needed for the AKS cluster to run correctly.
The Kubernetes agent The Kubernetes agent (also known as a kubelet) receives the orders from the orchestrator and executes them in the node. One of these orders could be launching the container that holds your application.
Proxy The proxy or kube-proxy manages the virtual network on each node. This process routes the network traffic and manages the IP addressing for the services and pods running in the node.
Container runtime This is the component that allows your containers to run and interact with the resources, such as the network or the storage that is available in the node.
When you create the AKS node, you set the size of the VM that will be used for the AKS nodes. This setting defines the amount of resources available to your containers. Bear in mind that the Kubernetes agent reserves some resources to ensure that it has enough resources to manage the requests from the master nodes. These reservations are 60ms of CPU and 20 percent of memory, up to 4GiB. This means that if you use a DS2 v2 node size with 2vCPU and 7GiB, the amount of memory reserved for the agent will be 1.4
GiB (20% * 7 GiB = 1.4 GiB). If you use an E4s V3 node with 4 vCPI and 32 GiB of memory, then 4 GiB of memory will be reserved, even if the 20 percent of 32GiB is equal to 6.4GiB.
Note: Running Windows Containers in Aks
At the time of this writing, you can only use Ubuntu VMs as nodes of an AKS cluster. If you need to use a different host OS for the containers, you need to deploy your own Kubernetes cluster using aks-engine. You can review the official aks-engine GitHub page for more details. See https://github.com/Azure/aks-engine.
Before explaining how to delay an AKS cluster, we need to discuss how to deploy the containers to the AKS cluster. From the most basic to the most complex, these concepts are:
Pod This is a logical resource that Kubernetes uses for running an instance of your container. The container is where the code actually runs. A pod is a structure needed by Kubernetes to define resource limits, plan the schedule, and deploy the container. A Pod usually has a 1:1 relationship with a container, although there can be advanced scenarios in which a single pod can contain multiple containers.
Deployments One or more identical pods can be grouped in a deployment. When deploying a pod using a deployment structure, if you deploy a single pod without using a deployment and a problem occurs, it could be finished and wouldn’t be restarted or migrated to another healthy node. Every deployment is managed by the Deployment Controller. You can also update the deployment definition. When you apply that updated definition to an existing deployment, the Deployment Controller manages the termination or creation of new pods according to the new definition. When a pod in a deployment is drained from a node, any resource attached to the pod is also removed.
YAML manifests Any deployment is defined using a YAML file that contains the definition of the resource that will be deployed. Depending on the type of the resource, you will set the key kind to the correct value: Deployment, StatefulSet, or DaemonSet. The manifest contains the entire definition of the resource that needs to be deployed to the AKS cluster.
StatefulSets These work similarly to deployment managing pods. The big difference is that any pod managed by a StatefulSet is assigned a static network identifier, the storage assigned to the pod is persistent, the deployment and scaling of the pod is ordered and graceful across the nodes, as well as updates on the nodes are also managed in an ordered way. The storage assigned to a pod in a StatefulSet is persisted even if the pod is deleted. StatefulSets are managed by the StatefulSet Controller.
DaemonSets Pods in a DaemonSets are guaranteed to be deployed in every node specified in the manifest. The sets are usually used for log collection in the monitoring workloads.
Once you have reviewed the main concepts needed to work with an AKS cluster, you should be able to better understand the requirements when creating a cluster in Azure. The following procedure shows how to create an AKS cluster using the Azure Portal:
Azure provides several services that allow you to deploy your application in a container. It doesn’t matter if you decide to use Azure Kubernetes Services, Service Fabric, Azure Web Apps for Containers, Azure Container Registry, or Azure Container Instances; all these services use the same container technology implementation, Docker.
Before you can deploy your application to any of these services, you need to put your application into a container by creating an image of your container. A container image is a package that contains everything you need —code, libraries, environment variables, and configuration files—to run your application. Once you have your container images, you can create instances of the image for running the code, each of which is a container.
When you create your container image, you must define your application’s requirements, which are placed in a file called Dockerfile. This Dockerfile contains the definition and requirements needed for creating your container image. Use the following high-level procedure for creating an image:
docker build --tag=<tag_name>[:<version>] <doc
docker image ls
Listing 1-7 Dockerfile example
# Use an official Python runtime as a parent image
FROM python:2.7-slim
# Set the working directory to /app
WORKDIR /app
# Copy the current directory contents into the container COPY . /app
# Install any needed packages specified in requirements.txt
RUN pip install --trusted-host pypi.python.org -r requirements.# Make port 80 available to the world outside this container
EXPOSE 80
# Define environment variable
ENV NAME World
# Run app.py when the container launches
CMD ["python", "app.py"]
Need More Review?: Best Practices for Writing Dockerfiles
When you are writing your own Dockerfile, you should bear in mind some best practices detailed at https://docs.docker.com/develop/developimages/dockerfile_best-practices/.
For complex applications, creating an image for each component of the application can become a complex task. For scenarios in which you need to define and run multiple containers, you can use Docker Compose. You can also think of Docker Compose as the definition of your images for a production environment. If your application is comprised of several images, you can define the relationship between those images and how they are exposed to the external world. Also, you can set the limits of resources that will be assigned to each container and what happens if one container associated to a service fails.
A service in the Docker world is each of the pieces of that are part of your application. A service has a one-to-one relationship with an image. It’s important to remember that a service can have multiple instances of the same image; this means you can have multiple containers. The definitions of these relationships and requirements are stored in the docker-composer.yaml file.
Need More Review?: Fully Functional Example
You can run a fully functional example in your local environment by reviewing the instructions published by Microsoft at
https://docs.microsoft.com/en-us/azure/aks/tutorial-kubernetes-prepareapp.
The main purpose for creating an image is to make your code highly portable and independent from the server that executes your code. To achieve this objective, your image needs to be accessible by all the servers that can execute your image. Therefore, you need to store your image in a centralized storage service.
Azure Container Registry (ACR) is the Microsoft’s implementation of a
Docker registry service, based on the Docker Registry 2.0 definition. Using this managed Docker registry service, you can privately store your images for later distribution to container services, such as Azure Managed Kubernetes Service. You can also use ACR for building your images on the fly and automating the building of the image based on the commits of your source code.
Before you can upload an image to your private container registry, you need to tag the image. To do this, you need to include the name of your private container registry in the tag. You will use the name structure <acr_name>.azurecr.io/[repository_name][:version]. The following list breaks down each part of the tag:
acr_name This is the name that you gave to your registry.
repository_name This is an optional name for a repository in your registry. ACR allows you to create multi-level repositories inside the registry. If you want to use a custom repository, just put its name in the tag. version This is the version that you use for the image.
Use following procedure for pushing your image to your ACR registry. We assume that you already created an Azure Container Registry and you have installed the latest Azure CLI:
az acr login -name <acr_name>
docker tag foobar <acr_name>.azurecr.io/<repos
docker push <acr_name>.azurecr.io/<repository_
When docker finishes pushing your image to the registry, you can browse the repositories in your registry, as shown in Figure 1-6, to verify that has been successfully uploaded.
In the next section, we will review how to run the container from the image you have already pushed to the registry.
Once you have created your image and made it available to Azure services by pushing it to your container registry, it is time to run the container in any of
the services that Azure offers to you. Follow this high-level procedure:
When you want to create an image in the Azure Container Instance (ACI) service from your Azure Container Registry (ACR), you need to authenticate before you can pull the image from your ACR. For the purpose of demonstration, we will use Admin account authentication in the following procedure showing how to create and run a container in ACI:
#!/bin/bash
#Some variable definition useful for the script
ACR_NAME=az203cr
SP_NAME=az203cr_sp
IMAGE_TAG=az203cr.azurecr.io/develop/foobar:latest
RESOURCE_GROUP=AKSdemo-RG
APP_NAME=foobar
APP_DNS_NAME=prueba
#Get the registry ID. You will need this ID for creating //service principal
ACR_ID=$(az acr show --name $ACR_NAME --query id --output www.examsnap.com
ExamSnap - IT Certification Exam Dumps and Practice Test Questions
#Get the ACR login server
ACR_SERVER=$(az acr show --name $ACR_NAME --query loginServer #Get the service principal password. We will grant pull //principal
echo "Generating Service Principal password"
SP_PASS=$(az ad sp create-for-rbac --name http://$SP_NAME acrpull --query password --output tsv)
#Get the App ID associated to the service principal
SP_ID=$(az ad sp show --id http://$SP_NAME --query appId echo "Service principal ID: $SP_ID"
echo "Service principal password: $SP_PASS"
#Create the container in the Container Instance service
az container create --resource-group $RESOURCE_GROUP --$IMAGE_TAG --cpu 1 --memory 1 --registry-login-server $SP_ID --registry-password $SP_PASS --dns-name-label
sh <your_script_name>
Once you have executed this procedure, you can access your container by looking for your container’s name in the Azure Portal. You can also access the application that you put in this container by entering the URL of the container into a browser. The URL for this container will be in the form of <APP_DNS_NAME>.<region>.azurecontainer.io, based on the value of the variable APP_DNS_NAME that you provided in the previous script.
You can use several authentication mechanisms, such as an individual login with Azure AD, an Admin account, or a Service Principal. Authentication with Azure AD is a good approach for your development and testing environment. Using the Admin account is disabled by default and is discourage for production environments because you need to put the Admin account password in your code. For production environments, the recommended way to pull images is using service principals for authentication with the ACR.
Azure provides computing services for deploying your own virtualized infrastructure directly in the cloud. You can also deploy hybrid architectures to connect your on-premises infrastructure with your IaaS resources.
Azure Resource Manager is the service in Azure that manages the different resources that you can deploy in the cloud. You can define the resources and their dependencies by using a JSON-based file called an ARM template.
You can secure the data stored in your VMs by encrypting the virtual disks of the VM. This encryption is performed by the operating system of the VM. By default, Managed and Unmanaged virtual disks are also encrypted at rest by the cloud storage system.
Azure Batch offers the capability to unload your application of heavy or repetitive tasks by executing these tasks on a separate group of compute nodes.
You typically use Azure Batch for executing an image analysis, prediction or simulation model calculations, and 3D- or FX-image rendering.
Azure Managed Kubernetes Service (AKS) service is a managed version of the Kubernetes open-source solution. This solution provides you high-availability and load balancing for your application containers.
A container image is a package of software in which you store your code and any library or dependencies for running your application in a highly portable environment.
When you create a new instance of a container image, each of these instances is named a “container.”
You can store your container images in a centralized store called a registry.
Azure Container Registry is a managed registry, which is based on the open-source specification of Docker Registry 2.0.
You can run your containers in several Azure services, such as Azure Managed Kubernetes Service, Azure Container Instance, Azure Batch, Azure App Service, or Azure Container Service.
In this Thought Experiment, you can demonstrate your skills and knowledge about the topics covered in this chapter. You can find the answers to this Thought Experiment in the next section.
You are developing an application for making the analysis of images from a Geographic Information System. You decide to use containers for packaging the code that will make the image analysis. You use an Azure Container Registry for storing all the images of your application. The result of the image analysis will be in another image file and additional data will be stored in a database. The resulting images won’t be stored in the database. The users of your application need to access a web portal for reviewing the results of the analysis.
With this information in mind, answer the following questions:
This section contains the solutions to the Thought Experiment.
Using Azure AD login
Using Admin account
Using Azure AD service principals
Azure AD login is an interactive authentication mechanism and won’t work well on production workloads in which authentication needs to happen automatically. By using an Admin account, you will also need to interactively provide the username and password. Using service principles, you can also apply fine-grained authorization based on RBAC. You can even secure these credentials by using Azure Key Vault.

Top Training Courses


 Training Course")


 Training Course")


LIMITED OFFER: GET 30% Discount
This is ONE TIME OFFER

A confirmation link will be sent to this email address to verify your login. *We value your privacy. We will not rent or sell your email address.
Download Free Demo of VCE Exam Simulator
Experience Avanset VCE Exam Simulator for yourself.
Simply submit your e-mail address below to get started with our interactive software demo of your free trial.
