


Use VCE Exam Simulator to open VCE files

This Chapter covers following Topic Lessons
This Chapter covers following Lab Exercises
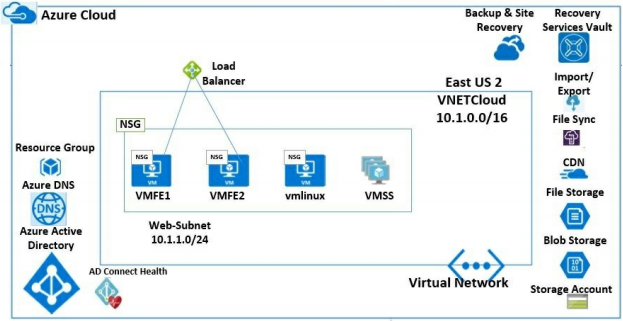
In this chapter we will add AD Connect and AD Connect health Agent to the topology. They will be installed on VM VMAD. AD Connect will synchronize on-premises users in Active Directory Domain Services (AD DS) to Default Azure AD Tenant. AD Connect health Agent will monitor health of On-premises Active Directory (AD DS). AD DS role was installed on VM OnPremAD in Compute Chapter.
Users in on-premises AD DS will be synchronized to Default Azure AD Tenant.
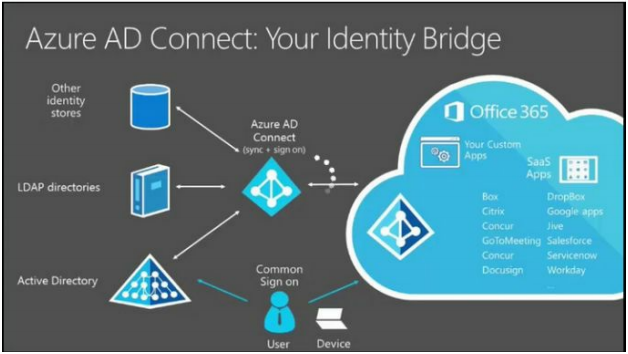
Azure AD Connect integrates on-premises directories with Azure Active Directory. AD Connect synchronizes on-premises users in Active Directory Domain Services (AD DS) or any other compatible Directory Services to Azure Active Directory.
The advantage of AD Connect is that Users can access cloud and onpremises resources with the single identity. Another advantage is that we don’t have to manually create user in Azure Active Directory as they synced from on-premises AD. Third advantage is that by enabling single sign-on, users who are logged on to on-premises can access cloud resources without logging to Azure.
You need to just manage your on-premises AD and all changes are synchronized with Azure AD.
AD Connect is usually installed on-premises with a service component in Azure. Figure below shows Architecture of AD Connect.
Following 5 identity options are available with Azure AD when used in conjunction with AD Connect. Figure below shows various Identity options available.
Synced Identity or Password Hash Synchronization : Identity is maintained both in cloud and on-premises. Authentication happens in cloud.
AD Connect installed on-premises with password synchronization option, synchronizes users and password hash of on-premises Active Directory users to Azure AD.
One advantage of this option is that you can enable single sign-on during AD Connect Installation without requiring any complex hardware setup.
Requires Azure AD Subscription, AD Connect Installed on-premises and onpremises AD DS.
Pass-through Authentication Option : Identity is maintained in both cloud and on-premises. Authentication happen on-premises with Active Directory.
A Pass through agent is installed on-premises on a windows server. The agent listens for and responds to password validation requests only. It receives encrypted password from Azure AD. It Decrypts it and validates it against Local Active Directory. The communication between Azure AD and Pass through agent is over Azure Service Bus. Azure SQL Database in cloud is used to holds information about metadata and encryption keys of Authentication Agents.
The advantage of this option is that there is no need for complex on-premises deployments or network configuration as in the case of ADFS. Second advantage is that you can enable seamless single sign-on during AD Connect Installation.
Requires Azure AD Subscription, AD Connect installed on-premises, Pass through agent installed on-premises, Azure SQL Database, Azure Service Bus and on-premises Active Directory.
Federated Identity with ADFS : Identity is maintained in both cloud and on-premises. User Authentication happen on-premises by Active Directory Federation Services (ADFS) server against local Active Directory.
AD Connect installed on-premises with Federation with ADFS option, Synchronizes on premises Active Directory users to Azure AD. In this case Password Hash of users are not Synchronized.
Active Directory Federation Services (ADFS) server installed on-premises and ADFS component in AD Connect, federate the 2 directories which results in one-way trust with Azure AD Trusting on-premises ADFS. User Login happens in cloud but user authentication is redirected to on-premises ADFS.
Requires Azure AD Subscription, AD Connect Installed on-premises, onpremises Active Directory Domain Services (AD DS) and on-premises Active Directory Federation services (AD FS).
ADFS option is used by organizations to address complex deployments such as enforcement of on-premises AD sign-in policy, Single Sign-on (SSO) and smart card or 3rd party MFA.
Federated Identity with PingFederate : Identity is maintained in both cloud and on-premises. User Authentication happen on-premises by PingFederate Instance against local Active Directory or any other LDAP Server.
AD Connect installed on-premises with Federation with PingFederate option, Synchronizes on premises users to Azure AD. In this case Password Hash of users are not Synchronized.
Requires Azure AD Subscription, AD Connect Installed on-premises, onpremises Active Directory and on-premises PingFederate Instance.
Federated Identity with 3 rd Party Identity Manager : Identity is maintained in both cloud and on-premises. User Authentication happen onpremises by 3 rd party identity manager server against local Active Directory.
3rd Party Identity Manager can be from Okta, Big-IP Access Policy Manager & IBM Tivoli Federated Identity Manager etc.
Requires Azure AD Subscription, AD Connect installed on-premises, onpremises Active Directory and on-premises 3 rd Party Identity Manager.
Important Note : In this case Federation between 3 rd party identity manager and Azure AD requires integration to be provided by 3rd party identity manager.
Azure Active Directory Connect is made up of three components : the synchronization services , the optional Active Directory Federation Services (ADFS) component and the monitoring component named Azure AD Connect Health .
It synchronizes identity data between your on-premises Active Directory and Azure AD. The synchronization feature of Azure AD Connect has two components.
Synchronization service copies usernames and password hash from onpremises active directory to Azure AD tenant. This allows users to authenticate against Azure AD using there on-premises credentials.
Note: We will not discuss ADFS here as we have already covered it in previuos section and we also cover it in next sections.
Azure AD Connect Health helps you monitor and gain insight into your onpremises identity infrastructure and the synchronization services.
AD Connect Health Monitors - Active Directory Federation Servers (AD FS), Azure AD Connect servers (Sync Engine), Active Directory Domain Controllers (AD DS).
Azure Connect Health requires Azure AD Premium edition. You also require an agent on each of your on-premises identity servers.
Figure below shows Azure AD Connect Health portal which is used to view alerts, performance monitoring, usage analytics, and other information for your identity Infrastructure.
The AD Connect Health Portal URL is at https://aka.ms/aadconnecthealth.
On the Portal you can see the identity services which are being monitored and the severity level of the services. You can drill down on the service further by clicking one of the tiles. Figure bellows AD Connect Health Portal dashboard showing monitoring of ADFS, AD Connect & AD DS.
CPU : Dual Core 1.6 GHz or Higher.
Memory : 4GB or Higher (Depends on number of objects in Active
Directory).
HDD : 70 GB to 500 GB (Depends on number of objects in Active
Directory).
Table below shows Database, Memory and HDD requirement for AD Connect based on number of objects in Active Directory. CPU Requirement remains same.
Operating System : Recommended is to install on windows Server 2008 R2 SP1 Standard or higher version. The Azure AD Connect server must have .NET Framework 4.5.1 or later and Microsoft PowerShell 3.0 or later installed.
Database : SQL Server Express or SQL Server. By default a SQL Server 2012 Express is installed that enables you to manage approximately 100,000 objects. To manage more than 100000 objects you need SQL Server 2008 onwards
Note 1 : Certain feature like group managed service account require Windows server 2012.
The Azure AD Connect server needs DNS resolution for both intranet and internet.
In this Lab we will install AD connect with Password Hash Synchronisation option on VM VMAD. VM VMAD was configured with AD DS role in Chapter 2, Exercise 32.
We will use User1 to connect to Azure AD during AD Connect Installation. User1 was created in Exercise 86, Chapter 9. AD connect will synchronise on-premises users to Azure AD Tenant. You cannot use Subscription user with MS Hotmail Account.
Create 2 Users (Test1 & Test 2) in AD DS to be synced with Azure AD Tenant
RDP to VM OnPremAD.
Open Active Directory Users and Computers>Click on domain AZX0X.local> Right Click Users>New>User>Create User pane opens. Create 2 Users -Test1 & Test2.
Close Active Directory Users and Computers.
Download and Install AD Connect
RDP to VM VMAD.
Open Internet Explorer and log on to https://portal.azure.com with User1 Credentials user1@mikescottoutlook.onmicrosoft.com.
Click Azure Active Directory in left pane>In Azure AD Dashboard click AD Connect in left pane>In right pane Click Download Azure AD Connect>New Browser windows opens> click download to download AD Connect.
On VMAD Click the AD Connect downloaded file to start the installation>AD Connect Installation wizard opens>Select License terms check box>Click Continue (Not shown).
Express Setting Installation option opens> Click Customize in bottom.
Install Required Components pane opens>Click Install in Bottom right (Not shown)> Installation starts. (Don’t select any components here).
User Sign-in pane opens>Select Password Hash-Synchronization>Click next.
Note : There is Enable single sign-on check box. This enables seamless single sign-on for domain users. If you are logged on to on-premises Domain controller then you can log on to Azure AD without signing again.
In Connect to Azure AD pane Enter User1 Credential and password>click next.
Connect Directories pane select Active directory and enter domain name AZX0X.local. This domain was configured in Chapter 2, Exercise 32.
Click Add Directory>AD Forest Account pane pops up>Enter Administrator credentials in the format AZX0X.localAdminAccount> Enter password>Click Ok>Click Next.
Note : AdminAccount is administrator which was created during VM installation
In Azure AD sign-in pane>check mark Continue without matching all UPN suffixes to verified domains>Click Next.
In Domain and OU Filtering pane>Select Sync all domains and OUs> Click Next. This allows you to select specific OUs or all OUs.
In identifying Users pane select the default values>Click next.
In Filtering pane select the default and click next.
In optional make sure default option Password Hash Synchronization is selected and click next
Note : Note the password Write Back Option. We will discuss it in next section.
In Configure select the default option and click install.
After Configuration Process gets complete click exit to close the Azure AD Connect Installation wizard.
In Windows VM OnPremAD logout User1 and close RDP session.
In Azure AD Portal Click Azure Active Directory in left pane>Azure AD Dashboard opens>Click Users in left pane>User Dashboard opens> You can see Test1 and Test2 users are synchronized to Azure AD and the source is Windows Server AD.
User-id have become test1@mikescottoutlook.onmicrosoft.com.
Open Firefox and log on to portal.azure.com with Test1 Credentialstest1@mikescottoutlook.onmicrosoft.com
In right side on top you can see user test1.
In this exercise we will check options available to Operate and configure AD connect after Installation of AD Connect.
RDP to windows VM VMAD> click Start icon>Under AD Connect you
can see following 4 applications installed.
AD Connect.
Synchronization Rules Editor.
Synchronization Service.
Synchronization Service Webservice Connector Config.
Click on AD connect icon on desktop which was installed in Previous exercise>AD Connect welcome screen opens>Click Configure> You can see various task available for configuration.
Note1 : Readers are advised to go through all tasks by selecting a task and clicking Next.
On VM OnPremAD click Start icon>Under AD Connect Click Synchronization Service> Synchronization Service Manager opens.
Note: Readers are advised to click connectors tab and check the options available.
In this exercise we will monitor Sync services and Active Directory Domain Services (AD DS) running on VM VMAD. To Monitor AD DS we will download and install AD Connect Health agent on VM VMAD.
Open Browser and go to the AD Connect Health Portal URL at https://aka.ms/aadconnecthealth or Go to Azure Active Directory Dashboard >Click Azure AD Connect in left pane>Click Azure AD Connect Health in Right pane under Health and Analytics> Azure AD Connect Health pane opens.
Note 1: In left pane you can see 3 Services which can be monitored �" Sync Service, Active Directory Federation Services and Active Directory Domain Services.
Note 2: From right pane you can download AD Connect Health Agents.
RDP to VM VMAD> Open Browser and log on to AD Connect Health Portal URL at https://aka.ms/aadconnecthealth
In Right pane Click Download Azure AD Connect Health Agents AD DS>New Browser window opens>Click download and save exe file on desktop.
Click exe file downloaded>Run>Install>After Setup is complete>Click Configure now>Some PowerShell scripts are automatically run and Sign in to your account box opens>Enter User1 Credentials and click next>enter password and click sign in.
Agent registration completed successfully as shown.
Go to Azure AD Connect Health Dashboard> Click AD DS Services in left pane> In Right pane you can see that Domain Controller is Healthy.
In Right pane click the domain name>Domain pane open>Scroll down to see more options.
Go to Azure AD Connect Health Dashboard> Click Sync Services in left pane> In Right pane you can see that sync status is Healthy.
In Right pane click the sync service>Sync service pane open>Scroll down to see more options.
Note: Seamless single sign-on option is only available for Password Hash Synchronization option and Pass-through Authentication option. It is not applicable for Federation with ADFS option.
With seamless single sign-on users who are already logged on to their corporate network on domain-joined machines can sign on to Azure AD without entering there on-premises password again
The advantage of this feature is that it can be enabled without creating any complex on-premises deployments and network configuration as in the case of Federation with ADFS.
Seamless Single sign-on is enabled during installation of AD Connect with either Password Hash Synchronization option or Pass-through Authentication option as shown in figure below. You to need to just check the Enable single sign-on box.
To ensure that the client sign-ins automatically in the intranet zone you need to ensure that two URLs are part of the intranet zone. This ensures that the domain joined computer automatically sends a Kerberos ticket to Azure AD when it is connected to the corporate network.
Create or Edit existing Group Policy which applies to all synchronized users.
Value: https://autologon.microsoftazuread-sso.com
Data: 1
Users are automatically signed into both on-premises and cloud-based applications.
Works with Password Hash Synchronization or Pass-through Authentication option only.
Register Domain joined non-Windows 10 devices with Azure AD to enable device based conditional access. This capability needs you to install version 2.1 or later of the workplace-join client. Version 2.1 has added support for Azure Active Directory Seamless Single Sign On (https://aka.ms/hybrid/sso).
Note: For Windows 10, the recommendation is to use Azure AD Join for the optimal single sign-on experience with Azure AD.
Figure below shows using seamless single sign-on users logged on to domain joined machines can access Azure AD application without entering there passwords.
Password Writeback is a feature enabled with Azure AD Connect that allows password changes in the cloud to be written back to an existing on-premises directory in real time.
This feature can be enabled during AD Connect Installation.
Password writeback is supported in following options only:
License Requirement for Password Writeback option
Self-Service Password Reset/Change/Unlock with on-premises Writeback is a premium feature of Azure AD and requires Azure AD Premium P1 or Azure AD Premium P2 licenses.
Federation is a collection of domains that have established trust for shared access to a set of resources. Trust can be one way or 2 way. Trust with ADFS option includes authentication and authorization. This results that all user authentication occurs on-premises. This method allows administrators to implement more rigorous levels of access control including implementing onpremises password policies. This method also enables Single sign-on.
In ADFS, identity federation is established between two organizations by establishing trust between two security realms. A federation server on one side (Account side) authenticates the users against Active Directory Domain Services and then issues a token containing a series of claims about user. On the other side, resource side another federation server validates the token and issues another for the local servers to accept the claimed identity. This allows a system to provide controlled Access to its resources to a user that belongs to another security realm without requiring the user to authenticate directly to the system and without the two systems sharing a database of user identities or passwords.
Trust can be one-way or two-way trust. In one-way trust, trusted organization authenticates and issues claim based token to user of trusted organization who are connecting to trusting organization for resource access. In this way trusting organization need not maintain the identity infrastructure.
Note : Federation option is only available with ADFS and Ping Federate. ADFS or Ping Federate are option is chosen during AD Connect installation.
AD Connect installed on-premises with Federation with ADFS option, Synchronizes on premises Active Directory users to Azure AD. In this case Password Hash of users are not Synchronized.
Active Directory Federation Services (ADFS) server installed on-premises and ADFS component in AD Connect, federate the 2 directories which results in one-way trust with Azure AD Trusting on-premises ADFS. User Login happens in cloud but user authentication is redirected to on-premises ADFS.
Federation can be used to configure a hybrid environment using an onpremises AD infrastructure. This can be used by organizations to address complex deployments, such as enforcement of on-premises AD sign-in policy, SSO and smart card or 3rd party MFA.
ADFS also enables single sign-on. Users who are already logged on to their corporate network can sign on to Azure AD without entering there onpremises password again.
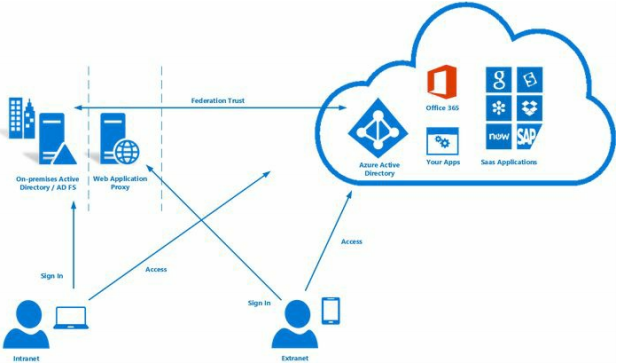
Figure below show users accessing Corporate resources and Azure AD from within or outside the Corporate Headquaters using a single identity. Single sign-on is also enabled.
Note 1: Web Application proxy server is required when users are accessing from outside the Company premises.
Note 2: AD connect is not shown in the figure but is always required.
Pre-Requisite
You need to install AD connect with Federation with AD FS option. The Azure AD Connect server needs DNS resolution for both intranet and internet.
Azure AD requires that User Attributes are in specific format. Successful directory synchronization between AD DS and Azure AD requires that your AD DS attributes are properly prepared.
IdFix is used to perform discovery and remediation of identity objects and their attributes in an on-premises Active Directory Domain Services (AD DS) environment in preparation for migration to Azure AD using AD Connect.
The purpose of IdFix is to reduce the time involved in remediating the Active Directory errors reported by Azure AD Connect.
https://www.microsoft.com/en-us/download/details.aspx?id=36832
Windows 7, Windows 10 or Windows Server 2008R2 and above. Net 4.0 must running on the workstation running the IDFIX application.

Top Training Courses


 Training Course")


 Training Course")


LIMITED OFFER: GET 30% Discount
This is ONE TIME OFFER

A confirmation link will be sent to this email address to verify your login. *We value your privacy. We will not rent or sell your email address.
Download Free Demo of VCE Exam Simulator
Experience Avanset VCE Exam Simulator for yourself.
Simply submit your e-mail address below to get started with our interactive software demo of your free trial.
