


Use VCE Exam Simulator to open VCE files

This Chapter covers following Topic Lessons
This Chapter covers following Lab Exercises
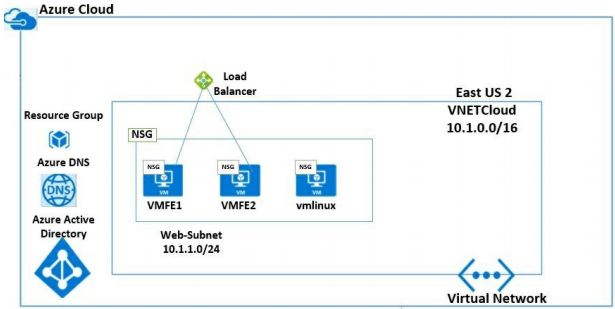
In this chapter we will add Azure Load Balancer to the topology. Virtual Machine VMFE1 and VMFE2 will be added as an endpoint to the Azure Load Balancer. We will then access default website on VMFE1 and Custom Website on VMFE2 using public IP of the Azure Load Balancers.
Load balancing distributes traffic across multiple computing resources.
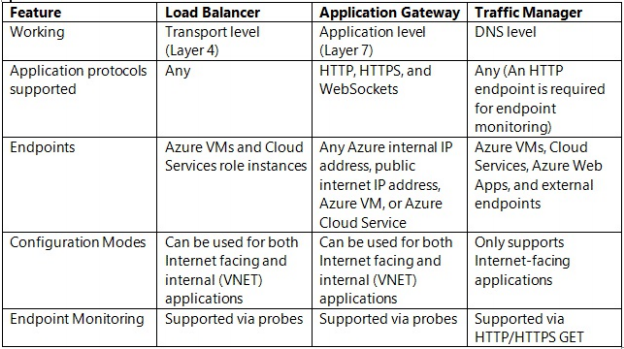
Microsoft Azure offers three types of load Balancers: Azure Load Balancer, Application Gateway & Traffic Manager.
Azure Load Balancer is a Layer 4 (TCP, UDP) load balancer that distributes incoming traffic among healthy instances defined in a loadbalanced set.
Application Gateway works at the application layer (Layer 7). Application Gateway deals with web traffic only (HTTP/HTTPS/WebSocket). It acts as a reverse-proxy service, terminating the client connection and forwarding requests to back-end endpoints.
Traffic Manager works at the DNS level. It uses DNS responses to direct end-user traffic to globally distributed endpoints. Clients then connect to those endpoints directly.
Azure Load Balancer is a managed Layer 4 (TCP, UDP) load balancer that distributes incoming traffic among healthy instances of services defined in a load-balanced set.
Azure Load Balancer Types : Basic & Standard.
Azure Load Balancer can be configured as Internet/Public Facing Load Balancer or Internal Load Balancer.
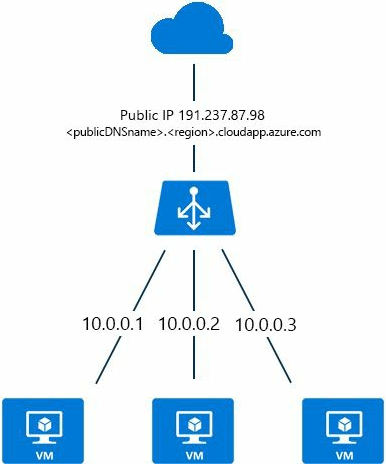
Internet or Public Facing Load Balancer distributes incoming Internet traffic to virtual machines. Figure below show shows internet traffic being distributed between Virtual Machines. LB has public IP and DNS name.
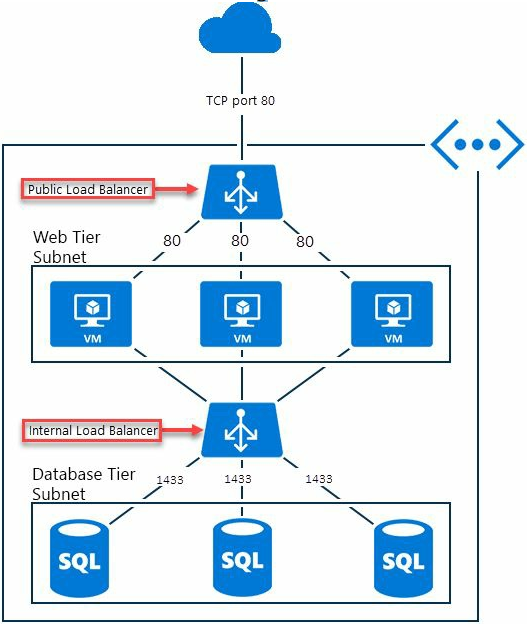
In Multi-Tier applications, Internal Load Balancer distributes traffic coming from Internet/Web tier to virtual Machines which are in back-end tiers and are not Internet-facing.
Internal Load Balancers can also distribute traffic coming from application tier which is not internet facing to Database tier which is also not internet facing.
Important Point: Internal Load Balancer can also direct traffic to on-premises VM which are connected to Azure through VPN gateway.
An internal Load Balancer enables the following types of load balancing:
Azure Load Balancer comes in 2 types: Basic & Standard . Basic Load Balancer is free of charge whereas Standard Load Balancer is charged.
Standard includes all the functionality of Basic Load Balancer and provides additional functionalities.
Azure Load Balancer Standard and Public IP Standard together enable you to provide additional capabilities such as multi-zone architectures, Low latency, high throughput, and scalability for millions of flows for all TCP and UDP applications.
Enterprise scale: With Standard Load Balance you can design Virtual Data Center which can support up to 1000 Virtual Machine instances.
Cross-zone load balancing: With Standard Load Balancer you can load balance Virtual Machines in backend pool spread across Availability Zones. Note that Availability Zones are also in Preview.
Resilient virtual IPs (VIP): A single front-end IP address assigned to Standard Load Balancer is automatically zone-redundant. Zone-redundancy in Azure does not require multiple IP addresses and DNS records.
Improved Monitoring: Standard Load Balancer is integrated with Azure Monitor (Preview) which provides new metrics for improved monitoring. Monitor your data from front-end to VM, endpoint health probes, for TCP connection attempts, and to outbound connections. New Metrics include VIP Availability, DIP Availability, SYN Packets, SNAT connections, Byte counters and Packets counters.
New SNAT: Load Balancer Standard provides outbound connections for VMs using new port-masquerading Source Network Address Translation (SNAT) model that provides greater resiliency and scale. When outbound connections are used with a zone-redundant front-end, the connections are also zone-redundant and SNAT port allocations survive zone failure.
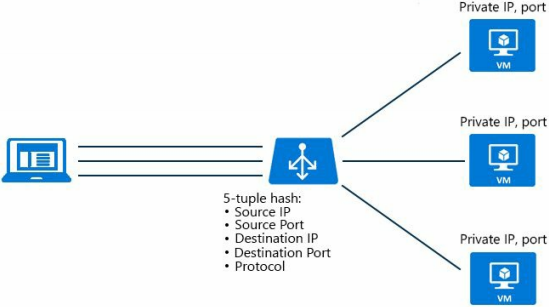
Traffic Distribution mode determines how Load Balancer will distribute client traffic to load balanced set.
Traffic Distribution mode is selected in Load Balancing Rules.
It uses 5 tuple hash of source IP, source port, destination IP, destination port, protocol type to map client traffic to available load balanced servers.
It provides stickiness only within a transport session. Packets in the same session will be directed to the same datacenter IP (DIP) instance behind the load balanced endpoint.
When the client starts a new session from the same source IP, the source port changes and causes the traffic to go to a different DIP endpoint.
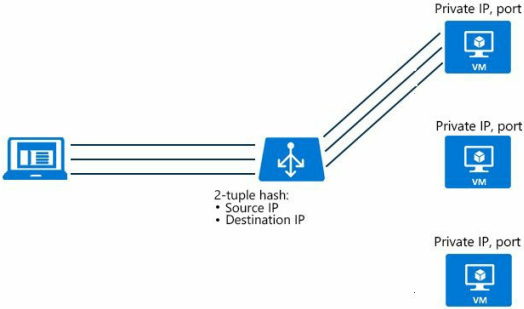
Source IP Affinity also known as session affinity or client IP affinity use a 2- tuple (Source IP, Destination IP) or 3-tuple (Source IP, Destination IP, Protocol) to map traffic to the available servers.
By using Source IP affinity, connection initiated from the same client IP goes to the same datacenter IP (DIP) instance.
Source IP Affinity distribution method provides session affinity based on Client IP address.
Source IP Affinity distribution method can result in uneven traffic distribution if clients are coming behind a proxy.
Load Balancer uses health probes to determine the health of instances in the backend pool.
When a probe fails to respond, the Load Balancer stops sending new connections to the unhealthy instances. Existing connections are not affected, and they continue until the application terminates the flow, an idle timeout occurs, or the VM is shut down.
Timeout and interval values are used to determine whether an instance is marked as up or down.
Interval: Interval is the number of seconds between probe attempts.
Unhealthy threshold: This value is the number of consecutive probe failures that occur before a VM is considered unhealthy.
Timeout and interval values are specified when you create Health Probes.
Azure Load Balance supports 3 probes types depending on the Load Balancer type.
TCP probes initiate a connection by performing a three-way open TCP handshake with the defined port.
The minimum probe interval is 5 seconds and the minimum number of unhealthy responses is 2. You can change these values when you are creating Health Probes.
HTTP and HTTPS probes build on the TCP probe and issue an HTTP GET request with the specified path. HTTPS probe is same as HTTP probe with the addition of a Transport Layer Security (TLS, formerly known as SSL) wrapper.
HTTP / HTTPS probes can also be used if you want to implement your own logic to remove instances from load balancer rotation. For example, you might decide to remove an instance if it's above 90% CPU and return a non200 HTTP status.
The health probe is marked up when the instance responds with an HTTP status 200 within the timeout period.
In its default configuration, Azure Load Balancer has an idle timeout setting of 4 minutes. If a period of inactivity is longer than the timeout value, there's no guarantee that the TCP or HTTP session is maintained between the client and your cloud service.
A common practice is to use a TCP keep-alive so that the connection is active for a longer period. With keep-alive enabled, packets are sent during periods of inactivity on the connection. These keep-alive packets ensure that the idle timeout value is never reached and the connection is maintained for a long period.
Idle timeout is configured in Load Balancing Rules. TCP Timeout is configured on Virtual Machine Public IP.
Load-balanced VM with no Instance Level Public IP address : Azure translates the private source IP address of the outbound flow to the public IP address of the public Load Balancer frontend.
Azure uses Source Network Address Translation (SNAT) to perform this function. Ephemeral ports of the Load Balancer's public IP address are used to distinguish individual flows originated by the VM. SNAT dynamically allocates ephemeral ports when outbound flows are created.
Load-balanced VM with Instance Level Public IP address (ILPI P): When an ILPIP is used, Source Network Address Translation (SNAT) is not used. The VM uses the ILPIP for all outbound flows.
With Port forwarding you can connect to virtual machines (VMs) in an Azure virtual network by using an Azure Load Balancer public IP address and port number.
This option is commonly used to connect to Azure VMs when Azure VMs have private IP assigned only.
Port Forwarding is enabled by Creating Load Balancer Inbound Nat Rules which forward traffic from a specific port of the front-end IP address to a specific port of a back-end VM.
In this Exercise we will create Basic Azure Load Balancer in Resource Group RGCloud and in region East US 2 .
In Azure Portal Click +Create a Resource> Networking> Load Balancer>Create Load Balancer Blade opens>Select Resource Group RGCloud, Enter a name, For Location select East US 2, For type Select Public and for SKU select Basic> For IP address select Create new and enter a name and select Dynamic> Click review + Create> After validation is passed click create.
Note: We have chosen IP Address as Dynamic to save on Azure Credits.
Figure below shows the Dashboard of Load Balancer.
Backend Address pool will include VMs (VMFE1 & VMFE2) which are to be load balanced. VMFE1 has default website and VMFE2 has Custom website.
Click Backend pools in left pane of Load Balancer Dashboard> Click +Add> Add Backend pool Blade opens> Give a name> Select Availability Set from Drop Down box> In Availability Set Select ASCloud> Add Virtual Machine VMFE1 and VMFE2 by clicking +Add a target Network IP configuration>Click OK.
It will take 2-3 minutes to add both VMs to Backend pool. Proceed to next step after both VMs are added to the backend pool.
Health probes are used to check availability of virtual machines instances in the back-end address pool. When a probe fails to respond, Load Balancer stops sending new connections to the unhealthy instance. Probe behavior depends on:
Go to Load Balancer Dashboard>Click Health Probes in left Pane>+Add>Add health Probe blade opens>Enter a name>Select HTTP in Protocol>Click Ok.
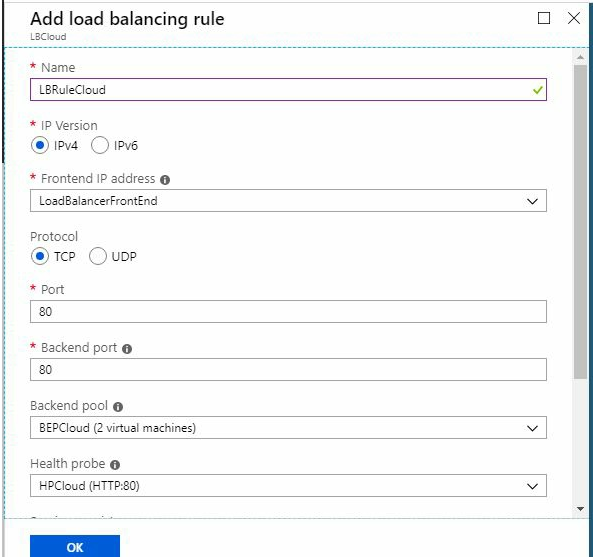
Load Balancer rule defines how traffic is distributed to the VMs. You define the front-end IP configuration for the incoming traffic and the back-end IP pool to receive the traffic, along with the required source and destination port, Health probe, session persistence and TCP idle timeout.
Go to Load Balancer Dashboard and Click Load Balancing Rules in left Pane> +Add> Add load Balancing Rule blade opens>Enter a name>Select Backend Pool and health Probe creates in previous exercise>Rest Select all default values>Ok.
Note: There is Session Persistence and idle Timeout setting are also there which is not shown in above figure. You just need to scroll down.
Go to Load Balancer Dashboard>From right pane copy the Public IP Address (104.208.234.10)> Open a browser and http:// 104.208.234.10> Custom website on VMFE2 opens.
Pres f5 couple of times to refresh the browser> Default Website of VMFE1 opens as shown below.
Note: In Load Balancing rule we had chosen Session Persistence as none.
Azure Basic Load Balancer is free of charge.
The pricing for standard Load Balancer will be based on the number of rules configured (load balancer rules and NAT rules) and data processed for inbound originated flows.

Top Training Courses


 Training Course")


 Training Course")


LIMITED OFFER: GET 30% Discount
This is ONE TIME OFFER

A confirmation link will be sent to this email address to verify your login. *We value your privacy. We will not rent or sell your email address.
Download Free Demo of VCE Exam Simulator
Experience Avanset VCE Exam Simulator for yourself.
Simply submit your e-mail address below to get started with our interactive software demo of your free trial.
