


Use VCE Exam Simulator to open VCE files

You’ve deployed infrastructure and configured platform as a service (PaaS) applications in many forms, web apps, containers, functions, or logic apps. Running through all of this is your customers’ data, which is the most valuable piece of any organizations’ digital estate.
Access to this data needs to be controlled using one of the four pillars of great Azure Architecture: Security. As an architect, you need to be keeping security at the heart of any design. It extends through implementation and deployment and is at every stage in the life cycle of the application. In the mindset of a good architect, security is not a dirty word!
For the AZ-300 certification exam, you need to understand how to secure access to your applications and how to protect the integrity of the data with security tools like encryption.
Need More Review?
Security
You can find the full “Azure security documentation” at https://docs.microsoft.com/en-us/azure/security This documentation includes best practices, which are a must read for any architect.
Skills covered in this chapter:
Skill 4.1: Implement authentication
Skill 4.2: Implement secure data solutions
You’ve deployed applications, but how do you control who or what is accessing those applications? What can you recommend to your customers so that they can ensure their applications are accessed only by users and applications that have been granted access? The answer is that you use the authentication implementations available to you through Azure services. As an architect, you need to be aware of the available choices when you make recommendations, and you need to know how to implement the options.
This skill covers how to:
Implement authentication by using certificates, forms-based authentication, tokens or Windows-integrated authentication
Implement Multi-Factor Authentication by using Azure AD
Implement OAuth2
Implement Managed Identities for Azure Resources Service Principle authentication
Authentication is the process where a user, application, or service trying to gain access is verified as the entity it claims to be, therefore allowing “entry” to the app and its services. Authentication is not the services a user or application can access once access is granted into the application; that is authorization.
Azure gives your customers multiple ways of authenticating depending on use case. When you’re recommending authentication mechanisms, you need to be aware of how they work and how to configure them.
Need More Review?
Authenticating Web Apps
To learn about the options available for authentication, visit the Microsoft Docs article “Authentication and authorization in Azure App Service” at https://docs.microsoft.com/en-us/azure/appservice/overview-authentication-authorization.
You can configure an Azure web app or API to require client certificate authentication to enable TLS mutual authentication on an Azure web app or API. When this is enabled, the web app or API requests a certificate from the client application during the SSL handshake. The web app or API then uses the certificate to authenticate the client. This is a form of machine-to-machine authentication that you often see in business-to-business applications; it’s a way for a front-end application to securely interact with a back-end service.
Azure App Service doesn’t have a direct connection to the internet. It’s proxied through other services, so to forward the certificate after SSL termination, the terminating Azure service injects the client certificate as a Base64 encoded value into the HTTP request header. It’s this value that is read by the application. So, to use this form of authentication, your customers’ web application must contain custom code to read the header and perform the authentication.
To look at configuring TLS mutual authentication for a web application, first follow the SSL Termination walkthrough in Skill 4.2. TLS mutual authentication requires that HTTPS Only is set on the web app; otherwise, the SSL certificate won’t be received. Therefore, as in the SSL Termination walkthrough, you need a B1 App Service Plan Tier or higher for SSL support. Once SSL Termination has been set up, complete the following steps to enable authentication by certificate:
az webapp update --set clientCertEnabled=true --name <app_name> --resource-group
<group_name>
The same process is used to secure function apps through Networking -> SSL from the Platform Features section of the function app. Other applications, including logic apps, that can present the correct certificate may now access the web app or function app.
Need More Review? Client Certificates
To learn more about enabling client certificates, visit the Microsoft Docs article “Configure TLS mutual authentication for Azure App Service” at https://docs.microsoft.com/en-us/azure/app-service/appservice-web-configure-tls-mutual-auth#enable-client-certificates.
A legacy form of authentication is forms-based authentication. You may have come across this when you’ve been looking to rearchitect legacy on-premises applications to the cloud. This method of authentication has an HTML-based web form, which means it must be viewed and filled in on a browser.
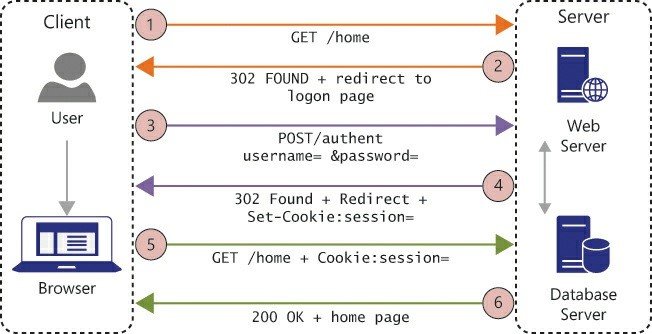
Therefore, the use case for this authentication is purely user intervention login; the user fills in information on the form, normally a username and password to authenticate against. One of the advantages to using this method was that the user didn’t have to be part of the domain to authenticate because the authentication process could be performed against a username and password stored within a database. Figure 4-1 shows the general flow of forms-based authentication, which works like so:
There are security issues with this implementation that you need to be aware of when you’re determining whether to rearchitect or lift directly into the cloud:
The credentials are sent as plaintext. You must be securing any traffic to this site with HTTPS, although this is always best practice.
The credentials are stored in a database. If the database uses poor encryption or no encryption of the passwords, the data is susceptible to attack. Encrypt the passwords with strong, salted encryption.
Forms use cookies that are vulnerable to cross-site request forgery (CSRF). In CSRF, a rogue site uses a cookie stored on a machine to influence the site that created the cookie to perform an action of which the user is not aware. If the user is an administrator of the site, this could allow the attacker to gain control of the site. This is mitigated using antiforgery techniques that must be coded into the application to create further security tokens to verify the source of requests.
The Azure Web Application Gateway, previously covered in Chapter 2, Skill 2.3 “Implement application load balancing” has a web application firewall. This firewall contains cross-site scripting protection, so it also provides protection against CSRF if you placed it in front of the web application.
Exam Tip
Knowing how to set up forms-based authentication using .NET or any other language is beyond the scope of the exam. However, understanding the concepts of how it works, why it is used, and how to mitigate the security concerns around it is important.
As mentioned earlier, forms-based authentication is a legacy mechanism.
Where possible, you need to recommend that your customers move to modern, secure authentication.
You can see such a mechanism when you log into the portal. To the user, this login looks like the same functionality as web forms; however, the login uses Azure AD as the back end. This method, where Azure AD authenticates the user and grants access to the portal, can be extended to your customers’ applications.
To set this up, you need to register an application with Azure AD and then use this registration on the web app to perform the authentication for you. To explore how this works, follow these steps:
Note
App Service Tier
If you’re planning to use authentication via Azure AD for your app, you have to be using HTTPS. Therefore, if you’re using a custom domain, you need your SSL bindings set (see Skill 4.2 ”SSL/TLS") and at least a B1 App Service Plan.
Name Enter a name that will make the app easily identifiable to you and any users.
Account Types If you’re developing an internal-use app, choose this organizational directory only. Use Any Organizational
Directory for internal use and guests within any Azure AD. The final choice, Accounts In Any Organizational Directory and Personal Microsoft accounts, allows you to also include any Microsoft personal accounts (Skype and so on). C. Ignore the Redirect URI for now.
Click Register to save the application definition into Azure AD. You now need to define how the service will use it.
Click Branding on the app registration blade, and paste the URLyou copied in step 2 into the Home Page URL field. Click Save. Here you’re setting up the URL for the home page of your web app.
Click Authentication. Under Redirect URIs, make sure Web isselected as the Type, and paste the URL from step 2 into the Redirect URL but add /.auth/login/aad/callback to the end. It should look like this:
https://<webappname>.<domainname>/.auth/login/aad/callback
Click Save. Here you’re establishing that you want to send the authentication information back to the page your user logged in from.
Select the box for ID Tokens. This is only required in this examplebecause we’re using a single-page application with no back end to accept the authorization information. Otherwise the authentication of the application will return an error message. Click Save.
In the App Registrations blade, choose Quickstarts. Copy theApplication (client) Id from App properties on the right. Keep this for later use; it uniquely identifies your application.
In the App Registrations blade, choose Overview and then Endpoints, copy the WS-Federation Sign-on Endpoint and save this for later use. This endpoint allows the authentication information to be stored in the session.
In the Action To Take When Request Is Not Authenticated drop-down menu, choose Log In With Azure Active Directory.
Select Azure Active Directory under Authentication Providers, andin Management mode choose Advanced.
Paste the Application client ID you saved in step 5a into the ClientID.
Paste the WS-Federation Endpoint URL from step 5b into theIssuer URL field, but remove/wsfed from the end. This is pointing the web app at the Single Sign-On URL for your Azure AD.
Click OK to save the Active Directory Authentication settings, andthen click Save on the Authentication/Authorization settings.
Need More Review?
App Registration and Authentication
To learn more about enabling web app authentication through Azure AD, visit the Microsoft Docs article “Register an application with the Microsoft identity platform” at https://docs.microsoft.com/en-us/azure/active-directory/develop/quickstart-register-app. Then check out “Configure a client application to access web APIs” in the “Next steps” section on the same page
In the walkthrough of the previous section for web application authorization with Azure AD, you registered an application for authentication. This process registers the app with the Microsoft identity platform. Microsoft identity platform is an identity provider that verifies the identity of users and applications against an organization’s directory. Once the identity platform has successfully authenticated a user or application, it issues security tokens back to the calling application. The calling application must then validate the tokens to ensure authentication was successful. These tokens are the refresh token from Azure AD, which is returned on authentication, and the access token from the application, which verifies the user’s access to the application.
Once tokens are returned to the web app, the App Service Token Store automatically collects and stores the tokens to make it easy for the application to access them by making them available in the request header for back-end code or by sending a GET request to the authentication endpoint. If your customer doesn’t need to do anything with the tokens once the user is authenticated, you can turn off the token store. Continuing with the earlier example, use the following steps to turn off the store:
Authentication/Authorization, and then scroll to the bottom of the page.
On-premises web applications often leverage Windows Active Directory (AD) as a user store, authenticating a user’s login using Active Directory. The web servers can be configured to use Single Sign-On, which is when the user signs into the client once, and the credentials are sent silently to the web application to use for authentication so that the user does not need to sign in again. This is Integrated Windows Authentication (IWA), and it can be achieved with Window AD configured to use NTLM or Kerberos.
One of the issues with this authentication implementation is the client must be able to complete part of the authentication process by communicating with the IdentityServer, in this case Windows AD. Therefore, the client needs to be on the domain. However, with applications moving to the cloud and remote work becoming more common, this isn’t always possible. In this scenario, as new applications are written or migrated, you should recommend hybrid identity management so that authentication and authorization of users is available wherever they are located.
You explored configuring Azure AD Connect in Chapter 1, Skill 1.9 “Implement and manage hybrid identities,” including the User Sign-In screen shown in Figure 4-2. (Note this is from the edit screen of AD Connect configuration rather than the setup screen.)
Note now the Enable Single Sign-On check box at the bottom of the page. If this is selected and Password Synchronization or Pass Through Authentication is also selected, with some more configuration steps, single sign-on capabilities of IWA can be available to your customers’ applications in the cloud.
Exam Tip
The additional steps to configure Seamless Single Sign-On are beyond the scope of the exam. However, it’s beneficial for you to know which sign-on methods suit specific use cases and which methods support Seamless Single Sign-On.
Need More Review?
Azure AD Connect and Seamless Single Sign-On
To learn more about configuring Seamless Single Sign-On, visit the Microsoft Docs article “Active Directory Seamless Single Sign-On: Quick Start” at https://docs.microsoft.com/en-us/azure/activedirectory/hybrid/how-to-connect-sso-quick-start.
The previous section explains using Azure AD to provide the authentication mechanism for a web app. When you set up an account type in step 3 of the section “Application authentication with Azure AD”, you selected the value Any Organizational Directory. Selecting this setting means any user in the entire directory can be authenticated. Even for a line-of-business application, granting access to every user in the directory is unlikely. Therefore, you need to be able to educate your customers on how to grant access to their applications only to the users that require it. You can achieve this by looking at the Enterprise Applications settings in Azure AD using the following steps:
Your customers may want to enable users who are outside their organization or users with specific rights on the web application to authenticate by using extra security measures. When architecting such a solution, Microsoft recommends you use conditional access policies and authenticate with Multi-Factor Authentication. Conditional access gives your customers the ability to enforce access requirements when a specific set of conditions occurs. The remaining steps in this section go through how this works for a web application.
Exam Tip
Don’t forget you need an Azure AD premium subscription P2 or P1 to take advantage of conditional access.
For this part of the walkthrough, you need two users in Azure AD: one in a group and one in a different group.
You can check that MFA is being enforced only for the application by logging the same user into the Azure Portal. The MFA code is not requested.
Now the Admin group is secured, it’s time to require MFA for your application for anyone outside the organization’s network. To do this, you need to set up a named location in Conditional Access. First, you need to set up a named location by following these steps:
Now you’re ready to configure a location-based conditional access policy. Follow these steps to create the configuration:
You also see trusted IPs listed in the named location. You could add your IP range to the trusted IPs (by selecting Azure AD > Security > MFA); however, this has further implications to security beyond just this application.
The other conditions available to select are:
Sign In Risk Azure calculates the likelihood that a sign in isn’t coming from the owner of the account.
Device Platforms You can select mobile platforms here to force MFA from a mobile device.
Device State You can use this to enforce MFA on unmanaged devices.
Exam Tip
Know the conditions that can be applied to a Conditional Access Policy. Check out the Need More Review documentation for a deeper dive into these.
Note
Conditional Access
Here we’ve covered conditional access of a web app hosted in Azure. The process is identical for on-premise applications published through Application Proxy.
Need More Review?
Implement MFA with Azure AD
To learn more about enabling MFA for a web application through Azure AD, visit the Microsoft Docs article “Require MFA for specific apps with Azure Active Directory conditional access” at https://docs.microsoft.com/en-us/azure/active-directory/conditionalaccess/app-based-mfa. Also see the generic conditional access documentation at https://docs.microsoft.com/en-us/azure/activedirectory/conditional-access/.
You may have heard OAuth being discussed in the same breath as authentication. However, OAuth 2.0 is not an authentication protocol, although it’s a common misconception that it is. OAuth is an authorization protocol that’s used in tandem with authentication protocols. Here’s an example of the differences using a real-world example of checking in to take a flight:
Authentication You go to the check-in desk, you hand over your passport, and the check-in officer verifies your identity against the passport because it’s a trusted document. It doesn’t say whether you can fly or not, but it proves you are who you say you are.
Authorization You also hand over your flight ticket or proof of booking. At this point, the combination of the passport and ticket enables the check-in officer to authorize you have the correct permissions to go on the flight. The check-in officer hands you a boarding pass, which is your proof of authorization for the flight.
If we map the flight example to a solution, we could have authentication by an authentication protocol such as OpenId. OpenId is an extension of OAuth, and it provides identity information as part of an ID token (id_token). It’s this identity information that is the extension; OAuth has no method for this in its definition. In the walkthrough for the section “Application authentication for Azure AD,“ the authentication endpoint selected was WSFederation. However, you could have chosen the OpenId endpoint. The additional identity information is sent in the form of claims. Key value pairs present in the ID Token such as email or name.
Going back to the flight example, OAuth would check whether you can have access to the flight (resource), by validating the id_token and checking against the booking (permissions, dependent on resource type). It would verify authorization when you hand over a boarding pass (access token), so that you may board your flight (access your resource). There is also the scope of the access. In other words, what does the token grant you access to in the resource? In the context of the example, this could be first-class or economy seating.
It’s important that solution architects understand the differences between these protocols and how they are implemented. Microsoft identity platform enables the implementation of OpenId and OAuth to allow your customer’s developers to authenticate using many identities, including Azure AD work and school accounts, personal Microsoft accounts (Xbox, Outlook, and so on) and social accounts such as Facebook or GitHub. The identity platform returns access tokens in the form of JSON Web Tokens (JWTs), these are also known as “bearer tokens” because the bearer of the token is granted access.
OAuth authorization is implemented using “flows.” There are different flows depending on the client type and what the application they are accessing needs to achieve:
Implicit Grant Flow Browser-based client accessing a single-page application, such as a JavaScript application.
Authorization Code Flow Application installed on a device—either mobile or desktop—that requires access to resources such as Web APIs.
Client Credentials Grant Server-to-server communications happening in the background and utilizing service accounts or daemons.
On-Behalf-Of (OBO) Flow An application calls a web service that invokes another web service. The first web service gets consent to use the second web service on behalf of the user.
Figure 4-6 shows the flow of access requests and tokens between the client, APIs, and the Microsoft identity platform.
Instead of talking through this, we’re showing you how to set it up using a function app and Microsoft graph. We note where each part of the flow occurs based on the numbered circles in Figure 4-6:
This is Circle 1 in Figure 4-6. The user is authenticated, and you have an id_token to send, but you can’t see it yet.
Select to Add a permission.
Select Microsoft Graph at the top.
Select Delegated Permissions and then select On Behalf Of, AccessAPI As Signed In User. Note here the Application Permissions option would be used in the Client Credentials Grant Flow.
Scroll to the bottom, select User Permission and User.Read. This isthe scope. The API requires read access to the user record.
Select Add Permissions. Permissions are added and you arereturned to the API permissions.
Click Accept to grant the function app consent to use the permissions listed on your behalf. This consent stays in place until either the user or admin revokes it. The function app should still work correctly once consent is given.
Delete everything from between
Write-Host "PowerShell HTTP trigger function processed a request."
to
# Associate values to output bindings by calling 'Push-OutputBindin
Paste in this code under the Write-Host:
$status = [HttpStatusCode]::OK
$aadToken = $Request.headers['x-ms-token-aad-id-token']
The first line sets up a 200 OK parameter to return at the end. The second line is part of Circle 1 from Figure 4-6. The Token Store of the function app (refer to the “Tokens” section from this skill) contains your id_token. It’s been injected into the header so you can pick it up for use here.
Paste in the next bit of code. You need the tenantId taken from the OAuth 2.0 token endpoint from step 2:
$uri = "https://login.microsoftonline.com/<tenantid>/oauth2/v2.0/token"
# Body required for on behalf of flow
$body = @{
client_id = "$env:WEBSITE_AUTH_CLIENT_ID"
assertion = $aadToken
scope = "https://graph.microsoft.com/user.read"
requested_token_use = "on_behalf_of"
client_secret = "$env:WEBSITE_AUTH_CLIENT_SECRET"
grant_type =
"urn:ietf:params:oauth:grant-type:jwt-bearer"
}
# Get OAuth 2.0 access and refresh tokens with user.read scope for microsoft
graph
$tokenRequest = Invoke-WebRequest -Method Post -Uri $uri -ContentType
"application/x-www-form-urlencoded" -Body $body
$token = ($tokenRequest.Content | ConvertFrom-Json).access_tok
Following this code through, you’re setting up a web POST using the Client ID, Client Secret, and id_token from the authorization, stating that the request is for the On-Behalf-Of flow and the token being sent is of type JWT Bearer. The POST is invoked and the access token for the scope Microsoft Graph user.read is stored. See Circle 2 and Circle 3 from Figure 4-6.
Paste the final section of code:
# Pass the authorization token to graph
$graphResp = Invoke-RestMethod -ContentType "application/json" -Headers
@{Authorization = "Bearer $token"} `
-Uri https://graph.microsoft.com/v1.0/me `
-Method Get
This invokes a RESTful call to the Microsoft Graph API to send the Bearer token on the Header. The/me returns user information for the logged in user. This is Circle 4 and Circle 5 from Figure 4-6.
Change the OutputBinding Body to the Graph API response:
Body = $graphResp
This will expire the access token and revoke the consent given by the user.
Note
Validating the Tokens
The example given here doesn’t validate the JWT tokens after they’re returned. You should be ensuring your customer’s developers are validating tokens against the signature on return to make sure they were issued by the correct identity provider. This is best practice, along with validating some claims within the token�" in particular the audience’s claim to ensure that the ID token was meant to be used by your customer’s application.
Need More Review?
OAuth 2.0 On-Behalf-Of Flow
To delve deeper into securing API’s using OAuth 2.0 check out “Mircrosoft identity platform and OAuth 2.0 On-Behalf-Of flow” at https://docs.microsoft.com/en-gb/azure/active-directory/develop/v2oauth2-on-behalf-of-flow.
You have explored the methods to secure calls between APIs, web apps, and devices using OAuth 2.0. However, these have been predominantly geared to interactions between your customer’s products. What if you need to architect a solution that requires APIs to be accessed externally? For this, you could recommend Azure API Management rather than exposing the APIs directly.
Azure API Management is a service that sits between back-end services (APIs) and the applications that call them. The Azure API Management service at its basic level is a proxy. It enables organizations to securely publish APIs internally and to partners or other third parties that want to leverage their data through the API gateway. The combination of the API gateway and developer and admin portals delivers the following features:
Onboard developers with a portal that can be branded
Response caching for performance
Protects APIs from misuse with security verifying tokens, certificates, and other credentials
Protects APIs from abuse by throttling using rate limits and quotas
Gives usage metrics for each API to the owners of the managed APIs and the developers subscribed to them
Allows on-premise use of the APIs, custom APIs in Azure, or thirdparty APIs
Open, standardized data exchange is a key component to enabling digital business, and solution architects need to know the services available to deliver this and how to configure them. API management is crossing the blurred line between architecting a solution and developing one. However, as mentioned previously, a good architect will have some development skills as part of their armory.
To explore using API management to secure an API using Azure AD and OAuth 2.0, you need to create an API and an API management instance, and then you configure the app to be protected by the instance. The following example looks at this using an Azure logic app because logic apps have integration built in to API Management:
Select your Subscription, Resource Group, and Location.
Enter your Organization Name. This is used on the developer portaland in email notifications—for example, notification to a developer that their quota is nearly exhausted.
Enter the Administrator Email. This is the email address that willreceive any system notifications.
Select a Pricing Tier. Note you can’t use Basic or Consumptionbecause they have no Azure AD integration, which is required in this walkthrough.
Click Create. When the service is ready to go, the admin emaildesignated in step 2d receives an email.
In the API Management Service blade of the API Managementservice created in step 2, click Products, and then click Starter. In Settings, look at the Requires Subscription check box. When checked, this forces a developer to subscribe before the product and its APIs can be used. The state must be published before APIs in a product can be called.
It lists the APIs in the Starter product.
In Policies you see a limit of 5 calls every 60 seconds and 100 callstotal in a week. This is for the product Starter.
Access control is where you can add groups that are created in theUsers And Groups section of the API Management blade.
Subscriptions are required if a subscription key is needed to accessan API.
Select the API Management service created and then select APIs inthe Management Service blade.
Here you select what type of API to add. There’s obviously tightintegration to Azure services, so you can select logic app, API app, or function app directly. For other external services, you can pick one of the others as appropriate. Note the Echo API on the left. This is used to create an API which echoes back the response headers and body, which is useful if your back-end API isn’t quite ready, and you need to test. Select Logic App.
Click Browse to find the logic app you created in step 1 and selectit. The first three lines of the form are auto populated. Set the URL Suffix to a relevant suffix and in the Product select Starter, the product you explored in step 3a. Click Create. The logic app is ingested.
Click Test, select POST manual-invoke, and scroll down. Take acopy of the Request URL.
Open PowerShell and execute the following command to call the API, ensuring you are not logged into the Azure AD account that owns the API Management service (or use Postman/equivalent):
invoke-webrequest -method Post -uri "<Request URL from Step 5a>"
An error is returned because there is no subscription key becausethis is an anonymous request:
invoke-webrequest : { "statusCode": 401, "message": "Access denied due to
missing subscription key. Make sure to include subscription key when making
requests to an API." }
You’re not going to secure this API using subscriptions becauseyou’re going to secure with Azure AD and OAuth 2.0. Go back to the Test tab, but this time select Settings to the left of it, scroll down and unmark Subscription Required. Click Save and try the call once more. You see a 200 OK response with the logic app response in Content.
Enter a Name that will make the app easily identifiable to yourselfand any users for the back-end API.
Select Account Types �" Any Organizational Directory because it’sa good fit for internal use and guests within any Azure AD. C. Ignore the Redirect URI for now. Click Register.
Copy the Application ID from the newly registered app’s Overview and save for later use.
Select the app registration you created earlier and select Expose AnAPI in the blade.
Select Add A Scope.
In Scope name, enter App.Read. This is the scope of thepermission.
In Who Can Consent, select Admins And Users. Admins canconsent for the tenant; users can consent for themselves.
In Admin Consent Display Name And Description, put ApplicationRead And Return Response.
The Status should be Enabled. Click Add Scope.
Register another application. This time, put the URL to your APIsdevelopment portal as the Redirect URL: https://<apiname>.developer.azure-api.net/signin.
Click Register and copy the Application ID for the clientapplication registration from its Overview page.
Staying in the new App Registrations blade, select Certificates AndSecrets and generate a New Client Secret. Keep a copy of this for later use.
Again staying in the App Registrations blade select API permissions. Select Add a permission, then My APIs. Select the back-end API registration created in steps 6 and 7 of this walkthrough. Select Delegated Permissions and select App.Read. Click Add Permission.
Navigate to the API Management Service you created in Step 2.Click OAuth 2.0 in the Management blade. Click Add.
In the Display name, select a relevant name for the OAuth2 service.Note that this auto populates ID.
For the client registration page URL, you can use any URL becauseno users will be registering their own accounts for OAuth2 for this example. Enter http://localhost.
Select Authorization Code Grant Type. This corresponds to thegrant types listed in how OAuth2 works at the beginning of the OAuth 2.0 section of this Skill.
In the Authorization Endpoint URL, paste in the OAuth 2.0authorization endpoint you copied in step 9 of this walkthrough.
The API is stateless, so you don’t require a state parameter. Leavethe authorization request method as Get.
In the Token Endpoint URL, paste in the OAuth 2.0 token endpointcopied in step 9 of this walkthrough.
Scroll down to Client Credentials, paste the Application ID fromthe back-end app registration in step 8b to Client ID and the Secret from step 8c of this walkthrough to Client Secret.
Copy the redirect_uri (it’s grayed out) by selecting the box andpressing Ctrl + C. Save this for later.
Click Create.
Navigate back to the API Management Service you created in step2 of this walkthrough. Select APIs in the blade, and pick the logic app API created in step 4 of this walkthrough.
Click Design, and then select Add Policy in the Inbound Processingsection.
Select Other Policies. Paste this into the inbound policy directlyunder
<inbound>
<validate-jwt header-name="Authorization" failed-validationhttpcode="401" failed-validation-error-message="Unauthorized. Access token is
missing or invalid.">
<openid-config url="<OpenID Endpoint>" />
<issuers>
<issuer>https://sts.windows.net/<TenantId from OpenId
Endpoint>/</issuer>
</issuers>
<required-claims>
<claim name="appid">
www.examsnap.com ExamSnap - IT Certification Exam Dumps and Practice Test Questions
<value><Client Application Id �" Step 8 ></value>
</claim>
</required-claims>
</validate-jwt>
Staying in the inbound policy configuration section, logic apps cannot handle the Authorization header and error with “The request must be authenticated only by Shared Access Scheme.” To mitigate this, you need to strip it from the header, and add a line above :
<set-header name="Authorization" exists-action="delete" />
Unauthorized message; the protection is now working correctly. To test this further, click Developer Portal at the top of the APIs part of the API Management service. The developer portal opens, and you’re already logged in as your user (authentication complete with token in the header). Now call the API:
Select APIs at the top.
Select the name of the API you published in step 4 of thiswalkthrough.
Before clicking Try It, note that the portal has picked up theAuthorization request header with the OAuth 2.0 access token.
Scroll to the bottom of the page, and click Send. The response isstill Unauthorized. Scroll up and look at the Authorization section. You see the name of your OAuth 2.0 server from step 10 of this walkthrough and next to it the choice of No Auth. Change this to Authorization Code; a permissions request will display because this application requires you use the permission to access your API with App.Read and Graph API. If you recall, this was the scope created in step 7 of this walkthrough. Click Accept. The 200 OK Message and content and other metadata displays.
Need More Review?
Protecting an API with OAuth
For more on protecting APIs using OAuth 2.0 and API Management, read “Protect an API by using OAuth 2.0 with Azure Active Directory and API Management” at https://docs.microsoft.com/en-us/azure/api-management/apimanagement-howto-protect-backend-with-aad.
Exam Tip
Understanding that Azure AD Authentication is available only in certain API Management pricing tiers and having a general grasp of the core features of API Management is good to know. The best practice of validating the JWT token, whether in API Management or a custom application, may also prove useful.
One of the issues we face when architecting solutions is managing the credentials that are required when integrating Azure resources. Ideally, the solutions being architected should not have credentials out in the open, and developers should not have access to them. Managed identities for Azure resources (formerly Managed Service Identity or MSI) provides this feature, authenticating Azure services through Azure AD using an automatically managed identity. This managed identity can be used to authenticate any service that supports Azure AD, and once the identity is assigned, authorized actions can be performed against this service without having to store credentials in the code. Architects need to understand how this works and how it’s configured.
There are two types of managed identity: system and user. Let’s look at system-assigned managed identity first.
When you enable a system-assigned identity on an Azure service, Azure AD creates an AD identity and then creates a service principal that can be used to represent the service for Access Control, Access Policies, and RoleBased Access Control (RBAC)—whichever is supported by the Azure service. If you delete the Azure resource, the identity is automatically deleted; it’s required only for the lifetime of the resource. To see this in action, set up a blob to be read and output by an Azure function by completing the following steps:
using namespace System.Net
# Input bindings are passed in via param block.
param($Request, $TriggerMetadata)
# Write to the Azure Functions log stream.
Write-Host "PowerShell HTTP trigger function processed a request."
$status = [HttpStatusCode]::OK
$blobURL = "<Place Blob URL here>"
# Grab the text from the Blob
$blobText=invoke-webrequest -URI $blobURL
# Associate values to output bindings by calling 'Push-OutputBinding'.
Push-OutputBinding -Name Response -Value ([HttpResponseContext]@{
StatusCode = $status
Body = $blobText.Content
})
Save and run the function. You see the sentence from the blob in the Output pane on the bottom right. This is due to the blob being publicly accessible.
Select Platform Features at the top of the function app.
Click Identity.
In the System Assigned section set Status to On.
Click Save.
Return to the blob container in the portal and click the ellipsis tothe right of the storage container. Select Container Properties. On the Container blade, select Access Control (IAM).
Click Add at the top, and then Add Role Assignment. Add RoleAssignment opens.
Select Storage Blob Data Reader for Role.
In Assign Access To �" Function App, select the function appcreated in step 2 of this section. The role assignment selection is shown in Figure 4-10. Click Save.
#Get the token for storage access from the MSI_ENDPOINT using the MSI_SECRET on
the header
$apiVersion = "2017-09-01"
$resourceURI = "https://storage.azure.com"
$tokenAuthURI = $env:MSI_ENDPOINT +
"?resource=$resourceURI&api-version=$apiVersion"
$tokenResponse = Invoke-RestMethod -Method Get -Headers @{"Secret"="$env:MSI_
SECRET"} -Uri $tokenAuthURI
$accessToken = $tokenResponse.access_token
$headers = @{}
$headers.Add("x-ms-version","2018-03-28")
$headers.Add("x-ms-client-request-id",[guid]::NewGuid())
$headers.Add("x-ms-date",(Get-Date).AddHours(1).ToString("ddd, dd MMM yyyy
HH:MM:ss GMT"))
$headers.Add("Authorization","Bearer $($accessToken)")
$resp=Invoke-WebRequest -UseBasicParsing -Uri "https://<yourcontainername>.
blob.core.windows.net/msiblobcontainer/
<yourblobfilename>" -Method GET -Headers $headers
$resp.StatusCode
Execute the function in a test and then in a browser. The blob contents are displayed once more as shown in Figure 4-11.
The process to retrieve the token for a VM is slightly different. You explore that in Skill 4.2 when you review Azure Key Vault.
User managed identity is currently in preview. A user managed identity is created as an identity in Azure AD, but it can be assigned to more than one Azure service. Therefore, you could have 100 VMs and assign the same user assigned managed identity to it. This would mean you could access multiple resources through the managed identity.
If you delete some of your VMs, the user managed identity is still available because it is a standalone resource. Assigning and granting access to the user managed identity is identical to the system managed as explored earlier; however, you need to know how to configure a user managed Identity:
az identity create -g myResourceGroup -n myUserIdentity
On the command line, it is a one-line command to create an identity that can be reused across resources. To view managed identities in the portal, search for the managed identities resource. This also has the ability to add and remove the managed identities.
Your customers’ applications are now secured. You know what to recommend when architecting user-to-application and application-toapplication authentication. That’s just half the story, though. What about the data that is transported on premise or across the public internet—or even from private internet to the cloud? What happens to that data when it’s stored for access at a later date? For this you need to understand the end-to-end encryption possibilities in Azure and which ones you should recommend based on the scenarios presented to you.
This skill covers how to:
Before you start looking at encryption, you first need to think about the mechanisms used in encryption and secure transit and how these require an extra level of care. Your customers may have a web application, and it may need a connection string to a Redis Cache or perhaps a key to access some file storage. There could be a VM on the back end that cannot be called without some secure form of credentials.
In all of this, you have secrets and keys. Your customers’ developers may have embedded some in the code or perhaps as plaintext in configuration files. Then there’s infrastructure as code, and IT pros should be deploying this in a reusable manner, but usernames and passwords could have been accidentally left in scripts and templates. What happens to this infrastructure when embedded secrets and keys expire? How can you tell where they are being used and that they’re being used for the correct purpose rather than being abused? What if these secrets end up in a public source code repository such as Github and a malicious party checks out your code and has access to your secrets? Even if the secrets don’t get outside your customer’s organization, how can they be sure a rogue employee hasn’t managed to get access to secrets? Either way, your customer’s infrastructure is now insecure, and their data is at risk. As a cloud architect, you need to ensure your customers know how to mitigate these risks, so how can you store these items securely? You need to use Azure Key Vault, a cloud-based securityenhanced secret store.
Key Vault gives your customers the ability to centrally store their secrets. These secrets are split into three groups:
Keys
Symmetric and asymmetric (public/private key pair) keys. Private keys cannot be retrieved; they’re used only in cryptographic operations.
They’re generated by key vault or imported (bring your own key or
BYOK).
They’re used for Azure services like Always Encrypted and Transparent Data Encryption (TDE).
They’re stored in a cryptographic key service. Keys are irretrievable. Secrets
For any sensitive information, database connection strings, Redis Cache connections, storage connections used in applications.
Other sensitive information you may need at runtime, if highly
sensitive, should be encrypted before storing.
25KB is the maximum size.
Certificates
X509 certificates, used in HTTPS/SSL/TLS.
They can link to some external CAs for autorenewal.
They’re stored as JSON wrapped secrets.
With centralized storage of secrets comes control of their distribution. You should be recommending that your customers secure access to the key vault to users via RBAC (currently only at the vault level) and access policies, creating three types of actors:
SecOps
�-� Create vaults, manage the keys and secrets in the vault. Revoke/delete.
Grant permissions to users and applications to perform cryptographic and management operations, read URIs, add keys, and so on.
Enable logging for auditors.
Can see some keys/secrets depending how they’re stored.
Developers
Add links to the keys and secrets into applications using URIs instead of actual values or keys.
Never see the keys or secrets. Auditors
Monitor the log files and review usage for compliance and security standards.
Never see keys or secrets.
With Azure Key Vault, Microsoft is unable to view or use the keys or secrets. This protection is by design and is a key component of a cryptographic vault.
Architects need to know how to create a key vault and secrets and then use this knowledge of key vault and secret creation to delve deeper into other key vault features.
Need More Review?
Azure Key Vault
To learn more about key vault, check out the article "What is Azure Key Vault" at https://docs.microsoft.com/en-us/azure/key-vault/key-vault-overview
The introduction for this skill looked at the theory of key vaults, the secrets that can be stored within them, and how the actors within an organization would interact with the key vault. You now need to create a key vault to start storing your secrets. Follow these steps:
Standard Software protected keys. Free to store, billed per transaction.
Premium Hardware Security Module—stored keys certified to FIPS 140-2 (required by some regulated industries). Cost to store and per transaction.
All Networks Can be accessed from anywhere, including the public internet.
Selected Networks Defaults to any trusted service, VMs, Disk
Encryption, backup. Click the information next to Allow Trusted Microsoft Services To Bypass This Firewall? to see a full list. If you select No here, select the VNets and Public IP address ranges that require access.
For this example, leave the setting on All Networks, and click Save.
Now that you have a key vault created, it’s time to add some secrets. In the
portal, navigate to the key vault you just added and use the following steps to add a secret to your newly created vault:
Your user was granted access to create secrets through the access policy created on the key vaults creation; therefore, the secret is created. Let’s take a further look at access policies.
If List was not enabled for the secrets in the access policy, your user would not be able to list the secrets. You can see whether it’s enabled by choosing Access Policies from the key vault plane. Click the access policy created for your user, and remove List against the Secrets. Log out of Azure and log in to force a permissions refresh. You can no longer see the secret you just added. Add List back in through the access policy.
List the secrets once more and click the secret name. You haven’t updated this secret yet, so there’s only one version displayed. Click this version to see the key details. Your user was granted Get permission on key vault creation, so when you click Show Secret Value at the bottom, you can view the secret. Go back to Access Policies on the key vault plane and remove Get
Permission On The Secret by unchecking it, clicking OK, and then clicking Save. Now go back to the Secrets section of the blade; you can view the secrets list and see the versions, but on clicking on the version, you can no longer see the details of the secret or show the secret value. Reenable the Get permission for the secret in the access policy.
Finally, you’ll need to turn on logging so that your customer’s auditors can review how the secrets are being used. For this, you need a storage account so that key vault can have a container to write the logs into. You can do this in the portal, on the command-line interface (CLI), or in PowerShell, as shown here:
$sa = New-AzStorageAccount -ResourceGroupName vaultRg -Name vaultLogs -Type
Standard_LRS -Location 'northeurope'
$kv = Get-AzKeyVault -VaultName 'vaultExample'
Set-AzDiagnosticSetting -ResourceId $kv.ResolurceId -StorageAccountId $sa.Id
-Enabled $true -Category AuditEvent
The logs can be read from the container insights-logs-auditevent.
Need More Review?
Azure Key Vault Security
To learn more about key vault Security through RBAC and access policies, read "Secure access to a key vault" at https://docs.microsoft.com/en-us/azure/key-vault/key-vault-secure-your-key-vault
Throughout this section, the discussion has been predominantly about secrets. The processes to manage and use keys and certificates are similar and are covered in the sections “Encrypt and decrypt data at rest and in transit” (keys) and “SSL/TLS” (certificates).
So far in this section, you’ve explored secrets using the portal. The portal when interacting with the key vault is a wrapper to the key vault REST APIs. The APIs we have touched on so far give you the ability to manage (management plane) the keys, secrets, and certificates. There is another set of APIs that allow you to get and use the secrets (data plane). You can see an example of the REST APIs when you view the secret created in the previous section. When you click the version number of the secret, the secret identifier appears as shown in Figure 4-14.
The identifier takes the following form:
https://<keyvaultname>.vault.azure.net/<secrets>/<secretName>/<version>?
Here you can replace <secrets> with <keys> or <certificates>, and their corresponding names and versions. The secret identifier make-up is still the same. You can try to access this directly with the URI as shown in the following, which is an example in PowerShell. Note that you need to use the URI from your secret identifier. Make sure you are logged into Azure in PowerShell to execute the following:
invoke-restmethod -Uri https://kvvaultexample.vault.azure.net/secrets/myAppDbConnect/
eeabaxxxxxxxxxxxxxxxxxxxxxxxxx31?api-version7.0
invoke-webrequest : The remote server returned an error: (401) Unauthori
Even though you’re logged into Azure and therefore authenticated as the user the secret was created with, the API call cannot GET this secret due to the access and refresh OAuth 2.0 tokens not being present as part of the request. The (401) Unauthorized message is returned because the endpoint doesn’t have the authorization yet.
Azure portal, Azure CLI, and PowerShell Az Module are all wrappers to Azure APIs, including the key vault REST API. Using the PowerShell command Get-AzKeyVaultSecret you can try to access the secret once more:
$secret=(get-azkeyvaultsecret -VaultName 'kvvaultexample' -secretName 'myAppDbConnect').
SecretValueText
$secret
kvdbexample.database.windows.net,1433
Here, you can see part of an Azure SQL Database connect string which was stored in the secret create in the key vault example. The command GetAzKeyVaultSecret is substituting the given VaultName and secretName into the URI for you as part of the wrapping process, along with tokens required for access. Because you haven’t specified the secret version, you will receive the current one.
Note
On Tokens, Api Usage, and Cli/Powershell
It’s possible to retrieve the OAuth 2.0 tokens and access the secret in this way, but it’s way beyond the knowledge required for the exam. This example is to explore what’s happening on the back end.
The walkthroughs so far have looked at what you can do as a user (User Principal). However, as an architect, you need to be able to instruct on how to set up access for your applications to the key vault and its secrets. To grant access to an application or other Azure service, you need to create an access policy to an identity that has been assigned to the Azure service. This can be a Managed Service Identity (MSI) or a User Assigned Identity as explored in Skill 4.1. To see this in action, in the following example you deploy a Linux VM. You then access a key vault secret via MSI and check access from inside the VM. This simulates a developer using a software development kit (SDK) to access a secret.
The following steps break up a single Azure CLI script, describing the tasks each section performs. Execute each section in this script to explore accessing secrets through an MSI:
rgName="kvrgexample"
rgLocation="northeurope"
kvName="kvvaultexample"
kvSecretName="kvsecretexample"
vmName="kvvmexample"
az group create --name $rgName --location $rgLocation
az keyvault create --name $kvName --resource-group $rgName --locati
az keyvault secret set --vault-name $kvName --name $kvSecretName --value "Shhh
it's secret!"
az vm create --resource-group $rgName --name $vmName --image UbuntuLTS
--admin-username sysadmin --generate-ssh-keys
az vm identity assign --name $vmName --resource-group $rgName
spID=$(az vm show --resource-group $rgName --name $vmName --query identity.
principalId --out tsv)
az keyvault set-policy --name $kvName --object-id $spID --secret-permissions
get list
Note
Azure Key Vault Access
When access to secrets, keys, and certificates is given, it’s for the entire vault. Therefore, it’s part of best practice to separate key vaults across applications and then again across environments (dev, pre-prod, prod). This ensures that each environment’s applications cannot use the other’s keys. This separation also helps to make sure key vault transaction limits are not hit.
ssh publicIpAddress -l sysadmin
sudo apt-get update
sudo apt-get install -y curl
curl 'http://169.254.169.254/metadata/identity/oauth2/token?api-version=2018-02-
01&resource=https%3A%2F%2Fvault.azure.net' -H Metadata:true
curl https://<YOUR-SECRET-URI>?api-version=2016-10-01 -H "Authorization: Bearer
<ACCESS TOKEN>"
curl https://kvvaultexample.vault.azure.net/secrets/kvsecretexample/
b8f1xxxxxxxxxxxxxxxx99c?api-version=2016-10-01 -H "Authorization:
Once the Curl request is executed, you can view the secret as shown in Figure 4-16 to confirm you have the access directly from the VM. This confirms access via the identity and that the access policy is functioning correctly.
{"value":"Shhh it's secret!","id":"https://kvvaultexample.vault.azure.net/secrets
/kvsecretexample/ b8f1xxxxxxxxxxxxxxxx99c","attributes":{"enabled":true,
"created":1559775793,"updated":1559775793,"recoveryLevel":"Purgeable"},"tags":
{"file-encoding":"utf-8"}}
Exam Tip
You will not be required to know every command to set up access from an Azure Service to a key vault secret; however, knowing the order of setup and where to retrieve an access token is important.
Keys, secrets, and certificates can be updated within the key vault. It’s possible to update the metadata or the secret itself. If the update is to the secret itself, a new version of the secret is created that can be referenced in the URI, either by its version number or by leaving the version number off the URI, which always returns the most recent version. Follow these steps in the portal to create a key and update this key to a new version to see versioning of keys in action:
Click Keys on the Key Vault blade, and select Generate/Import.
Select Import and select any private key from your local machine inFile Upload.
Enter the password you used when creating the private key in Password. Note that you can only import an RSA Key.
Enter a name for your key, and click Create.
Click on the key in the Keys list; select New Version.
Select Import. The information required is identical to that above,except you don’t need to supply a name. You may select the same private key here because it’s a demo. Click Create.
You are returned to the Keys version list, there are now Current andOlder Versions listed. Both are enabled and can be used.
From an architect standpoint, you need to ensure your customers are updating their secrets regularly. This is called rotation, and for some secrets, such as keys, could be a regulatory requirement.
Note
Secret Rotation
The example uses manual rotation. You either update the version after the rotate, or point your application at a new Key. This task can be automated using Azure Automation and Runbooks.
The deletion of a key or entire vault is a straightforward task in the portal. On the Vault blade, select Overview and Delete. You also can use PowerShell remove-azKeyVault and CLI az keyvault delete to perform vault deletion and associated commands for secret deletion.
The problem you need to be aware of as an architect is accidental deletion of a key vault or secret. In this scenario, unless you have a backup of the secret, you may no longer be able to communicate with your application or be unable to read encrypted data. You could place a resource lock on the key vault to stop it being deleted. However, key vault gives you two flags you can set at the vault level that are recommended for best practice. The following is an updated version of the CLI command used in the VM and key vault walkthrough from earlier in this section. You can execute this command to create a protected key vault:
kvName="ssekvexamplecli"
az keyvault create
--name $kvName
--resource-group $rgName
--location $rgLocation
--enable-soft-delete
--enable-purge-protection
Looking closely, you can see the following commands have been added at the bottom:
--enable-soft-delete If a secret or an entire vault is deleted, you can recover it for up to 90 days after deletion.
--enable-purge-protection If a secret or an entire vault is deleted and has gone into a soft-delete, it cannot be purged until the 90-day period because deletion has passed.
These options are not enabled by default and must be specified on creation or on an update to the Key Vault properties; updates must be performed on the command line. Here is an example in PowerShell of updating a key vault that has not been created with soft delete:
($vault = Get-AzResource -ResourceId (Get-AzKeyVault -VaultName $keyVaultName).
ResourceId).Properties `
| Add-Member -MemberType NoteProperty -Name enableSoftDelete -Value 'True'
Set-AzResource -resourceid $vault.ResourceId -Properties $vault.Propert
These two lines of PowerShell are retrieving the properties of the key vault, updating them to add the soft delete, and then setting the updated properties back to the vault.
Need More Review?
Soft Delete for Key Vault
To learn more about configuring soft delete and purge protection on a key vault, read "Azure Key Vault soft-delete overview" at https://docs.microsoft.com/en-us/azure/key-vault/key-vault-ovw-softdelete. Also review the other items listed under the section heading concepts from the same documentation page.
As a solution architect, you need to be educating your customers in designing solutions that protect their data, taking into account all the possible states the data can occur in and the appropriate controls for those states. These data states are
At rest Data that is inactive and stored physically (persisted) in digital form—for example, databases, files, disks, and messages.
In transit Data that is being transferred. This could be between locations, over a network, or between programs or components.
Encryption at rest is designed to prevent a possible attacker from gaining easy access to data at rest on compromised physical media.
So, why use encryption at rest when there’s a low chance of an attacker gaining access to Azure’s physical media? Aside from encryption at rest being part of best practice for Data Security, our customers’ data may have mandatory requirements for data protection from compliance and internal governance—for example, PCI DSS, HIPPA, or perhaps the new European data privacy laws, GDPR. Encryption at rest adds an additional layer of defense on top of Azure’s already highly compliant platform, which is why it’s enabled by default where possible.
By default, Azure resource providers (in this example, Azure Storage) use service-managed symmetric keys to encrypt the data as it is written to storage. This process is transparent to the user; the Azure resource provider manages the key and encryption process. The same key is then used to decrypt the data into memory before the data is accessible in an unencrypted format by the application, meaning that no code changes are required to use this feature. It also carries no cost to the customer. This is server-side encryption at rest and is shown in Figure 4-17.
The following services support encryption at rest with service-managed keys:
Azure Storage (Storage Service Encryption or SSE)
Azure SQL Database (Transparent Data Encryption or TDE)
Azure Cosmos DB
Azure Data Lake
Managed disks (via SSE)
Encryption at rest also supports customer-managed keys on some services With customer-managed keys, you can bring your own key (BYOK), importing a key into key vault, or you can create one directly within key vault. Customer-managed keys give your customers greater control over thei key management process, including
Import your own key or create one in key vault, which lets you decid when to rotate your keys. You can disable a key if compromised.
Define access controls to your key.
Audit of key usage.
Customer-managed keys are supported on Azure Storage (SSE) for blobs and files, Azure SQL Database (TDE), and Azure Disk Encryption for encryption at rest.
Exam Tip
Know what types of data are encrypted by Storage Service Encryption (SSE), Transparent Data Encryption (TDE), and Azure Disk Encryption.
Need More Review?
Azure Data Encryption at Rest
To learn more about encrypting Azure data at rest, visit the Microsoft Docs article "Azure Data Encryption-at-Rest" at https://docs.microsoft.com/en-us/azure/security/azure-security-encryption-atrest
As discussed above, Azure Storage uses Storage Service Encryption (SSE) for encryption at rest by default using service-managed keys. To use customer-managed keys, you need to specify your key for use. Follow these steps to configure a storage account to use customer-managed keys, using a new key vault and generating a new key:
Enter a name for the key vault and select the same resource group as the storage account for simple resource grouping. The location should be set to the same as the storage account. Leave the other options as default and click Create. Once the key vault is deployed, you’re returned to the Use Your Own Key setup.
Note
SSE Customer-Managed Keys
When creating a key in the key vault, you must select an RSA Key if it is to be used with SSE. You also can generate your own RSA key outside of key vault. To use such a key, import it into the vault, and then select the vault and the imported key in steps 4 and 5.
If you need to change the key used for encryption, go back to the same Encryption setting and select a new key in the key vault, or uncheck Use Your Own Key to revert to service-managed keys.
Exam Tip
Know how the PowerShell command Set-AzStorageAccount and the Azure CLI equivalent command az storage account update are used to accomplish this task.
Need More Review?
Configure Customer-Managed Keys for Azure Storage
To learn more about configuring customer-managed keys on SSE, visit the Microsoft Docs article “Azure Data Encryption-at-Rest” at https://docs.microsoft.com/en-us/azure/storage/common/storageencryption-keys-portal. Follow the linked articles for PowerShell and Azure CLI.
Unmanaged Disks in Azure Storage are not encrypted at rest by Storage Service Encryption. Managed disks are automatically encrypted by SSE. As a solution architect, you need to be teaching your customers to encrypt at rest where possible because encryption at rest follows best practice in data security. To encrypt unmanaged disks, you must use a customer-managed key and Azure Disk Encryption. Like SSE, Azure Disk Encryption integrates with key vault for management of encryption keys.
Note
Azure Disk Encryption
Azure Security Center will flag unencrypted IaaS disks and recommend the disks be encrypted. This is listed as a High Severity alert.
Azure Disk Encryption uses the industry-standard features of BitLocker (Windows) and DM-crypt (Linux Kernel 2.6+) to encrypt the Data and operating system disks.
Now you configure Azure Disk Encryption on an existing VM image with a single unmanaged disk. Before you do anything, back up your VM! Then complete the following steps:
vmName="adevmexample"
rgName="diskEncryption"
rgLocation="northeurope"
az vm encryption show --name $vmName --resource-group $rgName
kvName="adekvexamplecli"
az keyvault create --name $kvName --resource-group $rgName --location
$rgLocation
--enabled-for-disk-encryption true
keyName="adekeyexamplecli"
az keyvault key create --vault-name $kvName --name $keyName --prote
spName="https://adespexample"
read spPassword <<< $(az ad sp create-for-rbac --name $spName --query password
--output tsv)
spId=$(az ad sp show --id $spName --query appId --output tsv)
az keyvault set-policy --name $kvName --spn $spId --key-permissions wrapKey
--secret-permissions set
Now that the key vault, key, service principle, and key vault policy are in place, you can encrypt your VM disks using the service principle access to the key vault. Staying in Azure CLI, execute the following to encrypt the disks. In this command, volume-type of all is going to encrypt all your disks. If you add more data disks after encrypting a VM, use the same command with --volume-type data; otherwise your new disks won’t be encrypted:
az vm encryption enable --resource-group $rgName --name $vmName --aad-client-id
$spId
--aad-client-secret $spPassword --disk-encryption-keyvault $kvName --keyencryption-key $keyName
--volume-type all
az vm encryption show --resource-group $rgName --name $vmName --query [osDisk] -o
tsv
Need More Review?
Azure Disk Encryption
To learn more about encrypting Azure Disks, including some important prerequisites and quickstarts, visit the Microsoft Docs article "Azure Data Encryption-at-Rest" at https://docs.microsoft.com/en-us/azure/security/azure-security-diskencryption-overview.
In the encryption examples, which in this skill have all been server-side so far, it’s possible the data that has been in transit to Azure Storage has arrived through an unencrypted channel. Because the data has not been encrypted, it has been open to attack. When architecting a secure data solution, you need to address unencrypted data in transit because compliance and governance requirements may make encrypted in transit mandatory. Either way, it’s best practice to encrypt in transit.
Client-side encryption for Azure Storage encrypts the data on the application side; therefore, if the data is intercepted over an unencrypted communication channel, it’s not as easily compromised. Figure 4-20 shows a diagram of Azure Storage Encryption reworked for client-side encryption. All data leaving the application is encrypted.
Client-side encryption requires the Azure Storage Client Library to be called as part of an application. The encryption is performed using this process:
This process of wrapping the CEK key is called the envelope technique. During the decryption process, a key-resolver uses the key identifier to work out which key wrapped the CEK, meaning that again the Client Library has no need to access the KEK itself. Just call the KEK’s unwrap algorithm.
Exam Tip
You won’t need to know how to invoke the client library in code as part of an application for the exam, but it’s important to have a grasp of the process of encryption/decryption.
Need More Review?
Client-Side Encryption for Azure Storage
To learn more about configuring client-side encryption for Azure Storage, visit the Microsoft Docs article “Configure customermanaged keys for Azure Storage encryption from Azure portal" at https://docs.microsoft.com/en-us/azure/storage/common/storageencryption-keys-portal.
Azure Storage is only one of the areas within Azure where data is at rest. The SQL family of products in Azure also stores data at rest in its data files and log files. This includes
Azure SQL Database
Azure SQL Managed Instance
Azure SQL Data Warehouse
SQL Server (within an IaaS VM on Azure)
The SQL Database family of products uses Transparent Data Encryption (TDE) to encrypt data at rest. When engaging with customers to design a storage solution on SQL in Azure, you need to ensure that they are aware only new Azure SQL Databases have TDE enabled by default when they’re created. The other solutions and older versions of Azure SQL Database require TDE to be enabled manually.
TDE protects the data at rest by performing real-time I/O encryption of the data and log files at the page level. The pages are encrypted by a database encryption key (DEK), which is stored in the boot page (record on SQL Server) of the database, allowing startup and database operations within Azure including the following:
Geo and Self Service Point in time Restore
Restoration of a deleted database
Geo-replication
Database Copy
The now encrypted pages are then written to disk, and the same DEK is used to decrypt the page before it’s read into memory for use. The master database holds the components required to encrypt or decrypt the pages using a DEK, which is why the master database is not encrypted by TDE. This all happens without interaction from the user or the application developers, and it happens with no extra cost.
TDE uses service-managed keys by default, with Azure managing the key rotation and so on and storing the keys in its own secure location. TDE also can be configured to use customer-managed keys just like Azure Storage Encryption, which gives your customers the data security implementation they may need for governance and compliance purposes, as described in the skill introduction. Using customer-managed keys is also called bring your own key (BYOK).
Unlike Azure Storage Encryption, the customer-managed key encrypts the DEK, not the data itself and is therefore known as a TDE protector. Once BYOK is enabled and the DEK is encrypted, it’s stored at the boot page level, replacing the Azure-managed DEK if there was one. The customermanaged key used to encrypt the DEK must be stored in Azure Key Vault, where it can be imported to or created within the key vault. Storing the key in the vault gives your customers the same degree of management of the key as that described earlier in the discussion about Azure Storage Encryption.
Note
Exporting an Encrypted Azure SQL Database to BACPAC
When exporting an encrypted database to BACPAC, the data is first read into memory before it’s sent as part of the BACPAC file. This means that the data in the BACPAC file is unencrypted as TDE unencrypts the data before writing to memory. Therefore, you need to ensure your customers are aware they must secure the BACPAC file by other means once exported.
Use the following steps to take a look at encrypting an existing Azure SQL Database using a customer-managed key. In this example, you need to use an already created Azure SQL Server/Database:
Need More Review?
Transparent Data Encryption
To learn more about configuring Transparent Data Encryption for Azure Storage, visit the Microsoft Docs article “Transparent data encryption for SQL Database and Data Warehouse” at https://docs.microsoft.com/en-us/azure/sql-database/transparentdata-encryption-azure-sql.
You’ve made sure your customers know they need their data to be encrypted at rest, but what if there is some data that some users—even power users— should not be able to read? This is sensitive data.
Sensitive data could be personally identifiable information such as Social Security number (SSN), email address, date of birth, or perhaps financial data such as a credit card number. You should be ensuring your customers are protected from attackers with encryption for all sensitive data by encrypting at rest, but there are also times when power users—in this case database administrators—shouldn’t be able to view sensitive information. Would you want the database administrator of your employer’s human resource package to be able to view your SSN, data of birth, and so on? A solution architect needs to be able to advise how to prevent this, which is where Always Encrypted comes in.
Always Encrypted is a security feature within SQL products that is designed to protect sensitive data. This encryption happens on the client side, so it covers while the data is being used, when it is moving between client and server, and when it’s at rest on the server. With Always Encrypted, the data is never viewable in the database in plain text, even in memory. Because the client is handling the encryption and decryption process, the application needs a driver to be installed for this to happen. This can be .Net, ODBC, JDBC, PHP, and so on, which opens up a variety of programming languages.
However, unlike TDE, Always Encrypted means that there may be some
code changes required in the application to use Always Encrypted.
Unlike TDE, which is database wide, Always Encrypted should be set against just the columns that are required to be encrypted. There’s a slight performance hit with Always Encrypted; there also are limitations on types of columns that can be encrypted. It’s important to define a set of rules with your customers as to which fields these should be, although this may be decided for you with compliance and governance requirements.
When Always Encrypted is set up, it requires two keys: the Column Encryption Key (CEK) and the Column Master Key (CMK). The CEK is used to encrypt the data, which is then encrypted by the CMK and stored in the column encryption key metadata in the database. The CMK is stored outside the database in a trusted key store such as Azure Key Vault, Windows Certificate Store, or Java Key Store. The database just stores metadata about where this key is. As in previous sections, by storing the CMK in a trusted key store, your customers have control of the key management, including rotation and revoking of keys.
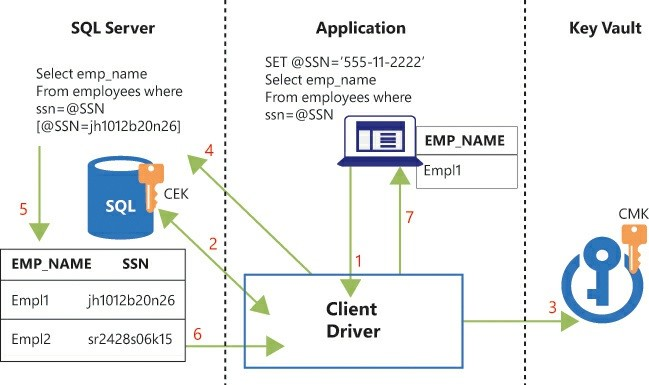
To see how this all works theoretically in an application, follow a standard select statement as shown in Figure 4-22.
In steps 4 and 5, the client library is executing the SQL statement using encrypted parameters in the where clause. The ability to do this depends on what column encryption type you select. There are two column encryption types. Here’s how they differ:
In the example, the SSN column must have been using Deterministic as its Column Encryption Type; otherwise, SQL Server would have returned an error. It’s not possible to search on a Randomized column.
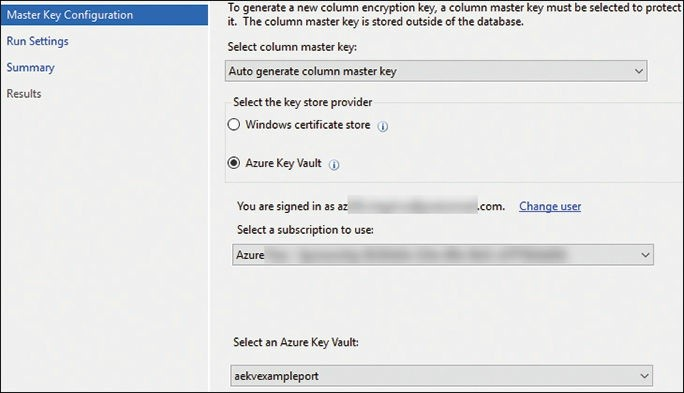
It’s time to set up a couple of encrypted columns and test this out. In this example, set up an empty key vault and a simple single Azure SQL Database with an employees table. Make this SQL Database accessible directly to your local IP on the Azure SQL Server Firewall. Use the following steps to set up Always Encrypted and encrypt two of the columns:
Note
Permissions for Creating the CMK in the Key Vault
At this point, if you’ve forgotten to set the permissions on the key vault, you see a wrapKey error, and you need to start the wizard again. The permissions required via an access-policy are create, get, list, sign, verify, wrapKey, and unwrapKey.
You can use SQL Server Management Studio to mimic an application that uses Always Encrypted by using some session settings. These settings are mandatory for an application that wants to use Always Encrypt. Follow these steps to set up the session settings and see Always Encrypt from an application perspective:
Column Encryption Setting=enabled
However, if you reconnect and don’t enable Column Encryption Setting, you can’t read the data, as you can see in Figure 4-26, and Create/Update/Delete will error.
Exam Tip
Setting up an application with the client library, connection string setting, and code changes required to use Always Encrypted is beyond the scope of this exam. However, it’s important to understand the concepts and naming conventions. It’s also useful as solution architects to see this in action and know how it can be circumvented in SSMS unless permissions to the CMK are set correctly.
Need More Review? Always Encrypted
To learn more about configuring Always Encrypted, visit the Microsoft Docs article “Always Encrypted (Database Engine)" athttps://docs.microsoft.com/en-us/sql/relationaldatabases/security/encryption/always-encrypted-database-engine. Have a good look at the limitations—not for the exam, but when designing solutions. You’ll need to keep your customers aware that a range of data types and scenarios are not catered for.
Beyond data at rest, there are further scenarios that we have not touched on so far, how to add a secure layer to data in transit, and how data in use can be secured. These are covered in the following sections, “SSL/TLS” and “Azure Confidential Compute.”
Data in transit that isn’t protected is more susceptible to attack, including session hijacking and man-in-the-middle attacks, which allows malicious users to gain access to possibly confidential data. Transport Layer Security (TLS) and Secure Sockets Layer (SSL) are both cryptographic protocols that provide data encryption and communication between servers and applications over a network, which protects the customer’s data in transit.
SSL was the predecessor to TLS. With each new version of the SSL protocol, more secure ciphers and algorithms were used; however, more and more vulnerabilities were discovered. For this reason, all SSL protocols have been deprecated by the Internet Engineering Task Force (IETF), along with TLS 1.0 and 1.1.
Note
SSL Certificates
SSL certificates and the SSL protocol are not the same thing. The SSL protocol is deprecated; SSL certificates are used by the SSL and TLS protocols. SSL and TLS certificates are the same
When recommending protocols for communication of data to customers, the current best practice is TLS 1.2, with settings for SSL to be disabled. You may be thinking, “If SSL is deprecated, why is it still available on many server configurations and often enabled by default?” The answer is backwards compatibility. Some systems still do not support SSL or even the earlier versions of TLS. For example, on a recent project, a proxy server at one customer site did not support TLS 1.2. This meant the proxy server couldn’t initiate the handshake with the Azure Application Gateway that had been configured for TLS 1.2 only. This meant traffic did not flow, and the application appeared to be down. Having configured the Application Gateway to only support TLS 1.2 as per best practice, the changes had to be backed out to TLS 1.0+.
You’ve already explored cross-premise connections using Azure VPN Gateway and Point-to-Site, Site-to-Site VPNs and ExpressRoute connections in Chapter 2, Skill 2.4 “Integrate an Azure virtual network and an onpremises network.” Each of these resources leverage SSL/TLS for private tunnels/networks between on premise and Azure. Azure SQL Database and Azure Storage also leverage SSL/TLS for communication by default. This leaves traffic over the public internet—most commonly between a browser and webserver.
Use the following steps to create an Azure Web App service deploying with an app service SSL certificate for a custom domain, checking SSL/TLS 1.0/1.1 and HTTP support and verifying the SSL configuration as secure:
Exam Tip
It’s good to know which app service tiers support custom domains and SSL bindings and which do not.
Note
Ssllabs.com/Ssltest
Ssllabs.com is a free service that analyzes the configuration of a public internet SSL web server. The resultant grade and report contain details on how to resolve SSL configuration issues, which could leave your server open to attack through vulnerabilities.
When you click OK, the custom domain is assigned to the Azure App Service, but as there is no SSL certificate for this domain, a warning displays. If you try the SSL test from step 3 with the newly assigned custom domain, the test errors because the SSL certificate doesn’t exist, and the certificate chain points to the *.azurewebsites.net certificate.
Name A name for the app service certificate will be identified as this in Azure services.
Naked Host Domain Enter the custom domain created for this walkthrough.
Certificate SKU Standard (S1) is enough for this example. Wild Card (W1) certificate is only recommended if multiple subdomain use is required.
Agree to the legal terms and click Create.
Note
Using App Service Certificate
Even though the price for the SSL certificate is given per month, the entire year will be charged to your account when you click Create.
Click Configured Required Key Vault Store; create a new vault if required.
Perform a Domain Verification by copying the Domain Verification Token displayed and creating a TXT record. Manage DNS Settings is held under App Service Domain on the App Service blade rather than Azure AD. Add a Record Set with the following details:
Name The App Service name.
Type
TTL This is the Time To Live, speeds up DNS record update for the example as it is the time until cached address expires. Set to 5 minutes.
Value Paste in the Domain Verification Token.
Click OK. It shouldn’t take more than 5 minutes for the DNS records to be updated. The domain can now be verified. Go back to App Service Certificate in the portal and select Domain Verification and verify the domain.
You can use the same process to add an App Service Domain and Certificate to secure a function app on a custom domain.
For connections coming in over the public internet, it’s also likely you will be architecting solutions to a VM Scale Set or Azure App Service, which requires load balancing or features of the Web Application Firewall (or both). These requirements require placing the application gateway in front of the app service or VM scale set. You’ve already explored the application gateway configuration settings in Chapter 2, Skill 2.3 “Implement application load balancing,” but let’s take a look at the SSL/TLS options:
On the Configuration section of Create An Application Gateway,select to add a Routing rule.
Enter the Listener name. This should be appropriate to the route—in this case, SSL termination.
Select Public for the Frontend IP, A Protocol of HTTPS, and a Portof 443.
Upload the PFX certificate from your local machine. Note thedomains must match, or it should be a wildcard subdomain certificate. Enter an appropriate name for the certificate and the password used when you created the private key.
Leave the Listener type as basic for a single site. Click Add to addthe route.
Exam Tip
Understanding that Application Gateway provides SSL termination, and knowing how to configure this on an existing app gateway is useful.
It’s also possible to use a key vault certificate (in preview) if you’re using an application gateway V2 SKU. This uses a managed identity to access and assign the certificate from the key vault.
When data is in use, it is often required to be plaintext, or “in the clear,” while loaded in memory. It’s often a requirement for processing to happen efficiently. During this time the data is susceptible to attack from malicious power users, hackers, malicious software, or anyone (or anything) that could get access to read a server’s memory. Your customers may have sensitive data, such as financial and medical information, that may require protection during processing in memory. This is particularly problematic in the cloud, where the customer may have less control over the underlying operating system and no control over the security of the hardware. Architects need to be able to advise a technology to address this requirement.
This is where Azure Confidential Compute comes in. It uses Trusted Execution Environments (TEE) to protect data and code while an application is running. Figure 4-28 shows a high-level overview of how TEEs work:
A TEE can be at the hardware or software (hypervisor) level. In hardware, it’s part of the CPU instruction set. A TEE implementation gives an application the possibility to execute sections of code within a protected area called an enclave. The enclave pretty much acts like a bubble, protecting the application from the host machine. As you can see from Figure 4-28, even the operating system cannot penetrate the bubble to access or tamper with the program or code. In the diagram, the TEE has created two enclaves. Enclave 1 is expanded just to show it has code and data within it.
An enclave has a trust relationship to a host application. Going back to Figure 4-28, only Host App 1 can access Enclave 1, and Host App 2 can access only Enclave 2. This trust relationship uses attestation, a protocol that ensures the code in the enclave is signed and trusted before sending protected data. The two enclaves have no visibility with each other; they can’t access the other’s data or code. This opens the possibility of running multiple workloads with different sources of protected data all on one server without compromising data security.
You may not have realized it, but it’s likely you’ve encountered TEE/Enclave technology already on your smartphone, especially if it’s storing your fingerprint/facial recognition (biometric data) for phone or app access. Use cases that can be fulfilled currently within Azure are DC-series VMs running Open Enclave SDK, TEE enabled applications.
SQL Server (2019+ IaaS) Always Encrypted with secure enclaves running on a DC-series VM. (Brings complex SQL searching, not currently available in Azure SQL.) Multi-source machine learning.
Confidential Consortium Blockchain, running the COCO framework.
This is an expanding area; future use cases will include IOT Edge for processing sensitive data before aggregating to the cloud.
Exam Tip
Setting up an application to use Confidential Compute via Open Enclave SDK is beyond the scope of the exam. However, understanding the basic concepts and potential use cases will be beneficial.
To complete this section, follow these steps to provision a Ubuntu DCseries VM ready for confidential computing:
Image Select a Ubuntu or Windows 2016 Datacenter image as required. For this example, select Ubuntu.
Include Open Enclave SDK Select yes to have this installed for you; however, it can be installed later.
Resource Group Must be an empty resource group.
Location Must be one of the regions listed at the top of the blade.
sysadmin@accsvmexample:/$ cd /opt/openenclave
sysadmin@accsvmexample:/opt/openenclave$
Need More Review?
Confidential Computing
To learn more about Confidential Computing, visit the Solutions Overview “Azure confidential computing” at
https://azure.microsoft.com/en-gb/solutions/confidential-compute. A further excellent resource is at https://azure.microsoft.com/engb/blog/azure-confidential-computing.
Windows-Integrated Authentication in a legacy application will leverage NTLM or Kerberos for SSO. In the cloud, this is accomplished using AD Connect and the single sign-on feature. AD Connect and single-sign on requires password or pass-through synchronization to be used. Microsoft recommends using conditional access policies for Multi-Factor Authentication using Azure AD.
App-to-API and API-to-API security via OAuth authorization can be configured in the client application or using Azure API Management. The flow used is dependent on use case to determine how to retrieve the access token. OAuth 2.0 uses authorization and access tokens in the form of JSON Web Tokens (JWTs). JWTs should be validated; in API Management, you should use validate-jwt.
Managed identities allow you to authenticate against services in Azure without having to use credentials or certificates.
Authentication is performed through Azure AD. When a managed identity is created, a service principle is automatically created, registered against the Azure AD, and trusted. System-managed identities exist for the lifetime of a resource. User-managed identities can be reused on multiple resources.
When enabling an identity on an app service/function app, the environment variables MSI_SECRET and MSI_ENDPOINT are created so that an access token can be obtained for use on a resource. VMs use the Azure Instance Metadata Service Endpoint to obtain an access token for use on a resource. This endpoint is only accessible from inside the VM.
To secure secrets, keys, and certificates, use Key Vault. If you need
HSM-backed keys for FIPS compliance, you need the premium tier.
Microsoft can’t read the keys, secrets, or certificates in your vault.
The key vault APIs can be called directly or via wrappers using Azure portal, PowerShell, CLI, and code libraries. Key vaults should be protected from deletion by mistake.
Storage Service Encryption (SSE) is data encryption at rest for Azure Storage. System-managed keys support all services; customermanaged keys are for blobs and files. Managed disks are automatically encrypted by SSE and do not support BYOK. Unmanaged disks must use BYOK. Azure security center flags unencrypted, unmanaged disks as a risk.
Azure SQL supports encryption at rest by Transparent Data
Encryption (TDE) and column-level encryption with Always Encrypted. Both technologies support BYOK. Always Encrypted requires code changes in the application; TDE does not.
SSL is the predecessor to TLS. Both are protocols that enable encrypted transmission of data. TLS is the current best practice minimum to support. SSL protocols should be disabled. Application gateway supports SSL Termination (Offloading). Communication with the application gateway is over SSL, but on termination the communication between the application gateway and background services is not encrypted.
In this thought experiment, demonstrate your skills and knowledge of the topics covered in this chapter. You can find answers to this thought experiment in the next section.
You have been hired as a consultant solutions architect by Contoso Stocks, a company managing investment portfolios. Contoso Stocks have decided to move their in-house software from an on-premises data center to Azure. Business and integration analysis of the current offering has identified the following key requirements:
Transactional data and user financial data (including bank details) are stored in a SQL Server 2012 Standard Edition database.
A front-end web application installed on a virtual machine uses HTML forms to authenticate using Windows Authentication (NTLM) against a single AD. The current implementation is Single Sign-On.
The front-end web application is ASP.Net running on IIS 7 on a Windows 2012 Server. It isn’t published beyond the firewall, so it isn’t deemed worth securing.
A back-end VM runs a bespoke mathematical algorithm to forecast portfolio growth and feedback into the portfolios on the SQL Database. This is Contoso Stock’s own IP and major value add offering. The VM stores data locally to learn from historically after every run.
Current Azure/Cloud services being used are that all users are running Office 365 with AD Connect synchronizing domain users.
Contoso Stock leadership and SecOps requirements include the following:
All data should be encrypted at rest.
Data transmitted between users and the Web API should be encrypted.
Application administrators need to provide extra security for authentication when not in one of the organization’s offices.
Bank details should not be visible to developers or SQL DBAs at any time.
SecOps require any encryption keys or secrets to be rotated regularly
for compliance.
SecOps would like to see the current hard-coded database, VM, and storage account credentials removed and stored securely.
SecOps don’t allow password hashes from Windows AD to be stored in the cloud.
The preference is to keep Single Sign-On if possible; however, the app must secure using the Windows AD credentials.
It’s desirable to rearchitect the app away from IIS on a VM. However, it’s not possible to make code changes to the mathematical algorithm on the VM until they’re ready to leverage Machine Learning in Azure.
With this information in mind, please answer the following questions:
This section contains the solution to the thought experiment. Each answer explains why the answer choice is correct.
The personally identifiable information in the Azure SQL Database includes bank details. To secure this information from possibly malicious employees, you would recommend using Always Encrypted and encrypt the financial information columns. This requires code changes within the web app; however, code changes on the web app were marked as acceptable. You should recommend these changes happen as a rearchitecture to an Azure Web App.
The data on the VM must also be encrypted at rest. As the VM stores historical financial information, you should be recommending that Contoso Stocks rotate encryption keys. The application code on the VM can’t be altered at this stage; therefore, the recommendation to migrate this VM would be “lift and shift,” utilizing unmanaged disks. By recommending unmanaged disks, Contoso Stocks can encrypt the VM disks with a customer-managed key and Azure Disk Encryption.
Further encryption mechanisms on the VM cannot be used as they require code changes to implement.
Managed identities should be recommended for use on the VM and rearchitected Azure Web App. This will remove the necessity for credentials to be hard-coded, with access to these secrets granted to each Identity through Access Policies.
have already been synchronized for use in Azure. You should recommend that Contoso Stocks review the AD Connect settings to ensure that the Single Sign-On and Pass-Through Authentication are the chosen settings. This will satisfy the requirement of no password hashes in the cloud from Windows AD and to keep Single Sign-On where possible.
The second part of this solution is for application administrators to provide further credentials when logging in from outside the offices. Your recommendation for this should be to upgrade Azure AD to a premium tier and implement location conditional access to an administrative Azure AD group created for this application.
Always be aware there will often be more information given in the requirements than needed to answer use-case style questions.

Top Training Courses


 Training Course")


 Training Course")


LIMITED OFFER: GET 30% Discount
This is ONE TIME OFFER

A confirmation link will be sent to this email address to verify your login. *We value your privacy. We will not rent or sell your email address.
Download Free Demo of VCE Exam Simulator
Experience Avanset VCE Exam Simulator for yourself.
Simply submit your e-mail address below to get started with our interactive software demo of your free trial.
