


Use VCE Exam Simulator to open VCE files

OCP exam objectives covered in this chapter:
Understanding Modules
Since Java 9, packages can be grouped into modules. In this chapter, we will explain the purpose of modules and how to build your own. We will also show how to run them and how to discover existing modules. This book only covers the basics of modules that you need to know for the 1Z0-815 exam.
We’ve made the code in this chapter available online. Since it can be tedious to create the directory structure, this will save you some time. Additionally, the commands need to be exactly right, so we’ve included those online so you can copy and paste them and compare them with what you typed. Both are available in the resources section of the online test bank and in our GitHub repo linked to from:
https://www.selikoff.net/ocp11-1/
When writing code for the exam, you generally see small classes. After all, exam questions have to fit on a single screen! When you work on real programs, they are much bigger. A real project will consist of hundreds or thousands of classes grouped into packages. These packages are grouped into Java archive (JAR) files. A JAR is a zip file with some extra information, and the extension is .jar.
In addition to code written by your team, most applications also use code written by others. Open source is software with the code supplied and is often free to use. Java has a vibrant open-source software (OSS) community, and those libraries are also supplied as JAR files. For example, there are libraries to read files, connect to a database, and much more.
Some open source projects even depend on functionality in other open source projects. For example, Spring is a commonly used framework, and JUnit is a commonly used testing library. To use either, you need to make sure you had compatible versions of all the relevant JARs available at runtime. This complex chain of dependencies and minimum versions is often referred to by the community as JAR hell. Hell is an excellent way of describing the wrong version of a class being loaded or even a ClassNotFoundException at runtime.
The Java Platform Module System (JPMS) was introduced in Java 9 to group code at a higher level and tries to solve the problems that Java has been plagued with since the beginning. The main purpose of a module is to provide groups of related packages to offer a particular set of functionality to developers. It’s like a JAR file except a developer chooses which packages are accessible outside the module. Let’s look at what modules are and what problems they are designed to solve.
The Java Platform Module System includes the following:
In Chapter 1, “Welcome to Java,” we had a small Zoo application. It had only one class and just printed out one thing. Now imagine we had a whole staff of programmers and were automating the operations of the zoo. There are many things that need to be coded including the interactions with the animals, visitors, the public website, and outreach.
A module is a group of one or more packages plus a special file called module-info .java. Figure 11.1 lists just a few of the modules a zoo might need. We decided to focus on the animal interactions in our example. The full zoo could easily have a dozen modules. In Figure 11.1 , notice that there are arrows between many of the modules. These represent dependencies where one module relies on code in another. The staff needs to feed the animals to keep their jobs. The line from zoo.staff to zoo.animal.feeding shows the former depends on the latter.
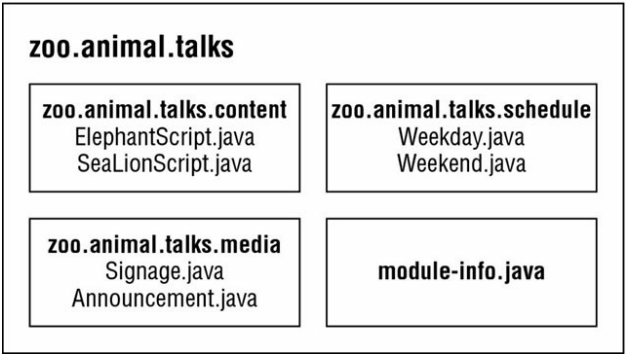
Now let’s drill down into one of these modules. Figure 11.2 shows what is inside the zoo.animals.talks module. There are three packages with two classes each. (It’s a small zoo.) There is also a strange file called module-info.java. This file is required to be inside all modules. We will explain this in more detail later in the chapter.
Modules look like another layer of things you need to know in order to program. While using modules is optional, it is important to understand the problems they are designed to solve. Besides, knowing why modules are useful is required for the exam!
In Chapter 7, “Methods and Encapsulation,” you saw the traditional four levels of access control available in Java 8: private, packageprivate, protected, and public access. These levels of access control allowed you to restrict access to a certain class or package. You could even allow access to subclasses without exposing them to the world.
However, what if we wrote some complex logic that we wanted to restrict to just some packages? For example, we would like the packages in the zoo.animal.talks module to just be available to the packages in the zoo.staff module without making them available to any other code. Our traditional access modifiers cannot handle this scenario.
Developers would resort to hacks like naming a package zoo.animal.internal. That didn’t work, though, because other developers could still call the “internal” code. There was a class named sun.misc.Unsafe, and it got used in places. And that class had Unsafe in the name. Clearly, relying on naming conventions was insufficient at preventing developers from calling it in the past.
Modules solve this problem by acting as a fifth level of access control. They can expose packages within the modular JAR to specific other packages. This stronger form of encapsulation really does create internal packages. You’ll see how to code it when we talk about the module-info.java file later in this chapter.
It is common for libraries to depend on other libraries. For example, the JUnit 4 testing library depends on the Hamcrest library for matching logic. Developers would have to find this out by reading the documentation or files in the project itself.
If you forgot to include Hamcrest in your classpath, your code would run fine until you used a Hamcrest class. Then it would blow up at runtime with a message about not finding a required class. (We did mention JAR hell, right?)
In a fully modular environment, each of the open source projects would specify their dependencies in the module-info.java file. When launching the program, Java would complain that Hamcrest isn’t in the module path and you’d know right away.
The Java Development Kit (JDK) is larger than 150 MB. Even the Java Runtime Environment (JRE) was pretty big when it was available as a separate download. In the past, Java attempted to solve this with a compact profile. The three compact profiles provided a subset of the built-in Java classes so there would be a smaller package for mobile and embedded devices.
However, the compact profiles lacked flexibility. Many packages were included that developers were unlikely to use, such as Java Native Interface (JNI), which is for working with OS-specific programs. At the same time, using other packages like Image I/O required the full JRE.
The Java Platform Module System allows developers to specify what modules they actually need. This makes it possible to create a smaller runtime image that is customized to what the application needs and nothing more. Users can run that image without having Java installed at all.
A tool called jlink is used to create this runtime image. Luckily, you only need to know that custom smaller runtimes are possible. How to create them is out of scope for the exam.
In addition to the smaller scale package, this approach improves security. If you don’t use AWT and a security vulnerability is reported for AWT, applications that packaged a runtime image without AWT aren’t affected.
Since Java now knows which modules are required, it only needs to look at those at class loading time. This improves startup time for big programs and requires less memory to run.
While these benefits may not seem significant for the small programs we’ve been writing, they are far more important for big applications. A web application can easily take a minute to start. Additionally, for some financial applications, every millisecond of performance is important.
Another manifestation of JAR hell is when the same package is in two JARs. There are a number of causes of this problem including renaming JARs, clever developers using a package name that is already taken, and having two versions of the same JAR on the classpath.
The Java Platform Module System prevents this scenario. A package is only allowed to be supplied by one module. No more unpleasant surprises about a package at runtime.
Modules for Existing Code
While there are many benefits of using modules, there is also significant work for an existing large application to switch over. In particular, it is common for applications to be on old open source libraries that do not have module support. The bill for all that technical debt comes due when making the switch to modules.
While not all open source projects have switched over, more than 4000 have. There’s a list of all Java modules on GitHub at https://github.com/sormuras/modules/blob/master/README.md.
The 1Z0-816 exam covers some strategies for migrating existing applications to modules. For now, just beware that the 1Z0-815 exam covers just the simplest use cases for modules.
In this section, we will create, build, and run the zoo.animal.feeding module. We chose this one to start with because all the other modules depend on it. Figure 11.3 shows the design of this module. In addition to the module-info.java file, it has one package with one class inside.
In the next sections, we will create, compile, run, and package the zoo.animal.feeding module.
First we have a really simple class that prints one line in a main() method. We know, that’s not much of an implementation. All those programmers we hired can fill it in with business logic. In this book, we will focus on what you need to know for the exam. So, let’s create a simple class.
package zoo.animal.feeding;
public class Task {
  public static void main(String...args) {
    System.out.println("All fed!");
  }
}
Next comes the module-info.java file. This is the simplest possible one.
module zoo.animal.feeding {
}
There are a few key differences between a module-info file and a regular Java class:
That’s a lot of rules for the simplest possible file. There will be many more rules when we flesh out this file later in the chapter.
Can a module-info.java File Be Empty?
Yes. As a bit of trivia, it was legal to compile any empty file with a .java extension even before modules. The compiler sees there isn’t a class in there and exits without creating a .class file.
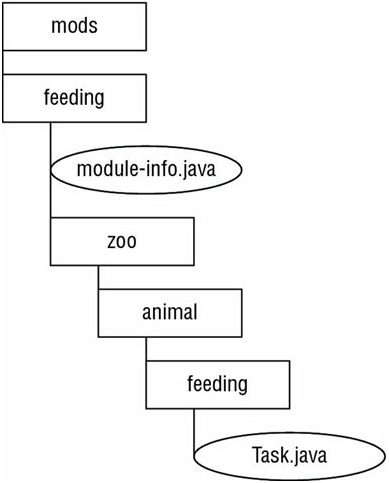
The next step is to make sure the files are in the right directory structure. Figure 11.4 shows the expected directory structure.
In particular, feeding is the module directory, and the module-info file is directly under it. Just as with a regular JAR file, we also have the zoo.animal.feeding package with one subfolder per portion of the name. The Task class is in the appropriate subfolder for its package.
Also, note that we created a directory called mods at the same level as the module. We will use it for storing the module artifacts a little later in the chapter. This directory can be named anything, but mods is a common name. If you are following along with the online code example, note that the mods directory is not included, because it is empty.
Before we can run modular code, we need to compile it. Other than the module-path option, this code should look familiar from Chapter 1:
javac --module-path mods
  -d feeding
  feeding/zoo/animal/feeding/*.java
  feeding/module-info.java
NOTE
When you’re entering commands at the command line, they should be typed all on one line. We use line breaks in the book to make the commands easier to read and study. If you wanted to use multiple lines at the command prompt, the approach varies by operating system. Linux uses a backslash () as the line break.
As a review, the -d option specifies the directory to place the class files in. The end of the command is a list of the .java files to compile. You can list the files individually or use a wildcard for all .java files in a subdirectory.
The new part is the module-path. This option indicates the location of any custom module files. In this example, module-path could have been omitted since there are no dependencies. You can think of module-path as replacing the classpath option when you are working on a modular program.
What Happened to the Classpath?
In the past, you would reference JAR files using the classpath option. It had three possible forms: -cp, -class-path, and - classpath. You can still use these options in Java 11. In fact, it is common to do so when writing nonmodular programs.
Just like classpath, you can use an abbreviation in the command. The syntax --module-path and -p are equivalent. That means we could have written many other commands in place of the previous command. The following four commands show the -p option:
javac -p mods
  -d feeding
  feeding/zoo/animal/feeding/*.java
  feeding/*.java

javac -p mods
  -d feeding
  feeding/zoo/animal/feeding/*.java
  feeding/module-info.java

javac -p mods
  -d feeding
  feeding/zoo/animal/feeding/Task.java
  feeding/module-info.java

javac -p mods
  -d feeding
  feeding/zoo/animal/feeding/Task.java
  feeding/*.java
While you can use whichever you like best, be sure that you can recognize all valid forms for the exam. Table 11.1 lists the options you need to know well when compiling modules. There are many more options you can pass to the javac command, but these are the ones you can expect to be tested on
Building Modules
Even before modules, it was rare to run javac and java commands manually on a real project. They get long and complicated very quickly. Most developers use a build tool such as Maven or Gradle. These build tools suggest directories to place the class files like target/classes.
With modules, there is even more typing to run these commands by hand. After all, with modules, you are using more directories by definition. This means that it is likely the only time you need to know the syntax of these commands is when you take the exam. The concepts themselves are useful regardless.
Do be sure to memorize the module command syntax. You will be tested on it on the exam. We will be sure to give you lots of practice questions on the syntax to reinforce it.
Before we package our module, we should make sure it works by running it. To do that, we need to learn the full syntax. Suppose there is a module named book.module. Inside that module is a package namedwhich has a class named OCP with a main() method. Figure 11.5 shows the syntax for running a module. It is important to remember that you specify the module name followed by a slash (/) followed by the fully qualified class name.
Now that we’ve seen the syntax, we can write the command to run the Task class in the zoo.animal.feeding package. In the following example, the package name and module name are the same. It is common for the module name to match either the full package name or the beginning of it.
java --module-path feeding
  --module zoo.animal.feeding/zoo.animal.feeding.Task
Since you already saw that --module-path uses the short form of -p, we bet you won’t be surprised to learn there is a short form of --module as well. The short option is -m. That means the following command is equivalent:
java -p feeding
  -m zoo.animal.feeding/zoo.animal.feeding.Task
In these examples, we used feeding as the module path because that’s where we compiled the code. This will change once we package the module and run that.
Table 11.2 lists the options you need to know for the java command.
A module isn’t much use if we can run it only in the folder it was created in. Our next step is to package it. Be sure to create a mods directory before running this command:
jar -cvf mods/zoo.animal.feeding.jar -C feeding/ .
There’s nothing module-specific here. In fact, you might remember seeing this command in Chapter 1. We are packaging everything under the feeding directory and storing it in a JAR file named zoo.animal.feeding.jar under the mods folder. This represents how the module JAR will look to other code that wants to use it.
NOTE
It is possible to version your module using the --moduleversion option. This isn’t on the exam but is good to do when you are ready to share your module with others.
Now let’s run the program again, but this time using the mods directory instead of the loose classes:
java -p mods
  -m zoo.animal.feeding/zoo.animal.feeding.Task
You might notice that this command looks identical to the one in the previous section except for the directory. In the previous example, it was feeding. In this one, it is the module path of mods. Since the module path is used, a module JAR is being run.
Figure 11.6 shows what the directory structure looks like now that we’ve compiled and packaged the code.
Now that our zoo.animal.feeding module is solid, we can start thinking about our other modules. As you can see in Figure 11.7, all three of the other modules in our system depend on the zoo.animal.feeding module.
Since we will be having our other modules call code in the zoo.animal.feeding package, we need to declare this intent in the module-info file.
The exports keyword is used to indicate that a module intends for those packages to be used by Java code outside the module. As you might expect, without an exports keyword, the module is only available to be run from the command line on its own. In the following example, we export one package:
module zoo.animal.feeding {
  exports zoo.animal.feeding;
}
Recompiling and repackaging the module will update the module-info inside our zoo.animals.feeding.jar file. These are the same javac and jar commands you ran previously.
javac -p mods
  -d feeding
  feeding/zoo/animal/feeding/*.java
  feeding/module-info.java

jar -cvf mods/zoo.animal.feeding.jar -C feeding/ .
Next, let’s create the zoo.animal.care module. This time, we are going to have two packages. The zoo.animal.care.medical package will have the classes and methods that are intended for use by other modules. The zoo.animal.care.details package is only going to be used by this module. It will not be exported from the module. Think of it as healthcare privacy for the animals.
Figure 11.8 shows the contents of this module. Remember that all modules must have a module-info file.
The module contains two basic packages and classes in addition to the module-info.java file:
// HippoBirthday.java
package zoo.animal.care.details;
import zoo.animal.feeding.*;
public class HippoBirthday {
  private Task task;
}

// Diet.java
package zoo.animal.care.medical;
public class Diet { }
This time the module-info.java file specifies three things.
1: module zoo.animal.care {
2:   exports zoo.animal.care.medical;
3:   requires zoo.animal.feeding;
4: }
Line 1 specifies the name of the module. Line 2 lists the package we are exporting so it can be used by other modules. So far, this is similar to the zoo.animal.feeding module.
On line 3, we see a new keyword. The requires statement specifies that a module is needed. The zoo.animal.care module depends on the zoo.animal.feeding module.
Next we need to figure out the directory structure. We will create two packages. The first is zoo.animal.care.details and contains one class named HippoBirthday. The second is zoo.animal.care.medical and contains one class named Diet. Try to draw the directory structure on paper or create it on your computer. If you are trying to run these examples without using the online code, just create classes without variables or methods for everything except the module-info.java files.
Figure 11.9 shows the directory structure of this module. Note that module-info.java is in the root of the module. The two packages are underneath it.
You might have noticed that the packages begin with the same prefix as the module name. This is intentional. You can think of it as if the module name “claims” the matching package and all subpackages.
To review, we now compile and package the module:
javac -p mods
  -d care
  care/zoo/animal/care/details/*.java
  care/zoo/animal/care/medical/*.java
  care/module-info.java
We compile both packages and the module-info file. In the real world, you’ll use a build tool rather than doing this by hand. For the exam, you just list all the packages and/or files you want to compile.
Order Matters!
Note that order matters when compiling a module. Suppose we list the module-info file first when trying to compile:
javac -p mods
  -d care
  care/module-info.java
  care/zoo/animal/care/details/*.java
  care/zoo/animal/care/medical/*.java
The compiler complains that it doesn’t know anything about the package zoo.animal.care.medical.
care/module-info.java:3: error: package is empty or does not
exist: zoo.animal.care.medical
exports zoo.animal.care.medical;
A package must have at least one class in it in order to be exported. Since we haven’t yet compiled zoo.animal.care.medical.Diet, the compiler acts as if it doesn’t exist. If you get this error message, you can reorder the javac statement. Alternatively, you can compile the packages in a separate javac command, before compiling the module-info file.
Now that we have compiled code, it’s time to create the module JAR:
jar -cvf mods/zoo.animal.care.jar -C care/ .
So far, we’ve used only one exports and requires statement in a module. Now you’ll learn how to handle exporting multiple packages or requiring multiple modules. In Figure 11.10, observe that the zoo.animal.talks module depends on two modules: zoo.animal.feeding and zoo.animal.care. This means that there must be two requires statements in the module-info.java file.
Figure 11.11 shows the contents of this module. We are going to export all three packages in this module.
First let’s look at the module-info.java file for zoo.animal.talks:
1: module zoo.animal.talks {
2:   exports zoo.animal.talks.content;
3:   exports zoo.animal.talks.media;
4:   exports zoo.animal.talks.schedule;
5:
6:   requires zoo.animal.feeding;
7:   requires zoo.animal.care;
8: }
Line 1 shows the module name. Lines 2-4 allow other modules to reference all three packages. Lines 6-7 specify the two modules that this module depends on.
Then we have the six classes, as shown here:
// ElephantScript.java
package zoo.animal.talks.content;
public class ElephantScript { }

// SeaLionScript.java
package zoo.animal.talks.content;
public class SeaLionScript { }

// Announcement.java
package zoo.animal.talks.media;
public class Announcement {
  public static void main(String[] args) {
    System.out.println("We will be having talks");
  }
}

// Signage.java
package zoo.animal.talks.media;
public class Signage { }

// Weekday.java
package zoo.animal.talks.schedule;
public class Weekday { }

// Weekend.java
package zoo.animal.talks.schedule;
public class Weekend {}
If you are still following along on your computer, create empty classes in the packages. The following are the commands to compile and build the module:
javac -p mods
  -d talks
  talks/zoo/animal/talks/content/*.java
  talks/zoo/animal/talks/media/*.java
  talks/zoo/animal/talks/schedule/*.java
  talks/module-info.java

jar -cvf mods/zoo.animal.talks.jar -C talks/ .
Our final module is zoo.staff. Figure 11.12 shows there is only one package inside. We will not be exposing this package outside the module.
Based on this information, do you know what should go in the moduleinfo?
module zoo.staff {
  requires zoo.animal.feeding;
  requires zoo.animal.care;
  requires zoo.animal.talks;
}
There are three arrows in Figure 11.13 pointing from zoo.staff to other modules. These represent the three modules that are required. Since no packages are to be exposed from zoo.staff, there are no exports statements.
In this module, we have a single class in file Jobs.java:
package zoo.staff;
public class Jobs { }
For those of you following along on your computer, create an empty class in the package. The following are the commands to compile and build the module:
javac -p mods
  -d staff
  staff/zoo/staff/*.java
  staff/module-info.java

jar -cvf mods/zoo.staff.jar -C staff/ .
Now that we’ve successfully created modules, we can learn more about the module-info file. In these sections, we will look at exports, requires, provides, uses, and opens. Now would be a good time to mention that these keywords can appear in any order in the moduleinfo file.
Are exports and requires Keywords?
In Chapter 2, “Java Building Blocks,” we provided a list of keywords. However, exports wasn’t on that list. Nor was module or requires or any of the other special words in a module-info file.
Java is a bit sneaky here. These “keywords” are only keywords inside a module-info .java file. In other files, like classes and interfaces, you are free to name your variable exports. These special keywords are called directives.
Backward compatibility is really important to the Java language designers so they don’t want to risk preventing existing code from compiling just to introduce new global keywords. However, the module file type is new. Since there are no legacy module files, it is safe to introduce new keywords in that context.
We’ve already seen how exports packageName exports a package to other modules. It’s also possible to export a package to a specific module. Suppose the zoo decides that only staff members should have access to the talks. We could update the module declaration as follows:
module zoo.animal.talks {
  exports zoo.animal.talks.content to zoo.animal.staff;
  exports zoo.animal.talks.media;
  exports zoo.animal.talks.schedule;
  requires zoo.animal.feeding;
  requires zoo.animal.care;
}
From the zoo.animal.staff module, nothing has changed. However, no other modules would be allowed to access that package.
You might have noticed that none of our other modules requires zoo.animal.talks in the first place. However, we don’t know what other modules will exist in the future. It is important to consider future use when designing modules. Since we want only the one module to have access, we only allow access for that module.
Exported Types
We’ve been talking about exporting a package. But what does that mean exactly? All public classes, interfaces, and enums are exported. Further, any public and protected fields and methods in those files are visible.
Fields and methods that are private are not visible because they are not accessible outside the class. Similarly, package-private fields and methods are not visible because they are not accessible outside the package.
The exports keyword essentially gives us more levels of access control. Table 11.3 lists the full access control options.
As you saw earlier in this chapter, requires moduleName specifies that the current module depends on moduleName. There’s also a requires transitive moduleName, which means that any module that requires this module will also depend on moduleName.
Well, that was a mouthful. Let’s look at an example. Figure 11.14 shows the modules with dashed lines for the redundant relationships and solid lines for relationships specified in the module-info. This shows how the module relationships would look if we were to only use transitive dependencies.
For example, zoo.animals.talks depends on zoo.animals.care, which depends on zoo.animals.feeding. That means the arrow between zoo.animals.talks and zoo.animals.feeding no longer appears in Figure 11.14.
Now let’s look at the four module-info files. The first module remains unchanged. We are exporting one package to any packages that use the module.
module zoo.animal.feeding {
  exports zoo.animal.feeding;
}
The zoo.animal.care module is the first opportunity to improve things. Rather than forcing all remaining modules to explicitly specify zoo.animal.feeding, the code uses requires transitive.
module zoo.animal.care {
  exports zoo.animal.care.medical;
  requires transitive zoo.animal.feeding;
}
In the zoo.animal.talks module, we make a similar change and don’t force other modules to specify zoo.animal.care. We also no longer need to specify zoo.animal.feeding, so that line is commented out.
module zoo.animal.talks {
  exports zoo.animal.talks.content to zoo.animal.staff;
  exports zoo.animal.talks.media;
  exports zoo.animal.talks.schedule;
  // no longer needed requires zoo.animal.feeding;
  // no longer needed requires zoo.animal.care;
  requires transitive zoo.animal.care;
}
Finally, in the zoo.staff module, we can get rid of two requires statements.
module zoo.staff {
  // no longer needed requires zoo.animal.feeding;
  // no longer needed requires zoo.animal.care;
  requires zoo.animal.talks;
}
The more modules you have, the more benefits of requires transitive compound. It is also more convenient for the caller. If you were trying to work with this zoo, you could just require zoo.staff and have the remaining dependencies automatically inferred.
Given our newly updated module-info files and using Figure 11.14, what is the effect of applying the transitive modifier to the requires statement in our zoo.animal.care module? Applying the transitive modifiers has the following effect:
These rules hold even if the zoo.animal.care and zoo.animal.talks modules do not explicitly reference any packages in the zoo.animal.feeding module. On the other hand, without the transitive modifier in our module-info file of zoo.animal.care, the other modules would have to explicitly use requires in order to reference any packages in the zoo.animal.feeding module.
One place the exam might try to trick you is mixing requires and requires transitive together. Can you think of a reason this code doesn’t compile?
module bad.module {
  requires zoo.animal.talks;
  requires transitive zoo.animal.talks;
}
Java doesn’t allow you to repeat the same module in a requires clause. It is redundant and most like an error in coding. Keep in mind that requires transitive is like requires plus some extra behavior.
For the remaining three keywords (provides, uses, and opens), you only need to be aware they exist rather than understanding them in detail for the 1Z0-815 exam.
The provides keyword specifies that a class provides an implementation of a service. The topic of services is covered on the 1Z0-816 exam, so for now, you can just think of a service as a fancy interface. To use it, you supply the API and class name that implements the API:
provides zoo.staff.ZooApi with zoo.staff.ZooImpl
The uses keyword specifies that a module is relying on a service. To code it, you supply the API you want to call:
uses zoo.staff.ZooApi
Java allows callers to inspect and call code at runtime with a technique called reflection. This is a powerful approach that allows calling code that might not be available at compile time. It can even be used to subvert access control! Don’t worry-you don’t need to know how to write code using reflection for the exam.
Since reflection can be dangerous, the module system requires developers to explicitly allow reflection in the module-info if they want calling modules to be allowed to use it. Here are two examples:
opens zoo.animal.talks.schedule;
opens zoo.animal.talks.media to zoo.staff;
The first example allows any module using this one to use reflection. The second example only gives that privilege to the zoo.staff package.
So far, we’ve been working with modules that we wrote. Since Java 9, the classes built into the JDK were modularized as well. In this section, we will show you how to use commands to learn about modules.
You do not need to know the output of the commands in this section. You do, however, need to know the syntax of the commands and what they do. We include the output where it facilitates remembering what is going on. But you don’t need to memorize that (which frees up more space in your head to memorize command-line options).
The java command has three module-related options. One describes a module, another lists the available modules, and the third shows the module resolution logic.
NOTE
It is also possible to add modules, exports, and more at the command line. But please don’t. It’s confusing and hard to maintain. Note these flags are available on java, but not all commands.
Suppose you are given the zoo.animal.feeding module JAR file and want to know about its module structure. You could “unjar” it and open the module-info file. This would show you that the module exports one package and doesn’t require any modules.
module zoo.animal.feeding {
  exports zoo.animal.feeding;
}
However, there is an easier way. The java command now has an option to describe a module. The following two commands are equivalent:
java -p mods
  -d zoo.animal.feeding
java -p mods
  --describe-module zoo.animal.feeding
Each prints information about the module. For example, it might print this:
zoo.animal.feeding
file:///absolutePath/mods/zoo.animal.feeding.jar
exports zoo.animal.feeding
requires java.base mandated
The first line is the module we asked about: zoo.animal.feeding. The second line starts information about the module. In our case, it is the same package exports statement we had in the module-info file.
On the third line, we see requires java.base mandated. Now wait a minute. The module-info file very clearly does not specify any modules that zoo.animal.feeding has as dependencies.
The java.base module is special. It is automatically added as a dependency to all modules. This module has frequently used packages like java.util. That’s what the mandated is about. You get java.base whether you asked for it or not.
In classes, the java.lang package is automatically imported whether you type it or not. The java.base module works the same way. It is automatically available to all other modules.
More About Describing Modules
You only need to know how to run --describe-module for the exam. However, you might encounter some surprises when experimenting with this feature, so we describe them in a bit more detail here.
As a reminder, the following are the contents of module-info in zoo.animal.care:
module zoo.animal.care {
  exports zoo.animal.care.medical to zoo.staff;
  requires transitive zoo.animal.feeding;
}
Now we have the command to describe the module and the output
java -p mods -d zoo.animal.care

zoo.animal.care file:///absolutePath/mods/zoo.animal.care.jar
requires zoo.animal.feeding transitive
requires java.base mandated
qualified exports zoo.animal.care.medical to zoo.staff
contains zoo.animal.care.details
The first line of the output is the absolute path of the module file. The two requires lines should look familiar as well. The first is in the module-info, and the other is added to all modules. Next comes something new. The qualified exports is the full name of exporting to a specific module.
Finally, the contains means that there is a package in the module that is not exported at all. This is true. Our module has two packages, and one is available only to code inside the module.
In addition to describing modules, you can use the java command to list the modules that are available. The simplest form lists the modules that are part of the JDK:
java --list-modules
When we ran it, the output went on for 70 lines and looked like this:
java.base@11.0.2
java.compiler@11.0.2
java.datatransfer@11.0.2
This is a listing of all the modules that come with Java and their version numbers. You can tell that we were using Java 11.0.2 when testing this example.
More interestingly, you can use this command with custom code. Let’s try again with the directory containing our zoo modules.
java -p mods --list-modules
How many lines do you expect to be in the output this time? There are 74 lines now: the 70 built-in modules plus the four in our zoo system. The custom lines look like this:
zoo.animal.care file:///absolutePath/mods/zoo.animal.care.jar
zoo.animal.feeding
file:///absolutePath/mods/zoo.animal.feeding.jar
zoo.animal.talks file:///absolutePath/mods/zoo.animal.talks.jar
zoo.staff file:///absolutePath/mods/zoo.staff.jar
Since these are custom modules, we get a location on the file system. If the project had a module version number, it would have both the version number and the file system path.
NOTE
Note that --list-modules exits as soon as it prints the observable modules. It does not run the program.
In case listing the modules didn’t give you enough output, you can also use the --show-module-resolution option. You can think of it as a way of debugging modules. It spits out a lot of output when the program starts up. Then it runs the program.
java --show-module-resolution
  -p feeding
  -m zoo.animal.feeding/zoo.animal.feeding.Task
Luckily you don’t need to understand this output. That said, having seen it will make it easier to remember. Here’s a snippet of the output:
root zoo.animal.feeding file:///absolutePath/feeding/
java.base binds java.desktop jrt:/java.desktop
java.base binds jdk.jartool jrt:/jdk.jartool
...
jdk.security.auth requires java.naming jrt:/java.naming
jdk.security.auth requires java.security.jgss
jrt:/java.security.jgss
...
All fed!
It starts out by listing the root module. That’s the one we are running: zoo.animal .feeding. Then it lists many lines of packages included by the mandatory java.base module. After a while, it lists modules that have dependencies. Finally, it outputs the result of the program All fed!. The total output of this command is 66 lines.
Like the java command, the jar command can describe a module. Both of these commands are equivalent:
jar -f mods/zoo.animal.feeding.jar -d
jar --file mods/zoo.animal.feeding.jar --describe-module
The output is slightly different from when we used the java command to describe the module. With jar, it outputs the following:
zoo.animal.feeding
jar:file:///absolutePath/mods/zoo.animal.feeding.jar /!moduleinfo.class
exports zoo.animal.feeding
requires java.base mandated
The JAR version includes the module-info in the filename, which is not a particularly significant difference in the scheme of things. You don’t need to know this difference. You do need to know that both commands can describe a module.
The jdeps command gives you information about dependencies within a module. Unlike describing a module, it looks at the code in addition to the module-info file. This tells you what dependencies are actually used rather than simply declared.
Let’s start with a simple example and ask for a summary of the dependencies in zoo.animal.feeding. Both of these commands give the same output:
jdeps -s mods/zoo.animal.feeding.jar

jdeps -summary mods/zoo.animal.feeding.jar
Notice that there is one dash (-) before -summary rather than two. Regardless, the output tells you that there is only one package and it depends on the built-in java.base module.
zoo.animal.feeding -> java.base
Alternatively, you can call jdeps without the summary option and get the long form:
jdeps mods/zoo.animal.feeding.jar
[file:///absolutePath/mods/zoo.animal.feeding.jar]
  requires mandated java.base (@11.0.2)
zoo.animal.feeding -> java.base
  zoo.animal.feeding   -> java.io
    java.base
  zoo.animal.feeding   -> java.lang
    java.base
The first part of the output shows the module filename and path. The second part lists the required java.base dependency and version number. This has the high-level summary that matches the previous example.
Finally, the last four lines of the output list the specific packages within the java.base modules that are used by zoo.animal.feeding.
Now, let’s look at a more complicated example. This time, we pick a module that depends on zoo.animal.feeding. We need to specify the module path so jdeps knows where to find information about the dependent module. We didn’t need to do that before because all dependent modules were built into the JDK.
Following convention, these two commands are equivalent:
jdeps -s
  --module-path mods
  mods/zoo.animal.care.jar

jdeps -summary
  --module-path mods
  mods/zoo.animal.care.jar
There is not a short form of --module-path in the jdeps command. The output is only two lines:
zoo.animal.care -> java.base
zoo.animal.care -> zoo.animal.feeding
We can see that the zoo.animal.care module depends on our custom zoo.animal.feeding module along with the built-in java.base.
In case you were worried the output was too short, we can run it in full mode:
jdeps --module-path mods
  mods/zoo.animal.care.jar
This time we get lots of output:
zoo.animal.care
  [file:///absolutePath/mods/zoo.animal.care.jar]
    requires mandated java.base (@11.0.2)
    requires transitive zoo.animal.feeding
  zoo.animal.care -> java.base
  zoo.animal.care -> zoo.animal.feeding
    zoo.animal.care.details -> java.lang
      java.base
    zoo.animal.care.details -> zoo.animal.feeding
      zoo.animal.feeding
    zoo.animal.care.medical -> java.lang
      java.base
As before, there are three sections. The first section is the filename and required dependencies. The second section is the summary showing the two module dependencies with an arrow. The last six lines show the package-level dependencies.
The final command you need to know for the exam is jmod. You might think a JMOD file is a Java module file. Not quite. Oracle recommends using JAR files for most modules. JMOD files are recommended only when you have native libraries or something that can’t go inside a JAR file. This is unlikely to affect you in the real world.
The most important thing to remember is that jmod is only for working with the JMOD files. Conveniently, you don’t have to memorize the syntax for jmod. Table 11.4 lists the common modes.
Congratulations on reaching the last section of the book. This section is a number of tables that cover what you need to know about running command-line options for the 1Z0-815 exam.
Table 11.5 shows the command lines you should expect to encounter on the exam.
Since there are so many commands you need to know, we’ve made a number of tables to review the available options that you need to know for the exam. There are many more options in the documentation. For example, there is a --module option on javac that limits compilation to that module. Luckily, you don’t need to know those.
Table 11.6 shows the options for javac, Table 11.7 shows the options for java, Table 11.8 shows the options for jar, and Table 11.9 shows the options for jdeps.
The Java Platform Module System organizes code at a higher level than packages. Each module contains one or more packages and a module-info file. Advantages of the JPMS include better access control, clearer dependency management, custom runtime images, improved performance, and unique package enforcement.
The process of compiling and running modules uses the --modulepath, also known as -p. Running a module uses the --module option, also known as -m. The class to run is specified in the format moduleName/className.
The module-info file supports a number of keywords. The exports keyword specifies that a package should be accessible outside the module. It can optionally restrict that export to a specific package. The requires keyword is used when a module depends on code in another module. Additionally, requires transitive can be used when all modules that require one module should always require another. The provides and uses keywords are used when sharing and consuming an API. Finally, the opens keyword is used for allowing access via reflection.
Both the java and jar commands can be used to describe the contents of a module. The java command can additionally list available modules and show module resolution. The jdeps command prints information about packages used in addition to module-level information. Finally, the jmod command is used when dealing with files that don’t meet the requirements for a JAR.
Identify benefits of the Java Platform Module System. Be able to identify benefits of the JPMS from a list such as access control, dependency management, custom runtime images, performance, and unique package enforcement. Also be able to differentiate benefits of the JPMS from benefits of Java as a whole. For example, garbage collection is not a benefit of the JPMS.
Use command-line syntax with modules. Use the command-line options for javac, java, and jar. In particular, understand the module (-m) and module path (-p) options.
Create basic module-info files. Place the module-info.java file in the root directory of the module. Know how to code using exports to expose a package and how to export to a specific module. Also, know how to code using requires and requires transitive to declare a dependency on a package or to share that dependency with any modules using the current module.
Identify advanced module-info keywords. The provides keyword is used when exposing an API. The uses keyword is for consuming an API. The opens keyword is for allowing the use of reflection.
Display information about modules. The java command can describe a module, list available modules, or show the module resolution. The jar command can describe a module similar to how the java command does. The jdeps command prints details about a module and packages. The jmod command provides various modes for working with JMOD files rather than JAR files.
Which of the following is an advantage of the Java Platform Module System?
Which statement is true of the following module?
zoo.staff
|---zoo
|-- staff
|-- Vet.java
Suppose module puppy depends on module dog and module dog depends on module animal. Fill in the blank so that code in module dog can access the animal.behavior package in module
animal.
  module animal {
  ___________ animal.behavior;
  }
Fill in the blanks so this command to run the program is correct:
java
_______ zoo.animal.talks/zoo/animal/talks/Peacocks
_______ modules
Which of the following statements are true in a module-info.java file? (Choose all that apply.)
What is true of a module containing a file named moduleinfo.java with the following contents? (Choose all that apply.)
module com.food.supplier {}
Suppose module puppy depends on module dog and module dog depends on module animal. Which two lines allow module puppy to access the animal.behavior package in module animal? (Choose two.)
module animal {
exports animal.behavior to dog;
}
module dog {
______ animal; // line S
}
module puppy {
______ dog; // line T
}
Which commands take a --module-path parameter? (Choose all that apply.)
Which of the following are legal commands to run a modular program? (Choose all that apply.)
Which would best fill in the blank to complete the following code?
module ________ {
exports com.unicorn.horn;
exports com.unicorn.magic;
}
Which are valid modes for the jmod command? (Choose all that apply.)
Suppose you have the commands javac, java, and jar. How many of them support a --show-module-resolution option?
Which are true statements about the following module? (Choose all that apply.)
class dragon {
exports com.dragon.fire;
exports com.dragon.scales to castle;
}
Which would you expect to see when describing any module?
Which of the following statements are correct? (Choose all that apply.)
Which are valid calls to list a summary of the dependencies? (Choose all that apply.)
Which is the first line to contain a compiler error?
1: module snake {
2: exports com.snake.tail;
3: exports com.snake.fangs to bird;
4: requires skin;
5: requires transitive skin;
6: }
Which of the following would be a legal module name? (Choose all that apply.)
What can be created using the Java Platform Module System that could not be created without it? (Choose all that apply.)
Which of the following options does not have a one-character shortcut in any of the commands studied in this chapter? (Choose all that apply.)
Which of the following are legal commands to run a modular program where n is the package name and c is the class name? (Choose all that apply.)

Top Training Courses


 Training Course")


 Training Course")


LIMITED OFFER: GET 30% Discount
This is ONE TIME OFFER

A confirmation link will be sent to this email address to verify your login. *We value your privacy. We will not rent or sell your email address.
Download Free Demo of VCE Exam Simulator
Experience Avanset VCE Exam Simulator for yourself.
Simply submit your e-mail address below to get started with our interactive software demo of your free trial.
