


Use VCE Exam Simulator to open VCE files

This Chapter covers following Topic Lessons
This Chapter covers following Lab Exercises
In this Chapter we will enable MFA for Azure AD Users.
Multifactor authentication ( MFA ) is a security system that requires more than one method of authentication apart from username/password.
Azure multifactor authentication (MFA) provides a second level of security when signing into cloud-based or on-premises applications apart from user password. When enabled, Azure MFA can be configured to verify a user’s identity using a call to a mobile or landline phone, a text message, a mobile app notification, Mobile app verification code or 3rd party OATH tokens.
Azure Multi-Factor Authentication is available as a service in cloud or as MFA Server to be installed on-premises.
It can be used both on-premises and in the cloud to add security for accessing Microsoft online services, Azure Active Directory-connected SaaS applications, line of business applications and remote access applications.
Azure MFA requires Users to have Azure AD Premium P1 or P2 License.
Azure MFA can be enabled in 3 ways for the users.
Note: You can also enable MFA for Users with Directory Role of Global Administrator free of cost. This MFA is known as MFA for Azure Administrators
In this Exercise we will enable MFA for User1 using Mobile Number as second Authentication. Mobile Number can be either added by Administrator in User Profile or User must specify Mobile number during MFA Authentication.
In Azure AD Dashboard>Click Users in left pane>All User Blade open
Click Multi-Factor Authentication in Top Right> A new Browser tab opens as shown below with users option>click User1> You can see option to enable MFA and Manage user settings for User1. Note the service settings tab in Top.
Click Manage User Settings> A box pops up> We will let it remain at default settings>Click Cancel.
Click enable in right pane>Enabling multi-factor auth box pops up> Click enable multi-factor auth> Click close.
You can now see MFA is enabled for User1.
Open Firefox Browser and enter https://portal.azure.com and Log on with User1 credentials: user1@mikescottoutlook.onmicrosoft.com.
After you enter the password for User1>A dialog Box will pop in browser asking for more information required>Click Next> Additional Security Verification screen will open> Select Authentication Phone from Dropdown box>Select Your Location . In my case I selected India>Enter Your Mobile Number > In Method Select Send me a code by text message >Click Next. Note: Users are requested to see Authentication options in Dropdown box.
Click next and enter verification code sent to your mobile and click Verify.
Additional Security Verification screen opens. This is basically for generating passwords for non-browser based applications which can’t use phone for account verification> Click Done and you are logged on to Azure Portal.
Note: Screens in step 2, 3 and 4 comes during first log only. In Subsequent log-on’s you are asked to enter verification code sent to your mobile.
With MFA Service setting you can configure Verification options, setting for app passwords, Skip MFA for trusted IPs, and remember multifactor authentication option.
In Azure AD Dashboard Click Users in left pane>All User Blade open> Click Multi-Factor Authentication in Top Right> A new Browser tab opens as shown below with users option>Click service settings in Top> Service setting options open.
There are Four verification methods that are available for users. When your users enroll their accounts for Azure Multi-Factor Authentication, they choose their preferred verification method from the options that you have enabled.
Microsoft Authenticator app for Android
https://play.google.com/store/apps/details?id=com.azure.authenticator
Microsoft Authenticator app for iOS
https://itunes.apple.com/app/id983156458
In Azure AD Dashboard Click Users in left pane>All User Blade open> Click Multi-Factor Authentication in Top Right> A new Browser tab opens >Click Service Setting in Top> You can see the 4 option under verifications options>Select your options and click save (Not Shown).
Some applications, like Office 2010 or earlier and Apple Mail before iOS 11, don't support two-step verification. The apps aren't configured to accept a second verification. To use these applications, take advantage of the app passwords feature. You can use an app password in place of your traditional password to allow an app to bypass two-step verification and continue working.
Enable app password option in MFA Service setting to allow users to create app passwords.
In Azure AD Dashboard Click Users in left pane>All User Blade open> Click Multi-Factor Authentication in Top Right> A new Browser tab opens >Click Service Setting in Top>Select Radio button Allow users to create app passwords to sign in to non-browser apps.
Trusted IPs feature bypasses two-step verification for users who sign in from the company intranet.
In Trusted IPs you have the option to bypasses two-step verification for Federated Users.
Note : When the Trusted IPs feature is enabled, two-step verification is not required for browser flows. App passwords are not required for older rich client applications, provided that the user hasn't created an app password. After an app password is in use, the password remains required.
In Azure AD Dashboard Click Users in left pane>All User Blade open> Click Multi-Factor Authentication in Top Right> A new Browser tab opens >Click Service Setting in Top>Under Trusted IPs Enter the ranges of IP Addresses in the Box> Click save (Not Shown).
Note: The option to bypass MFA for Federated Users.
Remember Multi-Factor Authentication feature remembers the device from which user has logged. Users can then bypass subsequent MFA verifications for a specified number of days, after they've successfully signed-in to a device by using Multi-Factor Authentication.
In Azure AD Dashboard Click Users in left pane>All User Blade open> Click Multi-Factor Authentication in Top Right> A new Browser tab opens >Click Service Setting in Top> Under remember multi-factor authentication Select the check Box and enter number of days for which Users can bypass MFA verifications>click save.
Fraud Alert feature Allows users to report fraud if they receive a two-step verification request that they didn't initiate.
In Azure AD Dashboard Scroll down and click MFA in left pane>MFA Dashboard opens>Click Fraud Alert in left pane> In right pane select On under allow users to submit Fraud Details> Enter a code to report fraud during initial Greeting. If you don’t enter then 0 is Fraud code> Click save.
Block and unblock feature prevents users from receiving authentication requests. Any authentication attempts for blocked users are automatically denied. Users remain blocked for 90 days from the time that they are blocked.
In Azure AD Dashboard Scroll down and click MFA in left pane>MFA Dashboard opens>Click Block/Unblock users in left pane> In right pane Click + Add>Block a User blade opens> Enter user log in credentials in email format such as user1@mikescottoutlook.onmicrosoft.com >Enter a reason> Click OK (Not shown).
Figure below shows User1 is blocked from receiving MFA authentication request.
Note 1: I accessed Azure portal (https://portal.azure.com) and logged with User1 credentials and entered password but did not received MFA code.
Note 2: Unblock the user User1 as we require it for more exercises.
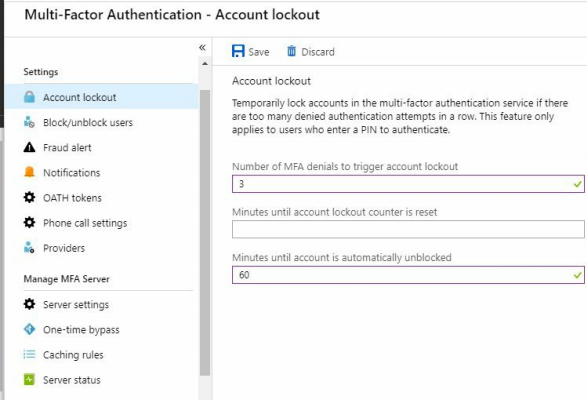
Account Lockout option temporarily lock accounts in the multi-factor authentication service if there are too many denied authentication attempts in a row. This feature only applies to users who enter a PIN to authenticate.
In Azure AD Dashboard Scroll down and click MFA in left pane>MFA Dashboard opens>Click Account lockout in left pane> In right pane enter options for Account Lockout>Click save.
One-time Bypass feature allow a user to authenticate without performing two-step verification for a limited time.
Important Note: This feature is only available with MFA Server only. This feature is not available for Cloud MFA.
In Azure AD Dashboard Scroll down and click MFA in left pane>MFA Dashboard opens>Scroll down and under MFA Server click one-time bypass.

Top Training Courses


 Training Course")


 Training Course")


LIMITED OFFER: GET 30% Discount
This is ONE TIME OFFER

A confirmation link will be sent to this email address to verify your login. *We value your privacy. We will not rent or sell your email address.
Download Free Demo of VCE Exam Simulator
Experience Avanset VCE Exam Simulator for yourself.
Simply submit your e-mail address below to get started with our interactive software demo of your free trial.
